Wealth Trading System - User Guide
Your guide to automated funding rate arbitrage trading
Welcome to the Wealth Trading System! This documentation will help you get started and make the most of the platform.
Quick Navigation
Supported Exchanges
| Exchange | Funding | Max Leverage |
|---|---|---|
| Binance Futures | 8h | 125x |
| Bybit Perpetuals | 8h | 100x |
| HyperLiquid | 1h | 50x |
| Aster Futures | 4-8h | 125x |
Strategy & Trading
- Trading Strategy - How the bot generates profits
- Strategy Formulas - Mathematical models and calculations
Getting Started
- Quick Start Guide - Installation, setup, and first run
- Practical Examples - Real-world workflows and use cases
- Configuration Guide - Settings and environment variables
- CLI Reference - Command-line interface documentation
- HTTP API Reference - REST API for automation
- TUI Dashboard - Interactive terminal interface
Monitoring & Operations
- Monitoring & Metrics - Prometheus, Grafana, and observability
- Grafana Cloud Setup - Cloud monitoring configuration
- Log Collection - Centralized logging with Loki
- Hot-Reload - Live configuration updates
Deployment & Security
- Deployment Guide - Production deployment and Docker
- Security & Credentials - Keeping your system secure
Help & Support
- FAQ - Frequently asked questions
- Troubleshooting - Common issues and solutions
- Licensing - License information
Quick Reference
| Task | Where to Look |
|---|---|
| First-time setup | Quick Start Guide |
| API key setup | Security Guide |
| Strategy tuning | Configuration Guide |
| Monitor trades | Monitoring Guide |
| Automate with scripts | HTTP API Reference |
| Deploy to server | Deployment Guide |
| Common questions | FAQ |
Core Features
- Real-time funding rate monitoring across multiple exchanges
- WebSocket market data streaming with automatic reconnection
- Atomic order execution with automatic rollback on failure
- Automatic max leverage detection with symmetric resolution for hedged positions
- Slippage protection with adaptive limit orders
- Paper trading mode for safe testing
- Encrypted credentials (AES-256-GCM)
- OpenTelemetry metrics & Grafana dashboards
- Docker containerization with compose support
- Fast graceful shutdown
Support
- GitHub Issues: https://github.com/thiras/wealth/issues
- Repository: https://github.com/thiras/wealth
License & Disclaimer
License: Proprietary License - See LICENSE file for details
⚠️ Disclaimer: Cryptocurrency trading involves substantial risk. Use at your own risk. The authors assume no responsibility for financial losses.
Trading Strategy Guide
Understanding how the Wealth bot generates profits through funding rate arbitrage
Overview
The Wealth bot implements a funding rate arbitrage strategy that profits from differences in funding rates across cryptocurrency exchanges while maintaining delta-neutral positions (no exposure to price movements).
Strategy Flow
stateDiagram-v2
    [*] --> Monitoring: Start Bot

    Monitoring --> Evaluating: Found Opportunity
    Evaluating --> Monitoring: Below Threshold
    Evaluating --> Executing: Meets Criteria

    state Executing {
        [*] --> PlacingLong
        PlacingLong --> PlacingShort
        PlacingShort --> Hedging
        Hedging --> Completed
        PlacingLong --> RollingBack: Failure
        PlacingShort --> RollingBack: Failure
        RollingBack --> RolledBack
    }

    Executing --> Active: Completed
    Executing --> Monitoring: RolledBack

    Active --> Closing: Exit Trigger
    Closing --> Monitoring: Position Closed

    note right of Active
        Exit Triggers:
        - Target profit reached
        - Spread reversal
        - Trailing stop
        - Max duration
    end note
What Are Funding Rates?
Funding rates are periodic payments exchanged between traders holding long and short positions in perpetual futures contracts. They keep the perpetual futures price aligned with the spot price.
- Positive funding rate: Longs pay shorts
- Negative funding rate: Shorts pay longs
- Payment frequency: Varies by exchange:
- Binance/Bybit: Every 8 hours (3× daily)
- HyperLiquid: Every 1 hour (24× daily)
- Aster: Every 4-8 hours depending on symbol (fetched automatically)
How the Strategy Works
The Arbitrage Opportunity
flowchart TB
    subgraph Funding["Funding Rate Arbitrage"]
        direction TB
        A[Exchange A<br/>Low Funding Rate]
        B[Exchange B<br/>High Funding Rate]

        A -->|"LONG Position<br/>(Pay low funding)"| POS[Delta-Neutral<br/>Position]
        B -->|"SHORT Position<br/>(Receive high funding)"| POS

        POS -->|"Net Profit"| PROFIT["Spread = High Rate - Low Rate"]
    end

    style A fill:#c8e6c9
    style B fill:#ffcdd2
    style POS fill:#e3f2fd
    style PROFIT fill:#fff9c4
Different exchanges often have different funding rates for the same asset. The bot exploits this by:
- Opening a LONG position on the exchange with the lower (or negative) funding rate
- Opening a SHORT position on the exchange with the higher funding rate
- Collecting the spread between the two rates every funding period
Delta-Neutral = Market-Neutral
Because you hold equal and opposite positions:
- If BTC price goes up: Your long profits, your short loses → net zero
- If BTC price goes down: Your long loses, your short profits → net zero
- Your only P&L comes from the funding rate difference
Visual Example
Exchange A (Binance):    Funding Rate = +0.01%  → You go LONG  (receive 0.01%)
Exchange B (HyperLiquid): Funding Rate = +0.05% → You go SHORT (pay 0.05%)

Your position:
┌─────────────────────────────────────────────────────────────┐
│  LONG 0.1 BTC on Binance    ←→    SHORT 0.1 BTC on HyperLiquid  │
│  (Receive funding)                (Pay funding)                 │
└─────────────────────────────────────────────────────────────┘

Net result per 8-hour period:
  Receive: +0.01% on Binance
  Pay:     -0.05% on HyperLiquid
  ────────────────────────────
  Wait... that's negative!

Actually, you want the OPPOSITE - go SHORT where rates are HIGH:
  Pay:     -0.01% on Binance (you're long, you pay positive funding)
  Receive: +0.05% on HyperLiquid (you're short, you receive positive funding)
  ────────────────────────────
  Net: +0.04% profit per 8 hours
Profit Calculation Example
Position size: $10,000 per side
Funding spread: 0.04% (4 basis points)
Leverage: 10x

Per funding period (every 8 hours):
  Profit = $10,000 × 0.0004 = $4.00

Daily (3 funding periods):
  Profit = $4.00 × 3 = $12.00

Monthly:
  Profit = $12.00 × 30 = $360.00

Annualized APY:
  APY = 0.04% × 3 × 365 = 43.8%
When Does the Bot Open Positions?
The bot continuously monitors funding rates and opens positions when:
- Spread exceeds threshold: The funding rate difference meets your configured minimum (default: 0.04%)
- Sufficient balance: You have enough collateral on both exchanges
- Position limits not reached: You haven't hit your maximum concurrent positions
- Positive expected value: After accounting for fees and slippage, the trade is profitable
When Does the Bot Close Positions?
Positions are closed automatically when:
- Target profit reached: Default 5% profit on position
- Spread reverses: The funding rate advantage disappears or reverses
- Trailing stop triggered: Profit retraces too much from peak (protects gains)
- Manual shutdown: You stop the bot gracefully
Risk Management Features
Delta-Neutral Protection
- Equal position sizes on both exchanges
- No exposure to price movements
- Profit comes only from funding rate spread
Slippage Protection
- Uses limit orders with timeout
- Falls back to market orders if needed
- Configurable maximum slippage tolerance
Trailing Stop Loss
- Activates after reaching profit threshold (default: 3%)
- Locks in minimum profit (default: 2%)
- Closes if profit retraces too much from peak
Atomic Execution
- Opens both legs simultaneously
- If one leg fails, the other is rolled back
- Prevents unhedged (risky) positions
Position Size Limits
- Maximum position size cap (USD)
- Maximum percentage of balance per trade
- Maximum concurrent positions
Configuring the Strategy
Key parameters in config.toml:
[trading]
# Minimum spread to open a position (0.04% = 4 basis points)
min_funding_spread = 0.04

# Position sizing
position_size_percent = 0.30    # Use 30% of available balance
max_position_usd = 10000        # Cap at $10,000 per position
max_concurrent_positions = 5    # Maximum open positions

# Profit targets
target_profit_percent = 0.05    # Close at 5% profit

[risk]
# Trailing stop configuration
trailing_stops_enabled = true
trailing_stop_activation = 0.03  # Activate at 3% profit
trailing_stop_distance = 0.40    # Allow 40% retracement
trailing_stop_min_lock = 0.02    # Lock in minimum 2%

# Slippage protection
max_slippage_bps = 50           # Maximum 0.5% slippage
Understanding Expected Value (EV)
Before opening a position, the bot calculates the expected value - whether the trade will be profitable after costs:
flowchart LR
    subgraph EV["Expected Value Calculation"]
        SPREAD[Funding Spread] --> GROSS[Gross EV]
        TIME[Time Weight] --> GROSS

        GROSS --> NET[Net EV]
        FEES[Entry + Exit Fees] --> NET
        SLIP[Slippage Estimate] --> NET

        NET --> DECISION{EV > Threshold?}
        DECISION -->|Yes| TRADE[Execute Trade]
        DECISION -->|No| SKIP[Skip Opportunity]
    end

    style GROSS fill:#e8f5e9
    style NET fill:#fff3e0
    style TRADE fill:#c8e6c9
    style SKIP fill:#ffcdd2
Expected Value = (Funding Spread × Time Weight) - (Entry Fees + Exit Fees + Slippage)
- Funding Spread: The rate difference between exchanges
- Time Weight: Reduced value if close to next funding payment
- Fees: Trading fees on both exchanges (entry and exit)
- Slippage: Expected price impact
The bot only opens positions with positive expected value.
Pair Selection Strategies
The bot supports multiple strategies for selecting which trading pairs to monitor:
Arbitrage-Based Selection (Recommended)
Sort pairs by their current funding rate spread to find the best arbitrage opportunities:
[instrument_discovery]
enabled = true
use_loris_rankings = true
loris_sort_by = "arbitrage"    # Sort by funding spread (default)
How it works:
- For each symbol, finds the exchange with the lowest rate (go long) and highest rate (go short)
- Calculates the spread:
short_rate - long_rate - Ranks symbols by spread size (highest first)
- Prioritizes pairs with immediate profit potential
Best for: Active traders seeking maximum returns
Liquidity-Based Selection
Sort pairs by open interest rank to prioritize the most liquid markets:
[instrument_discovery]
enabled = true
use_loris_rankings = true
loris_sort_by = "oi_rank"      # Sort by liquidity
How it works:
- Uses Binance open interest rankings as a proxy for liquidity
- Lower rank = more liquid (BTC is usually rank 1)
- Prioritizes easy entry/exit with minimal slippage
Best for: Conservative traders, larger position sizes
Volume-Based Selection
Sort pairs by 24h trading volume using direct exchange APIs:
[instrument_discovery]
enabled = true
use_loris_rankings = false     # Use exchange APIs
How it works:
- Fetches 24h volume from each exchange directly
- Ranks pairs by trading activity
- No third-party data dependency
Best for: Traders who prefer direct data sources
Supported Exchanges
| Exchange | Funding Interval | Max Leverage | Notes |
|---|---|---|---|
| Binance Futures | 8 hours | 125x | Most liquid |
| Bybit Perpetuals | 4-8 hours* | 100x | UTA required |
| HyperLiquid | 1 hour | 50x | 24× daily funding |
| Aster Futures | 4-8 hours* | 125x | Per-symbol intervals |
*Bybit and Aster funding intervals vary per symbol. The bot automatically fetches per-symbol intervals via API at startup, refreshes every 4 hours, and receives real-time updates from WebSocket streams.
Note: HyperLiquid's hourly funding means more frequent profit collection but requires different EV calculations.
Frequently Asked Questions
What happens if one exchange goes down?
The bot monitors connectivity and will:
- Alert you to connection issues
- Prevent new positions from opening
- Existing positions remain open (both legs on different exchanges)
Can I lose money?
While the strategy is market-neutral, risks include:
- Fee costs: If spread narrows before covering fees
- Liquidation: If leverage is too high and price moves sharply
- Exchange risk: Counterparty risk on centralized exchanges
- Execution risk: Slippage during entry/exit
How much capital do I need?
Minimum recommended: $1,000 per exchange ($2,000 total)
With leverage, you can control larger positions:
- $1,000 at 10x = $10,000 position size
- Required margin = Position / Leverage + Safety Buffer
What's a good minimum spread to trade?
- Conservative: 0.05% (5 basis points) - fewer trades, higher quality
- Moderate: 0.04% (4 basis points) - balanced approach
- Aggressive: 0.03% (3 basis points) - more trades, lower margins
How often are there opportunities?
This varies by market conditions:
- High volatility: More funding rate divergence = more opportunities
- Low volatility: Rates converge = fewer opportunities
- Typical: 2-5 high-quality opportunities per day
See Also
- Configuration Guide - Detailed parameter reference
- Getting Started - Initial setup
- Monitoring Guide - Track your positions
- Troubleshooting - Common issues
Strategy Calculation Formulas
Mathematical reference for funding rate arbitrage calculations, position sizing, and profitability analysis
Table of Contents
- Funding Rate Arbitrage
- Expected Value (EV) Calculation
- Position Sizing
- Fee Calculations
- Profit & Loss
- Risk Metrics
- Configuration Reference
Funding Rate Arbitrage
Core Concept
Funding rate arbitrage exploits differences in funding rates across exchanges while maintaining delta-neutral positions.
Funding Rate Spread
Where:
rate_short= funding rate on high-rate exchange (short position)rate_long= funding rate on low-rate exchange (long position)
Example:
Binance BTCUSDT: +0.0001 (1 basis point)
HyperLiquid BTCUSDT: +0.0006 (6 basis points)

spread = |0.0006 - 0.0001| = 0.0005 = 5 basis points = 0.05%
Annual Percentage Yield (APY)
Where:
funding_intervals_per_yeardepends on exchange funding frequency- Spread is expressed as a decimal (e.g., 0.0005)
APY by Exchange Interval:
| Exchange | Intervals/Day | Intervals/Year | APY Multiplier |
|---|---|---|---|
| Binance/Bybit | 3 | 1,095 | spread × 1,095 |
| HyperLiquid | 24 | 8,760 | spread × 8,760 |
| Aster | 3-6 | 1,095-2,190 | varies by symbol |
Example (8-hour interval):
spread = 0.0005 (5 basis points)
APY = 0.0005 × 1,095 = 0.5475 = 54.75%
Example (1-hour interval - HyperLiquid):
spread = 0.0001 (1 basis point per hour)
APY = 0.0001 × 8,760 = 0.876 = 87.6%
Expected Value (EV) Calculation
The bot uses risk-adjusted expected value to filter opportunities and ensure trades are profitable after all costs.
Funding Intervals by Exchange
| Exchange | Interval | Minutes | Payments/Day |
|---|---|---|---|
| Binance | 8 hours | 480 | 3 |
| Bybit | 4-8 hours | 240-480 | 3-6 (per-symbol)* |
| HyperLiquid | 1 hour | 60 | 24 |
| Aster | 4-8 hours | 240-480 | 3-6 (per-symbol)* |
*Bybit and Aster funding intervals vary by symbol. The bot automatically fetches per-symbol intervals via REST API at startup (refreshed every 4h) and from WebSocket streams in real-time.
Cross-Exchange Yield Normalization
When trading across exchanges with different funding intervals (e.g., HyperLiquid + Binance), the bot normalizes yields to a common 8-hour reference period. This is important because HyperLiquid pays funding 8x more frequently than Binance/Bybit.
How It Works:
| Position | Rate | Payments in 8h | Yield |
|---|---|---|---|
| Long Binance | +0.01%/8h | 1 | -0.01% (pay) |
| Short HyperLiquid | +0.10%/1h | 8 | +0.80% (receive) |
| Total | +0.79% |
Key Benefit: A 9 bps simple spread becomes 79 bps normalized yield when HyperLiquid's 8x payment frequency is properly accounted for.
Time Weighting
Where:
min_interval= minimum of both exchange intervals (determines next funding)- Weight approaches 1 as funding time approaches
- Weight approaches 0 immediately after funding
Gross Expected Value
Transaction Costs
For limit orders (maker fees):
For market orders (taker fees + slippage):
Staleness Haircut
Default: haircut = 0.03 (3 basis points = 0.03%)
Adjusted Expected Value
Qualification Criteria
An opportunity qualifies if:
Default thresholds (percentage form):
min_ev_bps= 0.05 (5 basis points = 0.05%)min_spread_threshold= 0.04 (4 basis points = 0.04%)
Complete EV Example
Scenario:
- Binance BTCUSDT: +0.01% (long position, 8h interval)
- HyperLiquid BTCUSDT: +0.10% (short position, 1h interval)
- Time to funding: 60 minutes (HyperLiquid's next funding)
- Order type: Limit (maker fees)
Step 1: Calculate normalized spread
Long Binance: -0.01% × (480/480) = -0.01% (pay 1 payment)
Short HyperLiquid: +0.10% × (480/60) = +0.80% (receive 8 payments)
Normalized spread = -0.01% + 0.80% = +0.79% (79 bps)
Step 2: Time weighting (using minimum interval = 60 min)
Step 3: Gross EV
Step 4: Calculate costs
Binance fees: 0.02% maker (entry) + 0.02% maker (exit) = 0.04%
HyperLiquid fees: 0.0144% maker (entry) + 0.0144% maker (exit) = 0.0288%
Total costs: ~7 bps
Step 5: Staleness haircut
Data age: < 4 minutes
Staleness: 0
Step 6: Adjusted EV
Step 7: Qualification check
adjusted_ev (72 bps) >= min_ev (5 bps) ✅
raw_spread (9 bps) >= min_spread (4 bps) ✅

Result: QUALIFIES
Expected profit per $10,000 position (over 8h reference):
Note: The normalized EV (72 bps after costs) is much higher than what you'd calculate from the simple 9 bps spread because HyperLiquid pays funding 8 times per Binance cycle.
Position Sizing
Conservative Sizing Formula
The bot reserves margin for both opening AND closing positions:
Where:
balance= available balance on exchange (USDT)percentage= position size percentage (default: 0.30 = 30%)leverage= configured leverage (default: 10x)- Division by 2 reserves margin for closing
Example:
balance = $1,000 USDT
percentage = 0.30 (30%)
leverage = 10x

position_size = (1,000 × 0.30 / 2) × 10
              = (300 / 2) × 10
              = 150 × 10
              = $1,500 USD notional
Quantity Calculation
Must be rounded to exchange precision:
Example:
position_size = $1,500
BTC price = $50,000
precision = 3 decimals (0.001 BTC minimum)

quantity = 1,500 / 50,000 = 0.030 BTC
quantity_rounded = floor(0.030 / 0.001) × 0.001 = 0.030 BTC ✅
Kelly Criterion Sizing
The bot supports two position sizing modes:
Mode 1: Kelly Criterion (Dynamic)
Enabled when use_kelly_criterion = true (default). Sizes positions based on expected value and variance:
With safety caps:
Where:
kelly_cap= 0.25 (quarter-Kelly, default)max_notional=$10,000(per-symbol cap, default)max_utilization= 0.50 (50% of balance, default)
Use when: You want dynamic sizing that increases with edge quality and decreases with variance.
Mode 2: Fixed Percentage (Simple)
Enabled when use_kelly_criterion = false. Uses fixed percentage of available capital:
With safety cap:
Use when: You want predictable, consistent position sizing regardless of opportunity quality.
Configuration:
[trading]
use_kelly_criterion = true    # Toggle between Kelly and fixed modes
kelly_fraction = 0.25          # Only used in Kelly mode
max_exchange_utilization = 0.5 # Used in both modes
max_notional_per_symbol = 10000 # Hard cap for both modes
Fee Calculations
Exchange Fee Structure
| Exchange | Maker Fee | Taker Fee | Funding Interval |
|---|---|---|---|
| Binance | 0.02% | 0.04% | 8 hours |
| Bybit | 0.01% | 0.06% | 4-8 hours* |
| HyperLiquid | 0.00% | 0.035% | 1 hour** |
| Aster | 0.02% | 0.04% | 4-8 hours* |
*Bybit and Aster funding intervals vary per symbol (4h or 8h), fetched dynamically via API and WebSocket **HyperLiquid has 24 funding payments per day (hourly)
Order Fee Calculation
Example:
quantity = 0.1 BTC
price = $50,000
fee_rate = 0.0004 (0.04% taker)

notional = 0.1 × 50,000 = $5,000
fee = 5,000 × 0.0004 = $2.00
Round-Trip Cost
For entering and exiting a position:
Example (limit orders):
Binance maker: 0.02%
HyperLiquid maker: 0.00%

Entry cost: (0.0002 + 0.0000) = 0.0002 = 0.02%
Exit cost: (0.0002 + 0.0000) = 0.0002 = 0.02%
Total: 0.0004 = 0.04% = 4 basis points

On $10,000 position: $10,000 × 0.0004 = $4.00
Breakeven Spread
Minimum spread needed to be profitable:
Example (3 funding periods = 24 hours):
round_trip_cost = 0.0004 (4 bps)
holding_periods = 3

breakeven = 0.0004 / 3 = 0.000133 = 1.33 bps per period
Profit & Loss
Funding Payment Calculation
For long position:
- Positive rate: pay funding
- Negative rate: receive funding
For short position:
- Positive rate: receive funding
- Negative rate: pay funding
Arbitrage Profit Per Period
Example:
position_size = $10,000
Binance rate (long): +0.0001
HyperLiquid rate (short): +0.0006

profit = 10,000 × (0.0006 - 0.0001)
       = 10,000 × 0.0005
       = $5.00 per funding period
Net Profit After Fees
Example:
gross_profit = $5.00 per period × 3 periods = $15.00
entry_fees = $4.00
exit_fees = $4.00

net_profit = 15.00 - 4.00 - 4.00 = $7.00 per day
monthly = $7.00 × 30 = $210.00
Return on Capital
Example:
position_size = $10,000
leverage = 10x
margin_used = 10,000 / 10 = $1,000

daily_profit = $7.00
daily_ROC = 7.00 / 1,000 = 0.007 = 0.7%
annual_ROC = 0.007 × 365 = 2.555 = 255.5%
ROI (Return on Investment)
The ROI displayed in the TUI is calculated as:
Where:
funding_collected= total funding payments received since position openedtrading_fees= trading fees for both legs (entry + exit). Note: as of now, the fee tracker only captures entry fees; exit fees are included in the formula but are effectively $0 until exit-fee tracking is implemented.position_size= notional value of the position
ROI Display States:
| Display | Meaning |
|---|---|
1.23% | Actual ROI with confirmed fees from exchange API |
1.23%* | ROI with estimated fees (asterisk = estimation) |
... | Fees being fetched from exchange |
N/A | Legacy position without fee tracking data |
Fee Estimation Fallback:
When exchange API calls fail or timeout (2 minutes), fees are estimated:
This uses a default taker fee rate of 0.05% (5 basis points) per leg.
Example:
position_size = $1,000
funding_collected = $5.00
entry_fee_long = $0.50
entry_fee_short = $0.35

ROI = (5.00 - 0.50 - 0.35) / 1,000 × 100%
    = 4.15 / 1,000 × 100%
    = 0.415%
Unrealized P&L (Price Spread)
Added in v0.58: The TUI and metrics now display unrealized P&L from price spread movements, not just funding collected.
While funding rate arbitrage is theoretically delta-neutral, price divergence between exchanges creates real P&L that must be tracked. This is especially important when exchanges have different liquidity or when prices move during entry/exit.
Formula:
Where:
Example (Spread Reversal - Loss):
# Position entered with 0.1 BTC
long_entry_price = $40,000 (Binance)
short_entry_price = $40,000 (Aster)
current_price = $40,100 (price moved up)

long_leg_pnl  = (40,100 - 40,000) × 0.1 = +$10.00 (profit)
short_leg_pnl = (40,000 - 40,100) × 0.1 = -$10.00 (loss)

# In theory, should net to $0 if hedged properly
# But with slippage or different prices on each exchange:

long_entry_price = $40,000 (Binance)
short_entry_price = $39,950 (Aster - worse fill)
current_price = $40,100

long_leg_pnl  = (40,100 - 40,000) × 0.1 = +$10.00
short_leg_pnl = (39,950 - 40,100) × 0.1 = -$15.00
total_price_pnl = 10.00 - 15.00 = -$5.00 (loss from spread)
Total Unrealized P&L:
Important: A position can show positive funding collected but still be losing money overall if the price spread moved against you.
Risk Metrics
Maximum Position Size
Where:
config_max=$10,000(default per-symbol cap)utilization= 0.50 (50% of balance usage)margin_rate= 1 / leverage
Example:
balance = $5,000
utilization = 0.50
leverage = 10x
margin_rate = 0.1

balance_limit = (5,000 × 0.50) / 0.1 = 25,000
max_size = min(10,000, 25,000) = $10,000
Margin Requirement
The 1.2 factor provides a 20% safety buffer.
Example:
position_size = $10,000
leverage = 10x

margin = (10,000 / 10) × 1.2 = 1,000 × 1.2 = $1,200
Liquidation Distance
Example:
margin = $1,000
maintenance = $100 (10% of margin)
position_size = $10,000

liq_distance = (1,000 - 100) / 10,000 = 0.09 = 9%

Position liquidates at 9% adverse price move
Sharpe Ratio
Calculated over historical trades for strategy performance evaluation.
Maximum Drawdown
Tracks the largest peak-to-trough decline in account equity.
Configuration Reference
Default Values
| Parameter | Default | Description |
|---|---|---|
min_spread_threshold | 0.04 (4 bps) | Minimum spread to qualify |
min_ev_bps | 0.05 (5 bps) | Minimum expected value |
max_position_usd | $10,000 | Maximum position size |
position_size_percentage | 0.30 (30%) | Percentage of balance |
leverage | 10x | Default leverage |
kelly_cap | 0.25 | Quarter-Kelly |
max_exchange_utilization | 0.50 (50%) | Max balance usage |
staleness_haircut_bps | 0.03 (3 bps) | Penalty for stale data |
Exchange Fee Rates
| Exchange | Maker | Taker |
|---|---|---|
| Binance Futures (VIP 0) | 0.02% | 0.04% |
| Bybit (Standard) | 0.01% | 0.06% |
| HyperLiquid | 0.00% | 0.035% |
| Aster | 0.02% | 0.04% |
Example Configuration
[trading]
# Spread thresholds
min_funding_spread = 0.04        # 4 basis points
min_ev_bps = 0.05                # 5 basis points

# Position sizing
position_size_percent = 0.30       # 30% of balance
max_position_usd = 10000           # $10,000 cap
leverage = 10                      # 10x leverage

# Kelly criterion settings
use_kelly_criterion = true
kelly_fraction = 0.25              # Quarter-Kelly
max_exchange_utilization = 0.50    # 50% max usage

[risk]
# Slippage
max_slippage_bps = 50              # 0.5% maximum
estimated_slippage = 0.001         # 0.1% estimate
Quick Reference Card
Profit Estimation
| Spread (bps) | Position Size | Per Period | Daily | Monthly |
|---|---|---|---|---|
| 4 | $10,000 | $4.00 | $12.00 | $360 |
| 5 | $10,000 | $5.00 | $15.00 | $450 |
| 10 | $10,000 | $10.00 | $30.00 | $900 |
| 20 | $10,000 | $20.00 | $60.00 | $1,800 |
APY by Spread
| Spread (bps) | APY (Pre-Fee) | APY (Post-Fee, ~4bps cost) |
|---|---|---|
| 4 | 43.8% | 0% |
| 5 | 54.75% | 10.95% |
| 10 | 109.5% | 65.7% |
| 20 | 219% | 175.2% |
Minimum Capital Requirements
| Position Target | Leverage | Margin Needed | Recommended Buffer |
|---|---|---|---|
| $5,000 | 10x | $500 | $750 |
| $10,000 | 10x | $1,000 | $1,500 |
| $20,000 | 10x | $2,000 | $3,000 |
| $50,000 | 10x | $5,000 | $7,500 |
See Also
- Trading Strategy - Strategy overview and concepts
- Configuration Guide - Detailed parameter reference
- Getting Started - Initial setup
- Monitoring Guide - Track your positions
Note: All formulas use decimal representation (e.g., 0.0005 = 5 basis points = 0.05%). The bot maintains high precision using Rust's Decimal type (96-bit precision) for all calculations.
Getting Started Guide
Quick start guide for installing and running the Wealth Trading Bot
⏱️ Estimated time: 10-15 minutes for paper trading, 20-30 minutes for live trading
Quick Start Flow
flowchart TB
    subgraph Setup["🔧 Initial Setup"]
        A[Download Binary] --> B[Create Config]
        B --> C{Paper or Live?}
    end

    subgraph Paper["📄 Paper Trading"]
        C -->|Paper| D[Run: wealth run]
        D --> E[Monitor at :9090]
    end

    subgraph Live["💰 Live Trading"]
        C -->|Live| F[Get API Keys]
        F --> G[Create Encrypted Credentials]
        G --> H[wealth credentials add]
        H --> I[Set WEALTH__EXECUTION__MODE=live]
        I --> J[Run: wealth run]
        J --> K[Enter Passphrase]
        K --> L[Monitor at :9090]
    end

    style Setup fill:#e3f2fd
    style Paper fill:#e8f5e9
    style Live fill:#fff3e0
Architecture Overview
flowchart LR
    subgraph Exchanges["Supported Exchanges"]
        BIN[Binance Futures]
        BYB[Bybit Perpetuals]
        HL[HyperLiquid]
        AST[Aster Futures]
    end

    subgraph Bot["Wealth Bot"]
        WS[WebSocket Streams]
        API[REST APIs]
        STRAT[Strategy Engine]
    end

    subgraph Outputs["Monitoring"]
        METRICS[Metrics :9090]
        LOGS[Structured Logs]
        HEALTH[Health Endpoint]
    end

    BIN & BYB & HL & AST <--> WS
    BIN & BYB & HL & AST <--> API
    WS --> STRAT
    API --> STRAT
    STRAT --> METRICS
    STRAT --> LOGS
    STRAT --> HEALTH
Prerequisites
- Operating System: Linux, macOS, or Windows
- Exchange Accounts: Binance Futures, Bybit Perpetuals, HyperLiquid, or Aster Futures (optional for paper trading)
Installation
Option 1: Download Binary (Recommended)
Download the latest release for your platform:
# Linux (x86_64)
curl -LO https://github.com/thiras/wealth/releases/latest/download/wealth-linux-x86_64.tar.gz
tar -xzf wealth-linux-x86_64.tar.gz
chmod +x wealth
sudo mv wealth /usr/local/bin/

# macOS (Apple Silicon)
curl -LO https://github.com/thiras/wealth/releases/latest/download/wealth-darwin-arm64.tar.gz
tar -xzf wealth-darwin-arm64.tar.gz
chmod +x wealth
sudo mv wealth /usr/local/bin/

# macOS (Intel)
curl -LO https://github.com/thiras/wealth/releases/latest/download/wealth-darwin-x86_64.tar.gz
tar -xzf wealth-darwin-x86_64.tar.gz
chmod +x wealth
sudo mv wealth /usr/local/bin/
Verify installation:
wealth --version
Option 2: Docker (Recommended for Production)
# Pull the latest image
docker pull ghcr.io/thiras/wealth:latest

# Run with Docker Compose (recommended)
curl -LO https://raw.githubusercontent.com/thiras/wealth/main/compose.yml
docker compose up -d

# Or run directly
docker run -d --name wealth \
  -v $(pwd)/config.toml:/app/config.toml \
  -v $(pwd)/credentials.encrypted.json:/app/credentials.encrypted.json \
  -e CREDENTIALS_PASSPHRASE="your_passphrase" \
  ghcr.io/thiras/wealth:latest
Option 3: Build from Source
Building from source requires Rust toolchain and development dependencies.
First Run (Paper Trading)
The bot runs in paper trading mode by default, which is safe for testing without real money.
# Run with defaults (paper trading)
wealth run

# Show help and available commands
wealth --help
You should see output like:
INFO  Initializing bot | mode=paper_trading
INFO  Starting WebSocket price streams
INFO  Binance WebSocket connected
INFO  Bybit WebSocket connected
INFO  Bot running | metrics_port=9090
Check Health
In another terminal:
# Health endpoint
curl http://localhost:9090/health | jq

# Metrics endpoint (JSON info about OTLP config)
curl http://localhost:9090/metrics | jq
# Query actual metrics in Grafana/Prometheus backend
Configuration
Paper Trading (Default)
No credentials needed! Just run:
wealth run
Live Trading Setup
The bot supports two methods for providing credentials, and automatically chooses the right one:
-
Encrypted Credentials (Recommended for production)
- Set
CREDENTIALS_PASSPHRASEin.env - Use
wealth credentialscommands to manage - Credentials stored in AES-256-GCM encrypted file
- Set
-
Environment Variables (For development/testing)
- Set exchange-specific variables in
.env - Simpler but less secure
- Bot automatically falls back to this if no encrypted file
- Set exchange-specific variables in
No configuration needed - just set up one method and the bot handles the rest!
Step 1: Get API Keys
- Binance API Keys - API Key + Secret Key
- Enable Futures trading permission
- IP whitelist recommended for production
- Bybit API Keys - API Key + Secret Key
- Requires Unified Trading Account (UTA)
- Enable Contract trading permission
- Aster API Keys - API Key + Secret Key (Binance-compatible format)
- Variable funding intervals: Aster uses 4h or 8h funding intervals per symbol (fetched automatically by the bot)
- API compatibility: Uses Binance-compatible endpoints, so credential setup is identical
- HyperLiquid: Use your Ethereum wallet private key (0x... format)
- Direct mode: Just the private key
- Subkey mode (recommended): Master wallet address + API wallet private key
- Vault mode: Vault address + API wallet private key
Step 2: Create Encrypted Credentials
# Create encrypted config and add credentials (interactive mode)
export CREDENTIALS_PASSPHRASE="your_secure_passphrase"
wealth credentials create
wealth credentials add binance
wealth credentials add bybit
wealth credentials add hyperliquid

# Verify setup
wealth credentials verify
📖 For detailed credential setup including HyperLiquid wallet modes (direct, subkey, vault), see Security Guide - Credential Setup.
Step 3: Run in Live Mode
export WEALTH__EXECUTION__MODE=live
wealth run
# You'll be prompted: 🔐 Enter credentials passphrase:
Note: The bot will automatically prompt for your passphrase if CREDENTIALS_PASSPHRASE is not set. For automation or scripts, set the env var to skip the prompt:
export CREDENTIALS_PASSPHRASE="your_secure_passphrase"
wealth run  # No prompt
Basic Commands
# Initialize configuration file
wealth init

# Run the bot
wealth run

# Verify configuration
wealth verify

# Display current config
wealth config

# Manage credentials
wealth credentials create
wealth credentials add binance  # Interactive mode
wealth credentials verify

# Generate shell completions
wealth completions bash > ~/.local/share/bash-completion/completions/wealth
💡 Tip: Once running, you can edit config.toml and changes will apply automatically within 500ms without restart. See Configuration Hot-Reload for details.
Testing the Setup
1. Verify Configuration
wealth verify --encrypted
2. Check Exchange Connectivity
wealth health --all
3. View Current Config
wealth config
4. Monitor Metrics
# In your browser
open http://localhost:9090/metrics
Common First-Run Issues
Issue: "Failed to decrypt credentials"
Solution: Enter the correct passphrase when prompted, or set the environment variable:
# Option 1: Just run and enter passphrase when prompted
wealth run
# 🔐 Enter credentials passphrase: ********

# Option 2: Set environment variable
export CREDENTIALS_PASSPHRASE="your_passphrase"
wealth run
Issue: "Configuration validation failed"
Solution: Check your configuration values
wealth verify
Issue: WebSocket connection failed
Solution: Check internet connection and firewall settings. Ensure your network allows outbound connections to:
- Binance:
stream.binance.com:443 - Bybit:
stream.bybit.com:443 - HyperLiquid:
api.hyperliquid.xyz:443
Issue: "Exchange rate limit exceeded"
Solution: The bot has built-in rate limiting, but if you see this:
- Wait 1-2 minutes before retrying
- Check if you have other tools using the same API keys
- Consider using different API keys for different tools
Issue: "Insufficient balance" in paper trading
Solution: Paper trading simulates with virtual balances. If you see balance issues:
- Check your
config.tomlfor position sizing settings - Ensure
max_position_usdis reasonable for simulated balance
📖 More issues? See Troubleshooting Guide for comprehensive problem-solving.
Next Steps
Once your bot is running:
- Monitor Performance: Visit
http://localhost:9090/metrics - View Logs: Check terminal output for trading activity
- Configure Strategy: See Configuration Guide
- Set Up Dashboards: See Monitoring Guide
- Deploy to Production: See Deployment Guide
Quick Reference
Paper Trading (Safe):
wealth run # That's it!
Live Trading (Requires credentials):
export WEALTH__EXECUTION__MODE=live
wealth run
# Enter passphrase when prompted, or set CREDENTIALS_PASSPHRASE env var
Custom Configuration:
# Use environment variables or config.toml for customization
export WEALTH__OBSERVABILITY__METRICS_PORT=8080
wealth run --verbose
AI-Powered Monitoring (After setup):
# Ask AI natural language questions like:
# "What's my current P&L?"
# "Show funding rates for BTCUSDT"
# "Are there any firing alerts?"
Stop the Bot:
Press Ctrl+C for graceful shutdown (takes ~6-8 seconds to close all positions safely)
Note: Shutdown is fast thanks to shutdown-aware background tasks that respond instantly to signals.
Related Documentation
| Topic | Guide |
|---|---|
| Command reference | CLI Reference |
| All config options | Configuration Guide |
| Secure credentials | Security Guide |
| Cloud monitoring | Grafana Cloud Setup |
| Production deploy | Deployment Guide |
| Common issues | Troubleshooting |
Practical Examples & Common Workflows
This guide provides practical, real-world examples for using the Wealth trading bot. All examples assume you've completed the Getting Started guide.
Table of Contents
- Quick Start Example
- Opening Your First Position
- Monitoring Active Positions
- Closing Positions
- Alert Integration
- Troubleshooting Common Issues
Quick Start Example
Complete Workflow from Scratch
This example shows the complete workflow from installation to your first trade:
# 1. Download and install (or use Docker)
# See Getting Started guide for installation options

# 2. Set up credentials
export CREDENTIALS_PASSPHRASE="your-secure-passphrase-here"
wealth credentials create
wealth credentials add binance   # Interactive prompts
wealth credentials add hyperliquid

# 3. Verify setup
wealth verify

# 4. Run the bot (paper trading by default)
wealth run
📖 For detailed setup instructions, see:
Expected Output:
2025-11-07T10:30:00Z INFO  Wealth Trading Bot
2025-11-07T10:30:00Z INFO  Mode: PAPER TRADING (no real orders)
2025-11-07T10:30:01Z INFO  Initialized leverage: BTCUSDT = 15x
2025-11-07T10:30:02Z INFO  WebSocket connected: Binance ticker stream
2025-11-07T10:30:03Z INFO  WebSocket connected: HyperLiquid ticker stream
2025-11-07T10:30:04Z INFO  Fetching funding rates...
2025-11-07T10:30:05Z INFO  Binance BTCUSDT: 0.0100%
2025-11-07T10:30:05Z INFO  HyperLiquid BTC: 0.0500%
2025-11-07T10:30:05Z INFO  Spread detected: 0.0400% (above 0.0300% threshold)
2025-11-07T10:30:05Z INFO  Opening arbitrage position...
Opening Your First Position
Manual Position Opening (Development/Testing)
# Check current funding rates
wealth funding

# Output:
# Exchange      Symbol      Rate        Next Payment
# binance       BTCUSDT     0.0100%     2025-11-07 12:00:00 UTC
# hyperliquid   BTC         0.0500%     2025-11-07 11:00:00 UTC
# Spread: 0.0400% ✓ (above 0.0300% threshold)

# Check available balance
wealth balance

# Output:
# Exchange      Asset    Free         Total        Reserved
# binance       USDT     10000.00     10000.00     0.00
# hyperliquid   USDT     10000.00     10000.00     0.00

# Start the bot (it will auto-open positions when spreads are found)
wealth run
Understanding Position Logic
The bot opens positions automatically when:
- Spread Check:
funding_rate_high - funding_rate_low >= 0.0300%(configurable) - Balance Validation: Sufficient collateral with 20% safety buffer
- Leverage Validation: Within exchange limits (1-125x Binance/Aster, 1-100x Bybit, 1-50x HyperLiquid)
- Position Limits: Under max concurrent pairs (default: 3)
Example Calculation:
Given:
- Position size: $1,000
- Leverage: 10x
- Safety buffer: 20%

Required collateral = ($1,000 / 10) * 1.2 = $120 per exchange
Total required = $120 + $120 = $240

If available balance >= $240, position opens
Monitoring Active Positions
Check Current Positions
# View all open positions
wealth positions

# Output:
# ID    Symbol      Long Exchange  Short Exchange  Size       Entry Spread  Current Spread  Funding Collected  P&L      Age
# 1     BTCUSDT     binance       hyperliquid     0.1 BTC    0.0400%      0.0350%         $2.40             $12.50   2h 15m
# 2     ETHUSDT     bybit         binance         2.0 ETH    0.0380%      0.0420%         $1.80             $8.30    1h 45m
Real-Time Monitoring with OpenTelemetry
The bot exports metrics via OTLP to your observability backend. Check configuration:
# View OTLP configuration (JSON response)
curl -s localhost:9090/metrics | jq

# Output:
# {
#   "status": "operational",
#   "backend": "OpenTelemetry OTLP",
#   "endpoint": "http://localhost:4317",
#   "protocol": "gRPC"
# }

# Query actual metrics in Grafana or your OTLP-compatible backend:
# wealth_funding_rate{exchange="binance",symbol="BTCUSDT"}
# wealth_positions_active
# wealth_profit_loss_usd
Using Grafana (Optional)
# Start Grafana with docker-compose
docker-compose up -d grafana

# Access dashboard at http://localhost:3000
# Default credentials: admin/admin
# Pre-configured dashboard shows:
# - Active positions
# - Funding rate spreads
# - P&L over time
# - WebSocket health
# - API latency
Closing Positions
Automatic Closing (Normal Operation)
Positions close automatically when any condition is met:
- Target Profit Reached: 5% profit (configurable via
target_profit) - Spread Reversal: Spread drops below 50% of entry spread
- Emergency: Critical errors or shutdown signal
Example Auto-Close:
2025-11-07T14:30:00Z INFO  Position #1 BTCUSDT reached target profit (5.2%)
2025-11-07T14:30:01Z INFO  Closing position atomically...
2025-11-07T14:30:02Z INFO  Close order placed: Binance (sell 0.1 BTC)
2025-11-07T14:30:03Z INFO  Close order placed: HyperLiquid (buy 0.1 BTC)
2025-11-07T14:30:04Z INFO  Position closed successfully. Final P&L: $52.40
Manual Emergency Close
# Close positions on specific exchange
wealth close --exchange binance --confirm

# Close positions for specific symbol
wealth close --symbol BTCUSDT --confirm

# Emergency close ALL positions (requires confirmation)
wealth close --all --confirm

# Graceful shutdown (closes all non-held positions cleanly)
# Press Ctrl+C once and wait (~6-8 seconds typical)
# Note: Held positions (marked with 🔒 in TUI) are preserved
^C
2025-11-07T14:35:00Z INFO  Shutdown signal received
2025-11-07T14:35:01Z INFO  Closing all positions gracefully...
2025-11-07T14:35:01Z INFO  Skipping held position ETHUSDT (will persist)
2025-11-07T14:35:05Z INFO  All non-held positions closed. Exiting.
Note: All close commands require --confirm flag for safety.
Verifying Position Closure
# Check positions after close
wealth positions

# Output should be empty:
# 📊 Current Positions
#
#   No active positions

# Check balances are back to normal
wealth balance
Alert Integration
Discord Notifications
Set up Discord alerts for important events:
# Set your Discord webhook URL
export DISCORD_WEBHOOK_URL="https://discord.com/api/webhooks/..."

# The bot will send notifications for:
# - Position opened/closed
# - Target profit reached
# - Errors or warnings
Slack Notifications
# Set your Slack webhook URL
export SLACK_WEBHOOK_URL="https://hooks.slack.com/services/..."
Dynamic Pair Discovery Examples
Using Loris.tools Arbitrage Mode (Recommended)
The bot can automatically discover trading pairs using Loris.tools API, sorted by arbitrage opportunity:
# config.toml - Maximum arbitrage opportunities
[instrument_discovery]
enabled = true
use_loris_rankings = true         # Use Loris.tools API
loris_sort_by = "arbitrage"       # Sort by funding spread (default)
min_24h_volume_usd = 1_000_000    # $1M minimum liquidity
quote_asset = "USDT"
max_symbols = 20
min_exchanges = 2
exclude = ["BULL", "BEAR", "UP", "DOWN"]
refresh_interval_hours = 6        # Refresh pairs every 6 hours
# Run with discovery enabled
wealth run --enable-discovery

# Output shows arbitrage-sorted pairs:
# INFO Pair discovery using Loris rankings (sort: arbitrage)
# INFO Top arbitrage opportunities:
#   1. DOGE: spread=0.12% (Binance: -0.05%, Bybit: 0.07%)
#   2. SOL:  spread=0.08% (Binance: 0.01%, HyperLiquid: 0.09%)
#   3. BTC:  spread=0.04% (Binance: 0.01%, Bybit: 0.05%)
Using Loris.tools OI Rank Mode (Liquidity-Focused)
For conservative strategies prioritizing liquidity:
# config.toml - Most liquid pairs
[instrument_discovery]
enabled = true
use_loris_rankings = true
loris_sort_by = "oi_rank"         # Sort by open interest (liquidity)
min_24h_volume_usd = 1_000_000
quote_asset = "USDT"
max_symbols = 10                   # Fewer, more liquid pairs
min_exchanges = 2
exclude = ["BULL", "BEAR", "UP", "DOWN"]
refresh_interval_hours = 6         # Refresh pairs every 6 hours
# Output shows OI-sorted pairs:
# INFO Pair discovery using Loris rankings (sort: oi_rank)
# INFO Top pairs by liquidity:
#   1. BTC:  OI rank=1
#   2. ETH:  OI rank=2
#   3. SOL:  OI rank=5
Using Exchange Volume Data (Direct)
For maximum control without third-party APIs:
# config.toml - Direct exchange data
[instrument_discovery]
enabled = true
use_loris_rankings = false        # Use exchange APIs directly
min_24h_volume_usd = 5_000_000    # Higher threshold
quote_asset = "USDT"
max_symbols = 20
min_exchanges = 2
exchanges = ["binance_futures", "bybit_perpetuals_usd"]
refresh_interval_hours = 0        # No periodic refresh (runs at startup only)
Troubleshooting Common Issues
Issue: "Insufficient balance" error
Solution:
# Check current balance
wealth balance

# If balance is low, deposit more funds or reduce position size
# Edit config.toml:
[trading]
position_size_percentage = 0.1  # Reduce from 30% to 10%
max_position_usd = 5000.0       # Reduce cap
Issue: Position not opening despite good spread
Possible causes:
-
Balance too low
# Check required collateral # For $1000 position at 10x leverage with 20% buffer: # Required = ($1000 / 10) * 1.2 = $120 per exchange -
Leverage not initialized
# Check logs for: grep "Initialized leverage" logs/wealth.log # If missing, verify config.toml has leverage section -
Max concurrent positions reached
# Check current count
wealth positions | wc -l

# Increase in config if needed:
"max_concurrent_pairs": 5
Issue: WebSocket keeps disconnecting
Automatic Recovery (v0.54.0+):
The bot now includes automatic per-exchange health monitoring and restart:
- Health checks every 30 seconds using ping/pong heartbeats
- Only unhealthy exchanges are restarted (not all)
- 90-second threshold before considering a stream unhealthy
- 60-second grace period for newly restarted streams
Manual troubleshooting:
# Check network connectivity
curl -I https://fstream.binance.com
curl -I https://stream.bybit.com

# Enable detailed logging to see health check status
export RUST_LOG=wealth::market_data=debug
wealth run

# Look for these log patterns:
# "All WebSocket streams healthy" - system is working
# "Exchange binance unhealthy: No activity for 95s" - single exchange restart
# "Restarting single exchange stream" - per-exchange recovery in progress
Persistent disconnection issues:
- Network instability: Check your connection quality
- Exchange rate limiting: The bot uses exponential backoff; wait for recovery
- Firewall/proxy: Ensure WebSocket connections (wss://) are allowed
Issue: Orders rejected by exchange
Common reasons:
-
Quantity too small
# Binance minimum: 0.001 BTC # HyperLiquid minimum: 0.01 BTC (varies by symbol) # Increase position size or use different symbol -
Insufficient margin
# Check exchange-specific requirements: wealth verify --check-margin -
Position mode not set (Binance)
# Bot auto-initializes hedge mode, but if it fails:
# Manually set in Binance UI: Futures > Preferences > Position Mode > Hedge Mode
Related Documentation
- Getting Started - Initial setup
- Configuration Guide - Detailed config options
- CLI Reference - All commands
- API Reference - Programmatic usage
- Troubleshooting - Detailed problem solving
Next Steps
- Test in Paper Trading Mode: Run with
WEALTH__EXECUTION__MODE=paperfor 1-2 weeks - Monitor Metrics: Set up Grafana dashboard for visualization
- Set Up Alerts: Configure Discord/Slack notifications for important events
- Gradual Scaling: Start with small position sizes, increase gradually
- Review Performance: Use
wealth statsto analyze historical performance
Questions? See Troubleshooting or check the logs in logs/wealth.log.
Configuration Guide
Complete reference for configuration settings
Overview
The bot uses a unified configuration system with support for TOML configuration files and environment variables. All variables have sensible defaults and are validated on startup.
Configuration Loading Flow
flowchart TD
    subgraph Priority["Configuration Loading Priority"]
        direction TB
        ENV["🔴 Environment Variables<br/>WEALTH__SECTION__FIELD<br/>(Highest Priority)"]
        TOML["🟡 TOML/JSON Config File<br/>config.toml or config.json"]
        DEF["🟢 Default Values<br/>(Fallback)"]
    end

    ENV --> TOML --> DEF

    style ENV fill:#ffcdd2
    style TOML fill:#fff9c4
    style DEF fill:#c8e6c9
Configuration Structure
flowchart LR
    subgraph Config["AppConfig Structure"]
        direction TB
        APP[AppConfig]
        APP --> INST[instruments]
        APP --> DISC[instrument_discovery]
        APP --> LEV[leverage]
        APP --> TRADE[trading]
        APP --> RISK[risk]
        APP --> EXEC[execution]
        APP --> OBS[observability]
        APP --> LIC[licensing]
    end

    style APP fill:#e3f2fd
    style TRADE fill:#fff3e0
    style RISK fill:#ffcdd2
Current Version: The bot uses a simplified configuration structure with direct field access.
Configuration Files:
config.toml- Main configuration file (instruments, leverage, trading params) - Preferredconfig.json- Legacy JSON format (still supported for backward compatibility).env- Local environment configuration for sensitive values
Hot-Reload Support: The bot supports runtime configuration updates for safe parameters without requiring a restart. See Configuration Hot-Reload for details on which parameters can be hot-reloaded.
Configuration Architecture:
AppConfig- Single unified configuration structure- Direct field access:
config.trading.*,config.risk.*,config.leverage.* - Environment variables with
WEALTH__prefix override TOML/JSON settings
Loading Priority:
- Environment variables with
WEALTH__prefix (highest priority) - TOML/JSON configuration file (
config.tomlorconfig.json) - Default values (fallback)
Configuration Sections
The configuration is organized into clear sections:
| Section | Description |
|---|---|
instruments | Trading pairs to monitor |
instrument_discovery | Dynamic pair discovery settings |
leverage | Per-symbol leverage settings |
trading | Strategy parameters (spread thresholds, position sizing) |
risk | Risk management (slippage, trailing stops, fees) |
pair_health | Pair health monitoring and auto-disable thresholds |
execution | Execution mode (paper/live), resilience, and reconciliation |
observability | Metrics, logging, telemetry |
licensing | License configuration |
Environment Variable Overrides:
- All configuration can be overridden via environment variables
- Prefix pattern:
WEALTH__SECTION__FIELD(e.g.,WEALTH__TRADING__MIN_FUNDING_SPREAD)
Trading Configuration
WEALTH__TRADING__MIN_FUNDING_SPREAD
Minimum funding rate spread required to open a position.
- Type: Decimal (0.0-1.0)
- Default:
0.04(0.04% = 4 bps) - TOML Path:
trading.min_funding_spread - Example:
WEALTH__TRADING__MIN_FUNDING_SPREAD=0.05
WEALTH__TRADING__MAX_POSITION_USD
Maximum position size cap in USD (safety limit).
- Type: Decimal
- Default:
10000($10,000) - TOML Path:
trading.max_position_usd - Example:
WEALTH__TRADING__MAX_POSITION_USD=20000
WEALTH__TRADING__POSITION_SIZE_PERCENT
Percentage of available balance to use per position.
- Type: Decimal (0.0 - 1.0)
- Default:
0.3(30%) - TOML Path:
trading.position_size_percent - Example:
WEALTH__TRADING__POSITION_SIZE_PERCENT=0.25
WEALTH__TRADING__TARGET_PROFIT_PERCENT
Target profit percentage per position.
- Type: Decimal (0.0 - 1.0)
- Default:
0.05(5%) - TOML Path:
trading.target_profit_percent - Example:
WEALTH__TRADING__TARGET_PROFIT_PERCENT=0.08
WEALTH__TRADING__MAX_POSITION_DURATION_HOURS
Maximum position duration in hours before forced exit. Prevents capital from being tied up indefinitely.
- Type: Integer
- Default:
168(7 days) - TOML Path:
trading.max_position_duration_hours - Example:
WEALTH__TRADING__MAX_POSITION_DURATION_HOURS=336 - Note: Set to
0to disable duration-based exits
WEALTH__TRADING__NARROW_SPREAD_EXIT_PERIODS
Number of consecutive narrow spread periods (8-hour intervals) before closing position.
- Type: Integer
- Default:
3(24 hours of narrow spread) - TOML Path:
trading.narrow_spread_exit_periods - Example:
WEALTH__TRADING__NARROW_SPREAD_EXIT_PERIODS=2 - Note: Set to
0for immediate spread narrowing exit
WEALTH__TRADING__MAX_CONCURRENT_POSITIONS
Maximum number of concurrent arbitrage pairs.
- Type: Integer
- Default:
5 - TOML Path:
trading.max_concurrent_positions - Example:
WEALTH__TRADING__MAX_CONCURRENT_POSITIONS=3
WEALTH__TRADING__UPDATE_INTERVAL_SECS
Funding rate update interval in seconds.
- Type: Integer
- Default:
60 - TOML Path:
trading.update_interval_secs - Example:
WEALTH__TRADING__UPDATE_INTERVAL_SECS=30
WEALTH__TRADING__MAX_HEDGE_ATTEMPTS
Maximum number of hedging attempts for partial fills.
- Type: Integer
- Default:
5 - TOML Path:
trading.max_hedge_attempts - Example:
WEALTH__TRADING__MAX_HEDGE_ATTEMPTS=3 - Purpose: Prevents infinite hedging loops when orders partially fill
WEALTH__TRADING__HEDGE_TOLERANCE_PERCENT
Hedging tolerance as percentage (when to stop hedging).
- Type: Decimal (0.0-1.0)
- Default:
0.001(0.1%) - TOML Path:
trading.hedge_tolerance_percent - Example:
WEALTH__TRADING__HEDGE_TOLERANCE_PERCENT=0.0005 - Purpose: Allows small quantity mismatches without additional hedging orders
WEALTH__TRADING__FALLBACK_PRICE_USD
Fallback price in USD used when real-time price data is unavailable.
- Type: Decimal
- Default:
100000($100,000) - TOML Path:
trading.fallback_price_usd - Example:
WEALTH__TRADING__FALLBACK_PRICE_USD=95000 - Purpose: Last-resort value for position sizing calculations when WebSocket price feeds fail
- Note: Set to approximately current BTC price for reasonable position sizing. An error is logged when fallback is used.
WEALTH__TRADING__SYMBOL_FALLBACK_PRICES
Per-symbol fallback prices when real-time data is unavailable.
- Type: Map<String, Decimal>
- Default: Empty (uses global
fallback_price_usd) - TOML Path:
trading.symbol_fallback_prices - Purpose: Provides accurate fallback prices for non-BTC symbols, improving position sizing accuracy
Example TOML Configuration:
[trading.symbol_fallback_prices]
BTCUSDT = 100000
ETHUSDT = 3500
SOLUSDT = 200
XRPUSDT = 2.5
Note: Symbol-specific fallback prices take precedence over the global fallback_price_usd. Only configure symbols you actively trade.
Note: Leverage is configured per-symbol in the [leverage] section, not as a global trading parameter.
Expected Value (EV) Gating
The bot uses expected value analysis to filter opportunities before execution. Only opportunities with positive risk-adjusted EV after costs are considered.
WEALTH__TRADING__MIN_EXPECTED_VALUE
Minimum expected value threshold (net profit after costs).
- Type: Decimal (0.0-1.0)
- Default:
0.05(0.05% = 5 bps) - TOML Path:
trading.min_expected_value - Example:
WEALTH__TRADING__MIN_EXPECTED_VALUE=0.08 - Purpose: Filters out low-quality opportunities with insufficient edge
- Formula:
EV = (time_weighted_spread × 3 funding payments) - (entry_fees + exit_fees + slippage) - Note: Time weighting applies linear decay based on minutes until next funding payment
WEALTH__TRADING__STALENESS_PENALTY
Discount applied to EV calculation when data age exceeds staleness haircut threshold.
- Type: Decimal (0.0-1.0)
- Default:
0.03(0.03% = 3 bps) - TOML Path:
trading.staleness_penalty - Example:
WEALTH__TRADING__STALENESS_PENALTY=0.05 - Purpose: Conservative adjustment for potential data lag
- When Applied: Reduces gross EV when funding rate data age exceeds
staleness_haircut_threshold_secs(default: 120s)
WEALTH__TRADING__STALENESS_HAIRCUT_THRESHOLD_SECS
Data age threshold (in seconds) for applying staleness penalty.
- Type: Integer (seconds)
- Default:
120(2 minutes) - TOML Path:
trading.staleness_haircut_threshold_secs - Example:
WEALTH__TRADING__STALENESS_HAIRCUT_THRESHOLD_SECS=180 - Purpose: Defines when funding rate data is considered "semi-stale" and warrants a penalty
- Note: Distinct from data rejection threshold - data older than 5 minutes is rejected entirely
Example EV Calculation:
Funding spread: 90 bps (0.0090)
Time to funding: 240 minutes (50% of 8h period)
Time weight: 0.5
Gross EV: 90 bps × 0.5 = 45 bps

Entry fees (both sides): 4 bps
Exit fees (both sides): 4 bps
Estimated slippage: 10 bps
Total costs: 18 bps

Adjusted EV: 45 - 18 = 27 bps
Passes threshold: 27 bps > 5 bps ✅
Kelly Position Sizing
The bot supports two position sizing modes: Kelly Criterion (dynamic, risk-adjusted) or Fixed Percentage (simple, predictable).
WEALTH__TRADING__USE_KELLY_CRITERION
Enable or disable Kelly Criterion for position sizing.
- Type: Boolean
- Default:
true - TOML Path:
trading.use_kelly_criterion - Example:
WEALTH__TRADING__USE_KELLY_CRITERION=false - When
true: Uses Kelly Criterion formula for dynamic sizing based on EV and variance - When
false: Uses fixed percentage sizing:size = min(balance) × max_exchange_utilization × leverage - Recommendation:
truefor optimal capital allocation,falsefor simpler, predictable sizing
WEALTH__TRADING__KELLY_FRACTION
Fraction of full Kelly size to use (0.0 - 1.0).
- Type: Decimal
- Default:
0.25(quarter-Kelly for conservative sizing) - TOML Path:
trading.kelly_fraction - Example:
WEALTH__TRADING__KELLY_FRACTION=0.5 - Purpose: Reduces risk by using only a fraction of the mathematically optimal Kelly size
- Recommendation: Keep at 0.25 or lower for funding rate arbitrage
WEALTH__TRADING__MAX_NOTIONAL_PER_SYMBOL
Maximum notional value per symbol across all exchanges in USD.
- Type: Decimal
- Default:
10000($10,000) - TOML Path:
trading.max_notional_per_symbol - Example:
WEALTH__TRADING__MAX_NOTIONAL_PER_SYMBOL=20000 - Purpose: Hard cap on position size regardless of Kelly calculation
- Applied: Per symbol across all exchanges (e.g., total BTC exposure)
WEALTH__TRADING__MAX_EXCHANGE_UTILIZATION
Maximum percentage of free balance to use for a single position (0.0 - 1.0).
- Type: Decimal
- Default:
0.5(50%) - TOML Path:
trading.max_exchange_utilization - Example:
WEALTH__TRADING__MAX_EXCHANGE_UTILIZATION=0.3 - Purpose: Prevents over-concentration on one exchange
- Reference Capital: Uses
min(long_exchange_balance, short_exchange_balance)for sizing
Example Kelly Sizing:
EV: 30 bps per 8h (0.003)
Variance: 0.0001 (estimated spread volatility)
Kelly fraction: EV / variance = 0.003 / 0.0001 = 30
Reference capital: min($50,000, $80,000) = $50,000
Leverage: 10x
Full Kelly size: $50,000 × 30 × 10 = $15,000,000 (unrealistic)

Apply kelly_cap (0.25): $15,000,000 × 0.25 = $3,750,000
Apply max_notional cap: min($3,750,000, $10,000) = $10,000
Apply utilization cap: min($10,000, $50,000 × 0.5) = $10,000

Final position size: $10,000 (binding constraint: notional cap)
Leverage Configuration
Leverage multiplies your position size relative to margin. Higher leverage means higher potential returns AND higher risk of liquidation.
WEALTH__LEVERAGE__DEFAULT
Default leverage for all symbols.
- Type: Integer OR
"max" - Default:
3 - TOML Path:
leverage.default - Example:
WEALTH__LEVERAGE__DEFAULT=10orWEALTH__LEVERAGE__DEFAULT=max
Supported Values:
- Numbers: Fixed leverage (e.g.,
3,5,10,20) "max": Automatically use the maximum leverage allowed by each exchange
Per-Symbol Overrides
You can configure different leverage for specific symbols using the [leverage.overrides] section:
[leverage]
default = 10  # Default 10x for most symbols

[leverage.overrides]
BTCUSDT = 5       # Lower leverage for BTC (less volatile)
ETHUSDT = 8       # Medium leverage for ETH
SOLUSDT = "max"   # Use max allowed for SOL
Symmetric Leverage for Hedged Positions
When trading hedged positions across exchanges, the bot automatically ensures consistent leverage:
- If config is a fixed number: Uses that value (clamped to exchange max if needed)
- If config is
"max": Usesmin(max_exchange_A, max_exchange_B)
Example:
- Config:
SOLUSDT = "max" - Binance max for SOL: 75x
- HyperLiquid max for SOL: 50x
- Result: Bot uses 50x on both exchanges
This ensures the hedge ratio remains balanced regardless of differing exchange limits.
Max Leverage Caching
When using "max" leverage:
- Max leverage is fetched from exchange APIs on startup
- Results are cached to avoid API rate limits
- Cache is refreshed when bot restarts
Exchange API Sources:
- Binance:
/fapi/v1/leverageBracket(uses first tier max) - Bybit:
/v5/market/instruments-info(leverageFilter.maxLeverage) - HyperLiquid:
/infometa endpoint (universe[].maxLeverage) - Aster: Binance-compatible API
Recommended Settings
| Risk Profile | Default | High-Volume (BTC/ETH) | Mid-Cap (SOL/XRP) |
|---|---|---|---|
| Conservative | 3 | 3 | 2 |
| Moderate | 10 | 5-8 | 10 |
| Aggressive | "max" | 20 | "max" |
Note: Higher leverage increases both potential gains and liquidation risk. The bot does NOT automatically manage position size based on leverage—that's controlled by position_size_percent and max_position_usd.
Slippage Protection Configuration
WEALTH__RISK__MAX_SLIPPAGE_BPS
Maximum allowed slippage in basis points.
- Type: Integer
- Default:
50(0.5%) - TOML Path:
risk.max_slippage_bps - Example:
WEALTH__RISK__MAX_SLIPPAGE_BPS=30
WEALTH__RISK__MIN_SLIPPAGE_BPS
Minimum slippage buffer in basis points (always applied).
- Type: Integer
- Default:
10(0.1%) - TOML Path:
risk.min_slippage_bps - Example:
WEALTH__RISK__MIN_SLIPPAGE_BPS=5
WEALTH__RISK__MARKET_ORDER_FALLBACK_ENABLED
Whether to fall back to MARKET orders if LIMIT order doesn't fill.
- Type: Boolean
- Default:
true - TOML Path:
risk.market_order_fallback_enabled - Values:
true|false - Example:
WEALTH__RISK__MARKET_ORDER_FALLBACK_ENABLED=false
WEALTH__RISK__LIMIT_ORDER_TIMEOUT_SECS
Timeout before falling back to MARKET order (seconds).
- Type: Integer
- Default:
5 - TOML Path:
risk.limit_order_timeout_secs - Example:
WEALTH__RISK__LIMIT_ORDER_TIMEOUT_SECS=10
WEALTH__RISK__SLIPPAGE_VOLATILITY_MULTIPLIER
Multiplier to increase slippage tolerance in volatile markets.
- Type: Float
- Default:
1.5(50% wider) - TOML Path:
risk.slippage_volatility_multiplier - Example:
WEALTH__RISK__SLIPPAGE_VOLATILITY_MULTIPLIER=2.0
Post-Only (Maker) Order Configuration
Post-only orders ensure you always pay maker fees instead of taker fees, significantly reducing execution costs.
WEALTH__RISK__USE_POST_ONLY
Enable post-only (maker) order execution.
- Type: Boolean
- Default:
false - TOML Path:
risk.use_post_only - Values:
true|false - Example:
WEALTH__RISK__USE_POST_ONLY=true
Exchange-Specific Order Types:
| Exchange | Post-Only Type | API Parameter |
|---|---|---|
| Binance Futures | GTX (Good-Til-Crossing) | timeInForce=GTX |
| Bybit Perpetuals | PostOnly | timeInForce=PostOnly |
| HyperLiquid | Alo (Add Liquidity Only) | tif=Alo |
| Aster Futures | GTX | timeInForce=GTX |
WEALTH__RISK__LIMIT_PRICE_OFFSET_BPS
Price offset from market for post-only orders (basis points).
- Type: Integer
- Default:
10(0.10%) - TOML Path:
risk.limit_price_offset_bps - Example:
WEALTH__RISK__LIMIT_PRICE_OFFSET_BPS=15
How it works:
- Buy orders: Place at
market_price × (1 - offset_bps/10000) - Sell orders: Place at
market_price × (1 + offset_bps/10000)
WEALTH__RISK__POST_ONLY_RETRY_COUNT
Number of retry attempts when post-only order is rejected.
- Type: Integer
- Default:
3 - TOML Path:
risk.post_only_retry_count - Example:
WEALTH__RISK__POST_ONLY_RETRY_COUNT=5
Retry Logic:
- Post-only order placed at calculated price
- If rejected (would cross spread), price adjusted deeper into book
- Repeat up to
post_only_retry_counttimes - If all retries fail and
market_order_fallback_enabled=true, fall back to market order
Fee Savings Example:
| Exchange | Maker Fee | Taker Fee | Savings per $10k Trade |
|---|---|---|---|
| Binance VIP 0 | 0.02% | 0.05% | $3.00 |
| Bybit Regular | 0.02% | 0.055% | $3.50 |
| HyperLiquid Tier 0 | 0.015% | 0.045% | $3.00 |
Trailing Stop Configuration
Note: Trailing stop configuration is defined in config.toml or via environment variables below.
WEALTH__RISK__TRAILING_STOPS_ENABLED
Enable trailing stop loss functionality.
- Type: Boolean
- Default:
true - TOML Path:
risk.trailing_stops_enabled - Values:
true|false - Example:
WEALTH__RISK__TRAILING_STOPS_ENABLED=true
WEALTH__RISK__TRAILING_STOP_ACTIVATION
Profit threshold to activate trailing stop (as decimal percentage).
- Type: Decimal (0.0-1.0)
- Default:
0.03(3%) - TOML Path:
risk.trailing_stop_activation - Example:
WEALTH__RISK__TRAILING_STOP_ACTIVATION=0.05
WEALTH__RISK__TRAILING_STOP_DISTANCE
Maximum allowed profit retracement before exit (as decimal percentage).
- Type: Decimal (0.0-1.0)
- Default:
0.40(40% from peak) - TOML Path:
risk.trailing_stop_distance - Example:
WEALTH__RISK__TRAILING_STOP_DISTANCE=0.3
WEALTH__RISK__TRAILING_STOP_MIN_LOCK
Minimum profit to lock in (prevents exit below this level).
- Type: Decimal (0.0-1.0)
- Default:
0.02(2%) - TOML Path:
risk.trailing_stop_min_lock - Example:
WEALTH__RISK__TRAILING_STOP_MIN_LOCK=0.015
WEALTH__RISK__SLIPPAGE_AWARE_EXITS
Consider estimated slippage cost in exit decisions. When enabled, positions with remaining potential profit less than expected closing costs may be held for one more funding period.
- Type: Boolean
- Default:
true - TOML Path:
risk.slippage_aware_exits - Example:
WEALTH__RISK__SLIPPAGE_AWARE_EXITS=false
Fee Configuration
WEALTH__RISK__FEES__ESTIMATED_SLIPPAGE
Estimated slippage for market orders (as decimal).
- Type: Decimal (0.0-1.0)
- Default:
0.001(0.1%) - TOML Path:
risk.fees.estimated_slippage - Example:
WEALTH__RISK__FEES__ESTIMATED_SLIPPAGE=0.002
Exchange Fee Overrides
Override default exchange fee rates in config.toml under [risk.fees.<exchange>]:
Binance
[risk.fees.binance]
maker = 0.0002  # 0.02% - Maker fee
taker = 0.0004  # 0.04% - Taker fee
funding_interval_hours = 8
Bybit
[risk.fees.bybit]
maker = 0.0001  # 0.01% - Maker fee
taker = 0.0006  # 0.06% - Taker fee
funding_interval_hours = 8
HyperLiquid
[risk.fees.hyperliquid]
maker = 0.0000   # 0.00% - Maker rebate
taker = 0.00035  # 0.035% - Taker fee
funding_interval_hours = 1  # HyperLiquid uses hourly funding (24x daily)
Note: HyperLiquid processes funding every hour, unlike most CEXes which use 8-hour intervals. This affects EV calculations and provides more frequent profit collection opportunities.
Aster
[risk.fees.aster]
maker = 0.0002   # 0.02% - Maker fee
taker = 0.0005   # 0.05% - Taker fee
funding_interval_hours = 4  # Aster uses 4h or 8h per-symbol (fetched dynamically)
Note: Aster funding intervals vary by symbol (4h or 8h). The bot automatically fetches per-symbol intervals via the API and caches them. The config value is a fallback only.
Instrument Discovery Configuration
Dynamic pair discovery settings for automatic symbol detection (v0.30+). These settings control how the bot discovers and manages trading pairs from external sources like Loris.tools.
WEALTH__INSTRUMENT_DISCOVERY__USE_LORIS_RANKINGS
Enable Loris.tools-based pair discovery for top funding rate opportunities.
- Type: Boolean
- Default:
false - TOML Path:
instrument_discovery.use_loris_rankings - Example:
WEALTH__INSTRUMENT_DISCOVERY__USE_LORIS_RANKINGS=true - Prerequisite: Requires
enabled = trueor--discoverCLI flag
WEALTH__INSTRUMENT_DISCOVERY__REFRESH_INTERVAL_HOURS
Periodic refresh interval for Loris.tools pair discovery (hours, 0 = disabled).
- Type: Integer (hours)
- Default:
0(disabled - discovery runs only at startup) - TOML Path:
instrument_discovery.refresh_interval_hours - Example:
WEALTH__INSTRUMENT_DISCOVERY__REFRESH_INTERVAL_HOURS=6 - Prerequisite: Requires
use_loris_rankings = trueand discovery enabled
Behavior:
- When
> 0: Periodically queries Loris.tools API to discover new high-opportunity pairs - Add-only strategy: New pairs are added automatically; pairs with active positions are never removed
- Jitter protection: Random 0-30 minute delay added to prevent synchronized API requests across multiple bot instances
- WebSocket integration: Automatically registers new pairs with price and funding rate streams
When to Enable:
| Scenario | Recommended Value |
|---|---|
| Long-running production bot that should adapt to market changes | 6 (6 hours) |
| Short-term trading sessions or manual pair management | 0 (disabled) |
| Stable, predictable instrument sets preferred | 0 (disabled) |
Note: The instrument list may grow over time with add-only logic. Use hot-reload config changes to manually prune symbols if needed.
WEALTH__INSTRUMENT_DISCOVERY__MAX_SYMBOLS
Maximum number of symbols to discover from Loris.tools rankings.
- Type: Integer
- Default:
20 - TOML Path:
instrument_discovery.max_symbols - Example:
WEALTH__INSTRUMENT_DISCOVERY__MAX_SYMBOLS=30
WEALTH__INSTRUMENT_DISCOVERY__ENABLED
Enable dynamic pair discovery (requires both config and CLI flag for safety).
- Type: Boolean
- Default:
false - TOML Path:
instrument_discovery.enabled - Example:
WEALTH__INSTRUMENT_DISCOVERY__ENABLED=true
When enabled, the bot discovers trading pairs automatically instead of using static [[instruments]] configuration. Requires double opt-in: set enabled = true in config AND use --enable-discovery CLI flag.
WEALTH__INSTRUMENT_DISCOVERY__EXCHANGES
Exchanges to use for pair discovery. If empty, all exchanges with credentials are used.
- Type: Array of strings
- Default:
[](all available exchanges) - TOML Path:
instrument_discovery.exchanges - Example:
WEALTH__INSTRUMENT_DISCOVERY__EXCHANGES=binance_futures,hyper_liquid
Options: binance_futures, bybit_perpetuals_usd, hyper_liquid
WEALTH__INSTRUMENT_DISCOVERY__MIN_24H_VOLUME_USD
Minimum 24-hour trading volume in USD for discovered pairs.
- Type: Integer (USD)
- Default:
1000000($1M) - TOML Path:
instrument_discovery.min_24h_volume_usd - Example:
WEALTH__INSTRUMENT_DISCOVERY__MIN_24H_VOLUME_USD=5000000
Higher values select more liquid pairs with lower slippage. Recommended range: $1M-$10M depending on position sizes.
WEALTH__INSTRUMENT_DISCOVERY__QUOTE_ASSET
Quote asset filter for discovered pairs.
- Type: String
- Default:
USDT - TOML Path:
instrument_discovery.quote_asset - Example:
WEALTH__INSTRUMENT_DISCOVERY__QUOTE_ASSET=USDC
Options: USDT, USDC, BUSD
WEALTH__INSTRUMENT_DISCOVERY__EXCLUDE
Symbols to exclude from discovery (substring matching, case-sensitive).
- Type: Array of strings
- Default:
["BULL", "BEAR", "UP", "DOWN", "HEDGE", "DEFI"] - TOML Path:
instrument_discovery.exclude - Example:
WEALTH__INSTRUMENT_DISCOVERY__EXCLUDE=BULL,BEAR,SHIB
Use to manually block leveraged tokens, sector baskets, or specific pairs. Example: "BULL" matches "BULLISH", "BULLUSDT", "ETHBULL".
WEALTH__INSTRUMENT_DISCOVERY__MIN_EXCHANGES
Minimum number of exchanges that must support a symbol for it to be discovered.
- Type: Integer
- Default:
2 - TOML Path:
instrument_discovery.min_exchanges - Example:
WEALTH__INSTRUMENT_DISCOVERY__MIN_EXCHANGES=3
Ensures arbitrage is possible (need at least 2 exchanges). Set higher to only trade pairs available on 3+ exchanges.
WEALTH__INSTRUMENT_DISCOVERY__LORIS_SORT_BY
Sorting strategy when using Loris.tools API for discovery.
- Type: String
- Default:
arbitrage - TOML Path:
instrument_discovery.loris_sort_by - Example:
WEALTH__INSTRUMENT_DISCOVERY__LORIS_SORT_BY=oi_rank
Options:
arbitrage- Sort by funding rate spread (highest arbitrage opportunity first)oi_rank- Sort by Binance open interest ranking (most liquid first)
Only applies when use_loris_rankings = true.
WEALTH__INSTRUMENT_DISCOVERY__FORCE_REMOVE_PAIRS
Force removal of pairs during hot-reload even if they have pending orders.
- Type: Boolean
- Default:
false - TOML Path:
instrument_discovery.force_remove_pairs - Example:
WEALTH__INSTRUMENT_DISCOVERY__FORCE_REMOVE_PAIRS=true
Behavior:
- When
true: Auto-cancels all pending orders for removed symbols - When
false: Blocks removal if symbol has pending orders or active positions
⚠️ Use with caution - may result in unhedged positions if orders are cancelled mid-execution.
Example Configuration
[instrument_discovery]
enabled = true
use_loris_rankings = true
loris_sort_by = "arbitrage"
refresh_interval_hours = 6
max_symbols = 20
min_24h_volume_usd = 1000000
quote_asset = "USDT"
min_exchanges = 2
exclude = ["BULL", "BEAR", "UP", "DOWN", "HEDGE", "DEFI"]
force_remove_pairs = false
# exchanges = ["binance_futures", "hyper_liquid"]  # Optional: limit to specific exchanges
Metrics Server Configuration
WEALTH__OBSERVABILITY__METRICS_PORT
Port for metrics and health check server.
- Type: Integer
- Default:
9090 - TOML Path:
observability.metrics_port - Example:
WEALTH__OBSERVABILITY__METRICS_PORT=8080
WEALTH__OBSERVABILITY__METRICS_BIND_ADDRESS
Bind address for metrics server.
- Type: String (IP address)
- Default:
0.0.0.0(all interfaces) - TOML Path:
observability.metrics_bind_address - Example:
WEALTH__OBSERVABILITY__METRICS_BIND_ADDRESS=127.0.0.1
Execution Mode
WEALTH__EXECUTION__MODE
Execution mode for order placement.
- Type: String ("paper" | "live" | "dryrun")
- Default:
paper - TOML Path:
execution.mode - Example:
WEALTH__EXECUTION__MODE=live
Modes:
paper- Simulated trading with mock order fillslive- Real trading with actual exchange ordersdryrun- Logs order intent but doesn't execute (useful for testing strategy logic)
Note: The old PAPER_TRADING and DRY_RUN boolean flags have been replaced with WEALTH__EXECUTION__MODE in v0.33.0 for clearer semantics.
Exchange Credentials
Credential Loading Strategy
The bot automatically tries to load credentials in the following order:
-
Encrypted Credentials File (if
CREDENTIALS_PASSPHRASEis set)- Uses
credentials.encrypted.jsonand.credentials.salt - Most secure, recommended for production
- Managed via
wealth credentialsCLI commands
- Uses
-
Environment Variables (fallback)
- Exchange-specific variables documented below
- Simpler for development and testing
No configuration needed - the bot seamlessly uses whichever method you set up.
Setup Option 1: Encrypted Credentials (Recommended)
Initial Setup:
# 1. Set passphrase in .env
echo "CREDENTIALS_PASSPHRASE=your-secure-passphrase" >> .env

# 2. Create encrypted credentials file
wealth credentials create

# 3. Add exchange credentials (interactive mode - recommended)
wealth credentials add binance
# Or with flags (less secure - visible in shell history)
wealth credentials add binance --api-key YOUR_API_KEY --secret-key YOUR_SECRET_KEY
wealth credentials add bybit --api-key YOUR_API_KEY --secret-key YOUR_SECRET_KEY
wealth credentials add hyperliquid --api-key 0xWALLET_ADDRESS --secret-key 0xPRIVATE_KEY

# 4. Verify
wealth verify --encrypted
Advantages:
- AES-256-GCM encryption
- Credentials never stored in plaintext
- Secure key derivation from passphrase (PBKDF2 with 100,000 iterations)
- Isolated from source code and version control
Security:
- Never commit
credentials.encrypted.jsonor.credentials.saltto version control - Use a strong passphrase (12+ characters, mix of types)
- Store passphrase securely (password manager, secrets vault)
CREDENTIALS_PASSPHRASE
Passphrase for encrypting/decrypting the credentials file.
- Type: String
- Default: None (not set)
- Example:
CREDENTIALS_PASSPHRASE=my-super-secure-passphrase-2024 - Required for: Encrypted credentials (Option 1)
- Not needed for: Direct environment variables (Option 2)
When set: Bot loads credentials from credentials.encrypted.json
When not set: Bot will fail to start (encrypted credentials are required since v0.21.0)
Note: Direct exchange credential environment variables (e.g.,
BINANCE_API_KEY) were deprecated in v0.21.0 and have been removed. Use encrypted credentials for all deployments. See Security Guide for setup instructions.
Resilience Configuration
WEALTH__EXECUTION__RESILIENCE__CIRCUIT_BREAKER_FAILURES
Number of failures before circuit breaker opens.
- Type: Integer
- Default:
5 - TOML Path:
execution.resilience.circuit_breaker_failures - Example:
WEALTH__EXECUTION__RESILIENCE__CIRCUIT_BREAKER_FAILURES=10
WEALTH__EXECUTION__RESILIENCE__CIRCUIT_BREAKER_TIMEOUT_SECS
Time to wait before testing recovery.
- Type: Integer
- Default:
60 - TOML Path:
execution.resilience.circuit_breaker_timeout_secs - Example:
WEALTH__EXECUTION__RESILIENCE__CIRCUIT_BREAKER_TIMEOUT_SECS=120
WEALTH__EXECUTION__RESILIENCE__CIRCUIT_BREAKER_SUCCESS_THRESHOLD
Number of successful calls needed to close circuit breaker.
- Type: Integer
- Default:
2 - TOML Path:
execution.resilience.circuit_breaker_success_threshold - Example:
WEALTH__EXECUTION__RESILIENCE__CIRCUIT_BREAKER_SUCCESS_THRESHOLD=3
WEALTH__EXECUTION__RESILIENCE__MAX_RETRIES
Maximum retry attempts for API calls.
- Type: Integer
- Default:
3 - TOML Path:
execution.resilience.max_retries - Example:
WEALTH__EXECUTION__RESILIENCE__MAX_RETRIES=5
WEALTH__EXECUTION__RESILIENCE__RETRY_INITIAL_BACKOFF_MS
Initial retry backoff in milliseconds.
- Type: Integer
- Default:
100 - TOML Path:
execution.resilience.retry_initial_backoff_ms - Example:
WEALTH__EXECUTION__RESILIENCE__RETRY_INITIAL_BACKOFF_MS=200
WEALTH__EXECUTION__RESILIENCE__RETRY_MAX_BACKOFF_SECS
Maximum retry backoff in seconds.
- Type: Integer
- Default:
10 - TOML Path:
execution.resilience.retry_max_backoff_secs - Example:
WEALTH__EXECUTION__RESILIENCE__RETRY_MAX_BACKOFF_SECS=30
WEALTH__EXECUTION__RESILIENCE__WEBSOCKET_MAX_RECONNECTS
Maximum WebSocket reconnection attempts.
- Type: Integer
- Default:
100 - TOML Path:
execution.resilience.websocket_max_reconnects - Example:
WEALTH__EXECUTION__RESILIENCE__WEBSOCKET_MAX_RECONNECTS=50
Position Reconciliation Configuration
Position reconciliation is a background task that monitors for unhedged positions and can automatically fix them. This is recommended for live trading to catch issues like partial fills that weren't properly hedged.
The reconciliation task monitors two types of positions:
- Tracked positions - Positions opened by the bot and tracked by the AtomicOrderExecutor
- Orphan positions - Positions found on exchanges but NOT tracked by the bot (requires explicit opt-in)
WEALTH__EXECUTION__RECONCILIATION__ENABLED
Enable background position reconciliation task.
- Type: Boolean
- Default:
false - TOML Path:
execution.reconciliation.enabled - Example:
WEALTH__EXECUTION__RECONCILIATION__ENABLED=true
Note: Reconciliation only runs in live trading mode. Paper trading doesn't have real positions to reconcile.
WEALTH__EXECUTION__RECONCILIATION__CHECK_INTERVAL_SECS
Interval between reconciliation checks in seconds.
- Type: Integer
- Default:
30 - TOML Path:
execution.reconciliation.check_interval_secs - Example:
WEALTH__EXECUTION__RECONCILIATION__CHECK_INTERVAL_SECS=60
Lower values detect issues faster but use more CPU. Typical range: 15-60 seconds.
WEALTH__EXECUTION__RECONCILIATION__AUTO_FIX_ENABLED
Enable automatic fixing of unhedged positions tracked by the bot.
- Type: Boolean
- Default:
true - TOML Path:
execution.reconciliation.auto_fix_enabled - Example:
WEALTH__EXECUTION__RECONCILIATION__AUTO_FIX_ENABLED=false
When enabled, unhedged positions that are tracked by the AtomicOrderExecutor are automatically closed via emergency close. When disabled, only alerts are triggered and manual intervention is required.
WEALTH__EXECUTION__RECONCILIATION__AUTO_CLOSE_ORPHANS
Enable automatic closing of orphan positions not tracked by the bot.
- Type: Boolean
- Default:
false - TOML Path:
execution.reconciliation.auto_close_orphans - Example:
WEALTH__EXECUTION__RECONCILIATION__AUTO_CLOSE_ORPHANS=true
⚠️ CAUTION: When enabled, the reconciliation task will automatically close ANY unhedged position found on exchanges that is NOT being tracked by the bot. This includes positions:
- Created manually outside the bot
- Left over from a previous bot session that crashed
- Opened by other trading systems on the same account
Only enable this if you exclusively use this bot for trading on the configured exchanges. When disabled (default), orphan positions trigger critical alerts but require manual intervention.
WEALTH__EXECUTION__RECONCILIATION__STUCK_EXECUTION_THRESHOLD_SECS
Threshold for stuck execution alerts in seconds.
- Type: Integer
- Default:
60 - TOML Path:
execution.reconciliation.stuck_execution_threshold_secs - Example:
WEALTH__EXECUTION__RECONCILIATION__STUCK_EXECUTION_THRESHOLD_SECS=60
Alert when an execution has been running longer than this threshold. Reduced from 300s to 60s for faster detection of stuck executions that could lead to liquidation. Typical range: 30-120 seconds.
WEALTH__EXECUTION__RECONCILIATION__EMERGENCY_CLOSE_FAILURE_THRESHOLD
Maximum consecutive emergency close failures before auto-shutdown.
- Type: Integer
- Default:
3 - TOML Path:
execution.reconciliation.emergency_close_failure_threshold - Example:
WEALTH__EXECUTION__RECONCILIATION__EMERGENCY_CLOSE_FAILURE_THRESHOLD=3
When this threshold is reached, the bot will automatically initiate a graceful shutdown to prevent further losses from unhedged positions. This is a critical safety feature to prevent liquidation during cascading failures. Set to 0 to disable auto-shutdown (not recommended).
WEALTH__EXECUTION__RECONCILIATION__HYPERLIQUID_CLOSE_SLIPPAGE
Slippage percentage for HyperLiquid force close operations.
- Type: Float (0.0 - 1.0)
- Default:
0.05(5%) - TOML Path:
execution.reconciliation.hyperliquid_close_slippage - Example:
WEALTH__EXECUTION__RECONCILIATION__HYPERLIQUID_CLOSE_SLIPPAGE=0.05
This slippage setting is used in two scenarios:
- Orphan Position Closing: When closing orphan positions on HyperLiquid during reconciliation
- Atomic Executor Fallback: When
reduce_onlyclose orders return zero fill but positions still exist (v0.52+)
Higher values increase the chance of fill but may result in worse execution prices. The default 5% is recommended for reliable closes.
Note: This uses HyperLiquid's SDK market_close function which fetches the current position state directly from the exchange before closing, making it more reliable than standard reduce_only orders.
Pair Health Configuration
The pair health system monitors trading pair health to detect degraded or broken data feeds. Unhealthy pairs can be automatically disabled to prevent bad trades.
WEALTH__PAIR_HEALTH__ENABLED
Enable automatic health monitoring for trading pairs.
- Type: Boolean
- Default:
true - TOML Path:
pair_health.enabled - Example:
WEALTH__PAIR_HEALTH__ENABLED=false
When enabled, the system tracks WebSocket disconnections, API errors, and data staleness for each trading pair.
WEALTH__PAIR_HEALTH__MAX_WS_DISCONNECTIONS
Maximum consecutive WebSocket disconnections before marking pair unhealthy.
- Type: Integer
- Default:
5 - TOML Path:
pair_health.max_ws_disconnections - Example:
WEALTH__PAIR_HEALTH__MAX_WS_DISCONNECTIONS=10
WEALTH__PAIR_HEALTH__MAX_API_ERRORS
Maximum consecutive API errors before marking pair unhealthy.
- Type: Integer
- Default:
10 - TOML Path:
pair_health.max_api_errors - Example:
WEALTH__PAIR_HEALTH__MAX_API_ERRORS=15
WEALTH__PAIR_HEALTH__MAX_FUNDING_RATE_STALENESS_SECS
Maximum age of funding rate data in seconds before considered stale.
- Type: Integer
- Default:
300(5 minutes) - TOML Path:
pair_health.max_funding_rate_staleness_secs - Example:
WEALTH__PAIR_HEALTH__MAX_FUNDING_RATE_STALENESS_SECS=600
Funding rate data older than this threshold is excluded from opportunity detection. This prevents trading on outdated market data.
WEALTH__PAIR_HEALTH__MAX_PRICE_STALENESS_SECS
Maximum age of price data in seconds before considered stale.
- Type: Integer
- Default:
60(1 minute) - TOML Path:
pair_health.max_price_staleness_secs - Example:
WEALTH__PAIR_HEALTH__MAX_PRICE_STALENESS_SECS=120
WEALTH__PAIR_HEALTH__AUTO_DISABLE_UNHEALTHY
Automatically disable pairs that become unhealthy.
- Type: Boolean
- Default:
false - TOML Path:
pair_health.auto_disable_unhealthy - Example:
WEALTH__PAIR_HEALTH__AUTO_DISABLE_UNHEALTHY=true
When true, pairs are auto-disabled when health thresholds are exceeded. When false (default), pairs stay enabled but show unhealthy status in TUI.
WEALTH__PAIR_HEALTH__AUTO_REENABLE_HEALTHY
Automatically re-enable pairs after they become healthy again.
- Type: Boolean
- Default:
true - TOML Path:
pair_health.auto_reenable_healthy - Example:
WEALTH__PAIR_HEALTH__AUTO_REENABLE_HEALTHY=false
WEALTH__PAIR_HEALTH__HEALTHY_CHECKS_FOR_REENABLE
Number of consecutive healthy checks before re-enabling auto-disabled pair.
- Type: Integer
- Default:
3 - TOML Path:
pair_health.healthy_checks_for_reenable - Example:
WEALTH__PAIR_HEALTH__HEALTHY_CHECKS_FOR_REENABLE=5
WEALTH__PAIR_HEALTH__CHECK_INTERVAL_SECS
Health check interval in seconds.
- Type: Integer
- Default:
30 - TOML Path:
pair_health.check_interval_secs - Example:
WEALTH__PAIR_HEALTH__CHECK_INTERVAL_SECS=60
Example Configuration:
[pair_health]
enabled = true
max_ws_disconnections = 5
max_api_errors = 10
max_funding_rate_staleness_secs = 300
max_price_staleness_secs = 60
auto_disable_unhealthy = false
auto_reenable_healthy = true
healthy_checks_for_reenable = 3
check_interval_secs = 30
Observability Configuration
WEALTH__OBSERVABILITY__METRICS_PORT
Port number for the metrics/API server.
- Type: u16
- Default:
9090 - TOML Path:
observability.metrics_port - Example:
WEALTH__OBSERVABILITY__METRICS_PORT=9090
The metrics server exposes:
/metrics- OpenTelemetry metrics info (JSON)/health,/ready,/live- Health check endpoints/api/positions,/api/funding_rates,/api/balances- HTTP API for querying bot state/api/arbitrage_positions- Cached arbitrage positions with funding collected (fast, no API quota)
WEALTH__OBSERVABILITY__METRICS_BIND_ADDRESS
IP address for the metrics/API server to bind to.
- Type: IP Address
- Default:
0.0.0.0(all network interfaces) - TOML Path:
observability.metrics_bind_address - Example:
WEALTH__OBSERVABILITY__METRICS_BIND_ADDRESS=127.0.0.1
Set to 127.0.0.1 for localhost-only access (recommended for production with external proxy).
WEALTH__OBSERVABILITY__OTLP_ENDPOINT
OpenTelemetry Protocol (OTLP) endpoint URL for exporting traces, metrics, and logs.
- Type: String (URL)
- Default: None (OTLP export disabled, local logging only)
- TOML Path:
observability.otlp_endpoint - Example:
WEALTH__OBSERVABILITY__OTLP_ENDPOINT=http://localhost:4317
When set, the bot will export all telemetry (traces, metrics, logs) to an OpenTelemetry Collector or compatible backend (Tempo, Jaeger, etc.) via gRPC. This replaces the previous Loki push logging with a unified observability pipeline.
URL Validation:
- Must start with
http://orhttps:// - Default port for OTLP gRPC is
4317 - Supports authentication via standard OTLP headers (configure in collector)
Resource Attributes:
You can add custom resource attributes via the OTEL_RESOURCE_ATTRIBUTES environment variable:
export OTEL_RESOURCE_ATTRIBUTES="service.name=wealth-bot,deployment.environment=production,service.version=0.16.0"
WEALTH__OBSERVABILITY__SERVICE_NAME
Service name for telemetry resource attributes.
- Type: String
- Default:
wealth - TOML Path:
observability.service_name - Example:
WEALTH__OBSERVABILITY__SERVICE_NAME=wealth-prod
Used as the service.name resource attribute in OpenTelemetry spans, metrics, and logs. Useful when running multiple bot instances.
WEALTH__OBSERVABILITY__ENVIRONMENT
Environment name for telemetry resource attributes (e.g., production, development, staging).
- Type: String
- Default:
development - TOML Path:
observability.environment - Example:
WEALTH__OBSERVABILITY__ENVIRONMENT=production
Used as a custom resource attribute for environment-based filtering in observability backends.
WEALTH__OBSERVABILITY__ENABLE_TRACES
Enable distributed tracing via OTLP.
- Type: Boolean
- Default:
true - TOML Path:
observability.enable_traces - Example:
WEALTH__OBSERVABILITY__ENABLE_TRACES=false
When enabled alongside otlp_endpoint, exports trace spans to the OTLP endpoint for distributed tracing visualization in Tempo, Jaeger, or similar backends.
WEALTH__OBSERVABILITY__TRACE_SAMPLE_RATE
Trace sampling rate (0.0 = never sample, 1.0 = always sample).
- Type: Decimal (0.0 - 1.0)
- Default:
1.0(100% of traces) - TOML Path:
observability.trace_sample_rate - Example:
WEALTH__OBSERVABILITY__TRACE_SAMPLE_RATE=0.1
Lower values reduce observability costs in high-throughput scenarios. Recommended: 1.0 for development, 0.1-0.01 for high-volume production.
WEALTH__OBSERVABILITY__LOG_FILE
Path to log file for file-based logging.
- Type: String (file path)
- Default: None (logs to stdout only)
- TOML Path:
observability.log_file - Example:
WEALTH__OBSERVABILITY__LOG_FILE=/var/log/wealth.log
When set, logs are written to both stdout and the specified file. Useful for debugging without disrupting OTLP telemetry.
Configuration Methods:
-
Environment Variables:
export WEALTH__OBSERVABILITY__OTLP_ENDPOINT=http://localhost:4317 export WEALTH__OBSERVABILITY__SERVICE_NAME=wealth-prod export WEALTH__OBSERVABILITY__ENVIRONMENT=production -
TOML Config:
[observability] otlp_endpoint = "http://localhost:4317" service_name = "wealth-prod" environment = "production" -
JSON Config (Legacy):
{
  "observability": {
    "otlp_endpoint": "http://localhost:4317",
    "service_name": "wealth-prod",
    "environment": "production"
  }
}
Configuration Precedence: Environment variables > TOML config > JSON config (legacy) > Defaults
See Logging Guide for complete OpenTelemetry setup instructions.
Configuration Examples
Development (Paper Trading)
# Trading
WEALTH__TRADING__MIN_FUNDING_SPREAD=0.04
WEALTH__TRADING__MAX_POSITION_USD=10000
WEALTH__TRADING__POSITION_SIZE_PERCENT=0.3
WEALTH__TRADING__TARGET_PROFIT_PERCENT=0.05

# Execution
WEALTH__EXECUTION__MODE=paper

# Observability
RUST_LOG=info
# Optional: Enable OTLP export for development
WEALTH__OBSERVABILITY__OTLP_ENDPOINT=http://localhost:4317
WEALTH__OBSERVABILITY__SERVICE_NAME=wealth-dev
WEALTH__OBSERVABILITY__ENVIRONMENT=development
Production (Live Trading)
# Trading
WEALTH__TRADING__MIN_FUNDING_SPREAD=0.04
WEALTH__TRADING__MAX_POSITION_USD=50000
WEALTH__TRADING__POSITION_SIZE_PERCENT=0.25
WEALTH__TRADING__TARGET_PROFIT_PERCENT=0.05

# Execution
WEALTH__EXECUTION__MODE=live

# Exchange Credentials (use encrypted credentials file instead)
CREDENTIALS_PASSPHRASE="your-secure-passphrase"

# Observability
RUST_LOG=info
WEALTH__OBSERVABILITY__OTLP_ENDPOINT=https://otlp.example.com:4317
WEALTH__OBSERVABILITY__SERVICE_NAME=wealth-prod
WEALTH__OBSERVABILITY__ENVIRONMENT=production
Testing Configuration
# Execution
WEALTH__EXECUTION__MODE=paper

# Conservative settings
WEALTH__TRADING__MAX_POSITION_USD=100
WEALTH__TRADING__POSITION_SIZE_PERCENT=0.1

# Verbose logging
RUST_LOG=debug
Configuration Validation
All configuration is validated on startup with fail-fast behavior.
Validation Process:
- Type validation during JSON parsing (serde)
- Cross-field validation after loading
- Clear error messages indicating which rule failed
Validated Constraints:
- All numeric thresholds must be positive
- Percentages must be between 0 and 1
- Port numbers must be non-zero
- At least one instrument must be configured
- Retry counts and timeouts must be valid
Example Error:
ERROR Configuration validation failed: Metrics port must be non-zero
ERROR Configuration validation failed: At least one instrument must be configured
Debugging Configuration
Use the config show --show-sources command to see where each configuration value comes from:
$ wealth config show --show-sources

📋 Configuration Sources

Shows: default → file (config.toml) → env vars → ✓ final value

🎯 Trading Configuration:
  min_funding_spread:
    default:  0.0004
    file:     0.0005
    env:      0.0006
    ✓ final:  0.0006 ← using environment override

  max_position_usd:
    default:  10000
    ✓ final:  10000 ← using default
This helps identify configuration issues and understand which values are active.
Environment Variable Precedence
Configuration loading happens in this order:
- Environment variables with
WEALTH__prefix (highest priority) - Override all other settings - TOML/JSON configuration file (
config.tomlorconfig.json) - Provides structured config - Default values (lowest priority) - Built-in sensible defaults
Example: If you set WEALTH__TRADING__MIN_FUNDING_SPREAD=0.001 in .env and min_funding_spread = 0.04 in config.toml, the environment variable takes precedence.
Best Practices:
- Use
config.tomlfor static configuration (instruments, leverage, strategy parameters) - Use environment variables with
WEALTH__prefix for deployment-specific settings - Use encrypted credentials file for API keys (safer than environment variables)
- Use
.envfile for local development overrides
Using with Different Tools
Systemd
[Service]
Environment="WEALTH__EXECUTION__MODE=live"
Environment="CREDENTIALS_PASSPHRASE=your-passphrase"
Docker
docker run -e WEALTH__EXECUTION__MODE=live \
  -e CREDENTIALS_PASSPHRASE=xxx \
  -v $(pwd)/config.toml:/app/config.toml \
  wealth
Docker Compose
environment:
  - WEALTH__EXECUTION__MODE=live
  - CREDENTIALS_PASSPHRASE=${CREDENTIALS_PASSPHRASE}
volumes:
  - ./config.toml:/app/config.toml:ro
  - ./credentials.encrypted.json:/app/credentials.encrypted.json:ro
Kubernetes
env:
- name: WEALTH__EXECUTION__MODE
  value: "live"
- name: CREDENTIALS_PASSPHRASE
  valueFrom:
    secretKeyRef:
      name: wealth-secrets
      key: credentials-passphrase
volumeMounts:
- name: config
  mountPath: /app/config.toml
  subPath: config.toml
Configuration Debugging
Config Show Sources Command
Display where each configuration value comes from (default → file → env):
wealth config --show-sources
Example Output:
📋 Configuration Sources

Shows: default → file (config.toml) → env vars → ✓ final value

🎯 Trading Configuration:
  min_funding_spread:
    default:  0.0004
    env:      0.0008
    ✓ final:  0.0008 ← using environment override

  max_position_usd:
    default:  10000
    file:     15000
    ✓ final:  15000 ← from config file
Use cases:
- Debug which source is being used for each config value
- Verify environment variable overrides are working
- Identify misconfigured values before running the bot
Validation Error Messages
Configuration errors now include source tracking (v0.33.0+):
File-based error:
Error: Invalid value for leverage.default: Must be greater than 0
(from config file: config.toml)
Environment variable error:
Error: Invalid value for trading.min_funding_spread: Cannot be negative
(from environment variable: WEALTH__TRADING__MIN_FUNDING_SPREAD)
Default value error:
Error: Invalid value for risk.max_slippage_bps: must be positive
(using default value)
Benefits:
- Quickly identify where the problematic value is configured
- Avoid checking multiple configuration sources manually
- Clear distinction between file errors and env var errors
Config Validation
Validate configuration without starting the bot:
wealth config --validate
Output:
🔍 Validating configuration...

  ✓ Loading config.toml
  ✓ TOML parsing successful
  ✓ Environment variable parsing successful
  ✓ Validating configuration... OK

✅ Configuration is valid!
   Instruments: 6
   Metrics Port: 9090
   Execution Mode: Paper
Common validation errors:
- Negative values (spreads, slippage, leverage)
- Out-of-range percentages (must be 0.0-1.0)
- Invalid exchange names (must be: binance, bybit, hyperliquid, aster)
- Missing required instruments
See Also
- CLI Reference - Command-line options
- Security Guide - Encrypted credentials
- Getting Started - Installation and setup
CLI Reference
Complete command-line interface reference for the Wealth Trading Bot
Overview
The wealth trading bot features a comprehensive command-line interface (CLI) built with clap. The CLI provides subcommands for all major operations, making it easy to manage the bot from the terminal.
Exchange Names
When specifying exchanges in CLI commands, use lowercase names:
| CLI Name | Full Name (API responses) |
|---|---|
binance | BinanceFutures |
bybit | BybitPerpetualsUsd |
hyperliquid | HyperLiquid |
aster | AsterFutures |
Global Options
Available on all commands:
-v                         # Info-level logging
-vv                        # Debug-level logging
-vvv                       # Trace-level logging (very verbose)
-q, --quiet                # Error-level only (warnings suppressed)
-l, --log-file <FILE>      # Path to log file (default: stdout)
-c, --config <FILE>        # Path to custom configuration file
-h, --help                 # Show help information
-V, --version              # Show version information
Environment Variables:
WEALTH__OBSERVABILITY__LOG_FILE   # Default log file path
WEALTH_CONFIG                      # Default configuration file path
Commands
wealth run - Run the Trading Bot
Start the trading bot. All configuration is managed via config.toml or environment variables.
Usage:
wealth run [OPTIONS]
Options:
--enable-discovery # Enable dynamic pair discovery (overrides config)
Note: The run command is required. Running wealth without a command displays help.
Configuration:
All runtime settings are configured via:
- Config file:
config.toml(persistent settings) - Environment variables:
WEALTH__*prefix (see Configuration Guide)
Common Configuration Examples:
# Paper trading mode (via environment variable)
export WEALTH__EXECUTION__MODE=paper
wealth run

# Live trading mode (via environment variable)
export WEALTH__EXECUTION__MODE=live
wealth run

# Custom metrics port
export WEALTH__OBSERVABILITY__METRICS_PORT=8080
wealth run

# OpenTelemetry export
export WEALTH__OBSERVABILITY__OTLP_ENDPOINT=http://localhost:4317
export WEALTH__OBSERVABILITY__SERVICE_NAME=wealth-prod
export WEALTH__OBSERVABILITY__ENVIRONMENT=production
wealth run
Examples:
# Run with default settings from config.toml
wealth run

# Show help
wealth

# Log to file
wealth run --log-file /tmp/wealth.log

# Verbose logging with file output
wealth run -v --log-file /var/log/wealth.log

# Very verbose (debug level)
export WEALTH__OBSERVABILITY__SERVICE_NAME=wealth-prod
export WEALTH__OBSERVABILITY__ENVIRONMENT=production
wealth run -vv
Environment Variables:
WEALTH__EXECUTION__MODE- Execution mode: "paper", "live", or "dryrun" (default: paper)WEALTH__OBSERVABILITY__METRICS_PORT- Metrics port (default: 9090)WEALTH__OBSERVABILITY__METRICS_BIND_ADDRESS- Bind address (default: 0.0.0.0)WEALTH__OBSERVABILITY__OTLP_ENDPOINT- OpenTelemetry OTLP endpoint URL (e.g., http://localhost:4317)WEALTH__OBSERVABILITY__SERVICE_NAME- Service name for telemetry resource attributes (default: wealth)WEALTH__OBSERVABILITY__ENVIRONMENT- Environment name for telemetry resource attributes (default: development)
Note: All configuration can also be set in config.toml. See Configuration Guide for details.
wealth dashboard - Interactive TUI Dashboard
🖥️ Status: Fully implemented (requires tui feature)
Run the trading bot with an interactive terminal dashboard for real-time monitoring and control.
Usage:
wealth dashboard [OPTIONS]
Options:
--enable-discovery     # Enable dynamic pair discovery
--tick-rate <MS>       # UI refresh rate in milliseconds (default: 250)
Examples:
# Run with TUI dashboard (default settings)
wealth dashboard

# Enable dynamic pair discovery
wealth dashboard --enable-discovery

# Slower refresh rate (for remote connections)
wealth dashboard --tick-rate 500
📖 See TUI Dashboard Guide for full documentation including keybindings, tabs, and troubleshooting.
wealth verify - Verify Configuration
✅ Status: Fully implemented
Verify that configuration files and credentials are valid, with optional API validation.
Usage:
wealth verify [OPTIONS]
Options:
--check-credentials    # Make test API calls to verify credentials work
--encrypted            # Verify encrypted credential decryption
Examples:
# Basic verification
wealth verify

# Verify with real API calls (recommended)
wealth verify --check-credentials

# Verify encrypted credentials (will prompt for passphrase if not set)
wealth verify --encrypted --check-credentials
# 🔐 Enter credentials passphrase: ********

# Or set env var to skip prompt
export CREDENTIALS_PASSPHRASE="your_passphrase"
wealth verify --encrypted --check-credentials
Output Format:
🔍 Configuration Verification

✅ Configuration file loaded successfully
✅ Strategy parameters validated
✅ Instruments configured: 3

🔐 Credential Verification:
  ✅ BinanceFutures: Valid (API call successful)
  ✅ BybitPerpetualsUsd: Valid (API call successful)
  ✅ HyperLiquid: Valid (API call successful)

All checks passed!
wealth config - Display Configuration
Show current configuration settings.
Usage:
wealth config [OPTIONS]
Options:
--strategy       # Show only strategy configuration
--execution      # Show only execution configuration
--credentials    # Show credential status (redacted)
--validate       # Validate configuration file
--show-sources   # Show configuration sources (defaults, file, env vars)
Examples:
# Show all configuration
wealth config

# Validate configuration
wealth config --validate

# Debug configuration with source tracking
wealth config --show-sources
Sample Output (with --show-sources):
📋 Configuration Sources

Shows: default → file (config.toml) → env vars → ✓ final value

🎯 Trading Configuration:
  min_funding_spread:
    default:  0.0004
    file:     0.0005
    env:      0.0006
    ✓ final:  0.0006 ← using environment override

  max_position_usd:
    default:  10000
    ✓ final:  10000 ← using default
wealth license - Check License Status
✅ Status: Fully implemented
Check license status, validate connectivity, and show machine fingerprint for support.
Subcommands
check - Check License Status
wealth license check
Displays:
- License configuration (account, product)
- Machine fingerprint
- License validity status
- Expiration information (if available)
Example Output:
📋 License Information:
   Account:     fcaa9cfa-8236-4270-81b6-da3ddd238d70
   Product:     6f04c081-10d2-4222-8310-b314d82ac410
   Machine ID:  a1b2c3d4-e5f6-7890-abcd-ef1234567890

✅ License is valid!
show-fingerprint - Show Machine Fingerprint
wealth license show-fingerprint
Displays your machine's unique identifier. Use this when:
- Contacting support about licensing issues
- Requesting additional machine activations
- Troubleshooting activation problems
Example Output:
📌 Machine ID: a1b2c3d4-e5f6-7890-abcd-ef1234567890

This unique identifier is used to activate your license on this machine.
Share this ID with support when requesting license assistance.

License Status: ✅ Configured
Account: fcaa9cfa-8236-4270-81b6-da3ddd238d70
validate - Validate License Connectivity
wealth license validate
Performs comprehensive license validation:
- Tests connection to Keygen API
- Validates license configuration
- Checks machine activation status
- Provides detailed error messages with troubleshooting guidance
Example Output (Success):
🔍 Configuration:
   Account:  fcaa9cfa-8236-4270-81b6-da3ddd238d70
   Product:  6f04c081-10d2-4222-8310-b314d82ac410
   API URL:  https://api.keygen.sh

🖥️  Machine ID: a1b2c3d4-e5f6-7890-abcd-ef1234567890

📡 Connecting to Keygen API...
✅ License validation successful!

Your license is active and this machine is properly configured.
Example Output (Error with Guidance):
❌ License validation failed: Network error contacting license server

💡 Network Issue:
   - Check internet connectivity
   - Verify firewall allows HTTPS to api.keygen.sh
   - Check proxy configuration if applicable
Environment Variables:
WEALTH__LICENSING__LICENSE_KEY- Your license key (required)WEALTH__LICENSING__API_URL- Custom Keygen API URL (optional, debug builds only)
deactivate - Deactivate License from Current Machine
wealth license deactivate --confirm
Deactivates your license from the current machine, allowing you to transfer it to another machine.
Use Cases:
- Migrating to a new server
- Replacing hardware
- Switching between development and production machines
- Freeing up a machine activation slot
Safety Features:
- Requires
--confirmflag to prevent accidental deactivation - Shows warning and confirmation prompt without flag
- Verifies license status before deactivation
- Provides clear next steps after deactivation
Example Usage:
# Show warning and instructions (safe dry-run)
wealth license deactivate

# Actually deactivate (requires confirmation)
wealth license deactivate --confirm
Example Output (Dry-Run):
⚠️  License Deactivation

This will deactivate your license from this machine.
You can reactivate it on another machine by running the bot there.

To confirm, run:
  wealth license deactivate --confirm
Example Output (Successful Deactivation):
📋 Deactivation Details:
  Account:     fcaa9cfa-8236-4270-81b6-da3ddd238d70
  Product:     6f04c081-10d2-4222-8310-b314d82ac410
  Machine ID:  a1b2c3d4-e5f6-7890-abcd-ef1234567890

🔍 Finding machine activation...
✅ License found: lic_1234567890

✅ License deactivated successfully!

📦 Your license is now available for activation on another machine.
  To activate on a new machine:
  1. Copy your license key to the new machine
  2. Set WEALTH__LICENSING__LICENSE_KEY environment variable
  3. Run: wealth run
  (The license will activate automatically)
Example Output (Already Deactivated):
ℹ️  License is not currently activated on this machine.

No action needed - you can activate on another machine anytime.
Error Handling:
- Invalid license key → Clear error message
- Network issues → Troubleshooting guidance
- Already deactivated → Informational message
- License not found → Verification steps
Environment Variables:
WEALTH__LICENSING__LICENSE_KEY- Your license key (required)
Notes:
- Deactivation is immediate and cannot be undone
- After deactivation, simply run the bot on a new machine to reactivate
- No limit on number of deactivations/reactivations
- Your license key remains valid after deactivation
Related Documentation:
- Licensing Guide - Complete licensing documentation
- Troubleshooting - Common licensing issues
wealth credentials - Manage Encrypted Credentials
Manage encrypted credential storage.
Subcommands
create - Create New Encrypted Config
wealth credentials create
Creates .credentials.salt and credentials.encrypted.json files.
add - Add Exchange Credentials
wealth credentials add <EXCHANGE> [OPTIONS]
Arguments:
<EXCHANGE>- Exchange name (binance, bybit, hyperliquid, aster)
Options:
--api-key <KEY>- API key (or master wallet/vault address for HyperLiquid)--secret-key <KEY>- Secret key (or API wallet private key for HyperLiquid)--testnet- Use testnet mode--vault-mode- HyperLiquid only: Enable vault mode (API_KEY is vault address)
Security Recommendation:
For maximum security, omit the --api-key and --secret-key options to use interactive prompts. This prevents secrets from appearing in shell history.
# Recommended: Interactive mode (secrets not in shell history)
wealth credentials add binance
# Prompts for:
#   Enter API key: <your-api-key>
#   Enter secret key (hidden): <your-secret-key>

# Less secure: CLI arguments (visible in shell history)
wealth credentials add binance --api-key YOUR_API_KEY --secret-key YOUR_SECRET_KEY
HyperLiquid Examples:
# Direct wallet mode (simplest) - interactive
wealth credentials add hyperliquid
# API key: 0xYourWalletAddress
# Secret key: 0xYourPrivateKey

# API wallet (subkey) mode (recommended) - interactive
wealth credentials add hyperliquid
# API key: 0xYourMasterWalletAddress
# Secret key: 0xAPIWalletPrivateKey

# Vault mode - interactive
wealth credentials add hyperliquid --vault-mode
# API key: 0xVaultAddress
# Secret key: 0xAPIWalletPrivateKey
verify - Verify Encrypted Credentials
wealth credentials verify
# 🔐 Enter credentials passphrase: ********
You'll be prompted for the passphrase interactively, or set CREDENTIALS_PASSPHRASE environment variable to skip the prompt.
list - List Configured Exchanges
wealth credentials list
remove - Remove Credentials
wealth credentials remove <EXCHANGE> --confirm
Safety: Requires --confirm flag.
wealth health - System Health Checks
✅ Status: Fully implemented
Check system health including exchange connectivity, WebSocket connections, and data freshness.
Usage:
wealth health [OPTIONS]
Options:
--exchanges     # Check exchange API connectivity (validates credentials)
--websockets    # Check WebSocket connectivity
--all           # Run all health checks
Examples:
# Check all health indicators
wealth health --all

# Check only exchange connectivity
wealth health --exchanges

# Check only WebSocket connections
wealth health --websockets
Output Format:
🏥 Health Check

📡 Exchange API Connectivity:
  🟡 BinanceFutures ... ✅ OK (142ms)
  🟠 BybitPerpetualsUsd ... ✅ OK (98ms)
  🔵 HyperLiquid ... ✅ OK (76ms)

  Summary: 3/3 exchanges accessible

🔌 WebSocket Connectivity:
  ⚠️  WebSocket health checks require running bot instance
  💡 Tip: Use 'curl http://localhost:9090/ready' while bot is running

✅ Health check complete
wealth balance - Display Account Balances
✅ Status: Fully implemented
Usage:
wealth balance [OPTIONS]
Options:
--exchange <NAME>    # Filter by exchange (binance, bybit, hyperliquid, aster)
--total              # Show total USD equivalent balance
--detailed           # Show detailed asset breakdown with total and free balances
Examples:
# View all balances
wealth balance

# View specific exchange
wealth balance --exchange binance

# Show total USD equivalent
wealth balance --total

# Detailed breakdown
wealth balance --detailed
Output Format:
💰 Account Balances

📈 BinanceFutures
  USDT: 5000.00

📈 BybitPerpetualsUsd
  USDT: 3000.00

━━━━━━━━━━━━━━━━━━━━━━━━━━━━━━━━━━━━━━━━
💵 Total Available (USDT equivalent): $8000.00
wealth positions - Display Current Positions
✅ Status: Fully implemented
Display current open positions across exchanges with funding rates and projected PnL. Automatically uses the bot's HTTP API when running for fast access to in-memory state.
Usage:
wealth positions [OPTIONS]
Options:
--exchange <NAME>    # Filter by exchange (binance, bybit, hyperliquid, aster)
--pnl                # Show P&L summary for all positions
--funding            # Show detailed funding rate breakdown
Smart Data Fetching:
- Bot running: Uses
/api/positionsand/api/funding_rates(fast, no API quota) - Bot not running: Queries exchanges directly (slower, uses API quota)
- API port is configurable (default: 9090, set via
WEALTH__OBSERVABILITY__METRICS_PORT)
Examples:
# View all positions (uses API if bot running)
wealth positions

# View positions on specific exchange
wealth positions --exchange binance

# Show detailed funding breakdown
wealth positions --funding

# Show with P&L summary
wealth positions --pnl

# Combine funding and P&L
wealth positions --funding --pnl
Output Format:
Positions table now includes funding rate information by default:
📊 Current Positions

  🔗 Using live data from running bot instance

# OR (if bot not running):

📊 Current Positions

  📡 Querying exchanges directly (bot not running or API unavailable)

╭──────────┬──────────┬───────┬────────┬─────────────┬────────────┬────────────────┬──────────────┬──────────╮
│ Exchange │ Symbol   │ Side  │ Size   │ Entry Price │ Mark Price │ Unrealized PnL │ Funding Rate │ Est. 8h  │
├──────────┼──────────┼───────┼────────┼─────────────┼────────────┼────────────────┼──────────────┼──────────┤
│ binance  │ BTCUSDT  │ LONG  │ 0.1000 │ $95000.00   │ $96000.00  │ $100.00        │ 0.0100%      │ -9.50    │
│ bybit    │ BTCUSDT  │ SHORT │ 0.1000 │ $95200.00   │ $96000.00  │ -$80.00        │ 0.0150%      │ +14.28   │
╰──────────┴──────────┴───────┴────────┴─────────────┴────────────┴────────────────┴──────────────┴──────────╯
Columns:
- Exchange: Exchange name
- Symbol: Trading pair
- Side: LONG or SHORT
- Size: Position size in base asset
- Entry Price: Average entry price
- Mark Price: Current mark price
- Unrealized PnL: Unrealized profit/loss
- Funding Rate: Current funding rate percentage
- Est. 8h: Estimated funding payment in next 8h (+ = receive, - = pay)
With --funding flag:
Additional detailed summary section:
📈 Summary:
  Total Long Notional:  $9600.00
  Total Short Notional: $9600.00
  Net Exposure:         $0.00

💰 Funding Rate PnL (Projected):
  binance BTCUSDT LONG: 0.0100% → -$9.50 USD (next 8h)
  bybit BTCUSDT SHORT: 0.0150% → +$14.28 USD (next 8h)

  Projected Next 8h:    +$4.78 USD
  Est. Daily Projected: +$14.34 USD (3 payments/day)

💹 Funding Collected (Actual):
  BTCUSDT (binance ↔ hyperliquid): +$15.50 (held 2d 5h)
  ETHUSDT (bybit ↔ binance): +$8.25 (held 1d 12h)

  Total Funding Collected: +$23.75
Funding PnL Details:
- Projected: Estimated funding payment for next 8h period based on current rates
- Actual (Collected): Real funding fees collected from active arbitrage positions (requires bot to be running)
- Long positions pay funding when rate is positive (negative PnL)
- Short positions receive funding when rate is positive (positive PnL)
- Funding collected is tracked by the bot's
FundingTrackerbackground task
Note:
- Position data fetched from bot's API or directly from exchange APIs
- Funding rates always displayed in table for immediate visibility
- Use
--fundingflag for detailed breakdown and projections
wealth funding - Display Funding Rates
✅ Status: Fully implemented
Display current funding rates, spreads, and calculate funding PnL for active positions.
Usage:
wealth funding [OPTIONS]
Options:
--symbol <SYMBOL>    # Filter by specific symbol (e.g., BTCUSDT)
--spreads            # Show funding rate spreads between exchanges
--pnl                # Show PnL from funding rates for current positions
--history            # Show historical funding rates (not yet implemented)
Note: The
--historyflag is reserved for future implementation of historical funding rate analysis.
Examples:
# View all funding rates
wealth funding

# View funding rate for specific symbol
wealth funding --symbol BTCUSDT

# Show spreads between exchanges
wealth funding --spreads

# Show funding rate PnL for current positions
wealth funding --pnl

# Combine spreads and PnL
wealth funding --spreads --pnl
Output Format:
📈 Funding Rates

┌─────────────┬───────────────┬────────────┬──────────────────────┐
│ Symbol      │ Exchange      │ Rate       │ Next Funding         │
├─────────────┼───────────────┼────────────┼──────────────────────┤
│ BTCUSDT     │ Binance       │    0.0100% │ in 5h 23m            │
│ BTCUSDT     │ Bybit         │    0.0500% │ in 5h 23m            │
│             │ Spread: 0.0400% (Bybit - Binance)                  │
└─────────────┴───────────────┴────────────┴──────────────────────┘

💰 Funding Rate PnL:
  Binance BTCUSDT LONG (0.5000 @ $95000.00): 0.0100% → -$4.75 USD (8h)
  Bybit BTCUSDT SHORT (0.5000 @ $95000.00): 0.0500% → +$23.75 USD (8h)

  Net 8h Funding:       +$19.00 USD
  Est. Daily Funding:   +$57.00 USD (3 payments/day)
  Est. Monthly Funding: +$1710.00 USD (30 days)
PnL Calculation:
- Long positions: Pay funding when rate is positive (cost), receive when negative (income)
- Short positions: Receive funding when rate is positive (income), pay when negative (cost)
- Formula:
funding_payment = notional_value × funding_rate / 100 - Notional value:
position_size × entry_price
Note: The --pnl flag fetches both funding rates and current positions from all configured exchanges to calculate expected funding payments.
wealth close - Close Positions
✅ Status: Fully implemented
Close open positions on exchanges with reduce-only market orders.
Usage:
wealth close [OPTIONS] --confirm
Options:
--exchange <NAME>    # Close positions on specific exchange (binance, bybit, hyperliquid, aster)
--symbol <SYMBOL>    # Close positions for specific symbol (e.g., BTCUSDT)
--all                # Close all positions (if --symbol not specified)
--confirm            # Required confirmation flag (safety)
Examples:
# Close all positions on Binance
wealth close --exchange binance --all --confirm

# Close specific symbol on all exchanges
wealth close --symbol BTCUSDT --all --confirm

# Close all positions on all exchanges
wealth close --all --confirm

# Close specific symbol on specific exchange
wealth close --exchange bybit --symbol ETHUSDT --confirm
Output Format:
🔴 Closing Positions

📊 Checking BinanceFutures positions...
  Found 2 position(s) to close:
    BTCUSDT Long 0.1 @ 35000.00 (PnL: $125.50)
      ✅ Closed (Order ID: 12345678)
    ETHUSDT Short 2.0 @ 2000.00 (PnL: $45.20)
      ✅ Closed (Order ID: 12345679)

━━━━━━━━━━━━━━━━━━━━━━━━━━━━━━━━━━━━━━━━
✅ Successfully closed: 2
Safety Features:
- Requires
--confirmflag for all operations - Uses reduce-only market orders (never increases position)
- Skips dust positions automatically
- Detailed error reporting per position
Note: This command fetches current positions from exchanges and closes them immediately. For graceful shutdown with automatic position closing, use Ctrl+C instead.
wealth stats - Trading Statistics
✅ Status: Fully implemented
Display trading performance statistics from the in-memory performance history repository.
Usage:
wealth stats [OPTIONS]
Options:
--period <PERIOD>    # Time period: 1h, 24h, 7d, 30d, 90d, all (default: 24h)
--detailed           # Show detailed breakdown with recent trades
Examples:
# View last 24 hours (default)
wealth stats

# View last 7 days
wealth stats --period 7d

# View all-time with details
wealth stats --period all --detailed
Output Format:
📊 Trading Statistics

  📅 Period: Last 7 Days (2025-11-07 10:00 - 2025-11-14 10:00)

  📈 Performance Summary:
     Total Trades: 42
     Winning Trades: 35 (83%)
     Losing Trades: 7
     Total P&L: $1,234.56
     Avg Win: $52.30
     Avg Loss: -$12.45
     Sharpe Ratio: 2.15

  � Recent Trades: (with --detailed)
     1. ✅ BTCUSDT → 2025-11-14 09:45 | $65.23 | WIN
     2. ✅ ETHUSDT → 2025-11-14 08:30 | $42.10 | WIN
     ...
Note: Data is collected while the bot is running from the InMemoryPerformanceHistoryRepository. Not persisted between restarts.
Important: Data Availability
The stats command displays data from an in-memory performance history repository. This has important implications:
- Data is not persisted: Trade statistics are stored in memory and reset when the bot restarts
- CLI creates new instance: Each CLI command creates a fresh, empty repository instance
- Bot must be running: To see meaningful data, the bot must be actively running and have executed trades
- Consider external monitoring: For persistent statistics, use the Prometheus metrics endpoint with Grafana or similar tools
If you see "No trading history found", this is expected behavior – it means:
- The bot hasn't executed any trades in the specified period, OR
- The bot was restarted (clearing in-memory history), OR
- You're running the CLI while the bot is stopped
wealth profit - Total Profit Tracking
✅ Status: Fully implemented
Display cumulative profit/loss tracking with realized and unrealized PnL.
Usage:
wealth profit [OPTIONS]
Options:
--period <PERIOD>         # Time period: 1h, 24h, 7d, 30d, 90d, all (default: all)
--by-exchange             # Show breakdown by exchange
--by-symbol               # Show breakdown by symbol
--include-unrealized      # Include unrealized PnL from open positions
Examples:
# View all-time profit (default)
wealth profit

# View last 7 days with exchange breakdown
wealth profit --period 7d --by-exchange

# View total profit including unrealized PnL
wealth profit --include-unrealized

# Detailed view with all breakdowns
wealth profit --by-exchange --by-symbol --include-unrealized
Output Format:
💰 Profit Tracking

  📅 Period: All Time (1970-01-01 00:00 - 2025-11-28 12:00)

  📊 Realized Profit/Loss (Closed Positions):
     Total Trades: 156
     Total Realized PnL: $2847.92

  📈 Breakdown by Exchange: (with --by-exchange)
     binance (LONG): +$1523.45
     hyperliquid (SHORT): +$1324.47
     ...

  📈 Breakdown by Symbol: (with --by-symbol)
     BTCUSDT: +$1245.30
     ETHUSDT: +$892.15
     SOLUSDT: +$710.47

  💹 Funding Rate Profit/Loss (Active Positions):
     Active Arbitrage Pairs: 3
     Total Funding Collected: +$156.78

     Per-Position Breakdown: (with --by-symbol)
       BTCUSDT (binance ↔ hyperliquid): +$85.50
       ETHUSDT (bybit ↔ binance): +$45.28
       SOLUSDT (binance ↔ hyperliquid): +$26.00

  📊 Unrealized Profit/Loss (Open Positions): (with --include-unrealized)
     Open Positions: 4
     Total Unrealized PnL: $123.45
       binance BTCUSDT LONG: +$45.20
       hyperliquid BTCUSDT SHORT: +$78.25

  💵 Total Profit/Loss:
     Realized PnL:       $2847.92
     Funding Collected:  $156.78
     Unrealized PnL:     $123.45
     ─────────────────────────────
     Total PnL:          +$3128.15
Notes:
- Realized PnL comes from
InMemoryPerformanceHistoryRepository(closed trades) - Funding Collected shows actual funding fees received from active arbitrage positions (requires bot to be running)
- Important: The CLI creates a new repository instance, so it will show zero trades unless the bot is configured with persistent storage that the CLI can access
- Unrealized PnL requires bot to be running (fetched via API)
- Data is collected during bot runtime and not persisted between restarts
- Use
--include-unrealizedto see current position PnL - Exchange breakdown splits PnL equally (50/50) between long and short legs of arbitrage pairs
Data Availability Summary:
| Data Type | Bot Running | Bot Stopped |
|---|---|---|
| Realized PnL | Shows current session trades | Always $0.00 |
| Funding Collected | Shows actual funding fees | "Bot not running" message |
| Unrealized PnL | Shows live position PnL | "Bot not running" message |
For persistent profit tracking across restarts, consider:
- Using Grafana dashboards with Prometheus metrics (recommended)
- Implementing external trade logging
wealth completions - Generate Shell Completions
✅ Status: Fully implemented
Usage:
wealth completions <SHELL>
Supported Shells: bash, zsh, fish, powershell, elvish
Installation Examples:
Bash:
wealth completions bash > ~/.local/share/bash-completion/completions/wealth
# OR
echo 'source <(wealth completions bash)' >> ~/.bashrc
Zsh:
mkdir -p ~/.zfunc
wealth completions zsh > ~/.zfunc/_wealth
echo 'fpath=(~/.zfunc $fpath)' >> ~/.zshrc
Fish:
wealth completions fish > ~/.config/fish/completions/wealth.fish
wealth init - Initialize Configuration
✅ Status: Fully implemented
Generate a new configuration file from the embedded example template. This is the recommended way to create your initial config.toml.
Usage:
wealth init [OPTIONS]
Options:
-o, --output <FILE>    # Output path (default: config.toml)
--force                # Overwrite existing file without prompting
Examples:
# Create config.toml in current directory
wealth init

# Create with custom filename
wealth init -o config.production.toml

# Create in subdirectory (creates parent dirs if needed)
wealth init -o configs/my-config.toml

# Overwrite existing config
wealth init --force
Output:
✓ Created configuration file: config.toml

Next steps:
  1. Edit config.toml to configure your trading parameters
  2. Set up credentials: wealth credentials create
  3. Verify setup: wealth verify --check-credentials
  4. Start trading: wealth run
Notes:
- The example configuration is embedded in the binary at compile time
- Creates parent directories automatically if they don't exist
- Fails safely if file exists (use
--forceto overwrite) - Generated config includes all available options with documentation comments
Configuration
Custom Config Files
# Use custom configuration file
wealth run --config config.production.json
Environment Variables
All CLI options can be set via environment variables:
export WEALTH__EXECUTION__MODE=live
export WEALTH__OBSERVABILITY__METRICS_PORT=8080
wealth run
Logging Levels
# Default: INFO level
wealth run

# Debug level
wealth run --verbose

# Trace level
wealth run --trace

# Via environment
export RUST_LOG=debug
wealth run
Exit Codes
0- Success1- General error2- Configuration error130- Interrupted by Ctrl+C (graceful shutdown)
See Also
- HTTP API Reference - REST API for automation and scripting
- Configuration Guide - Environment variables and settings
- Security Guide - Encrypted credentials management
- Getting Started - Installation and first run
HTTP API Reference
REST API for querying bot state and automating workflows
Overview
The Wealth trading bot exposes an HTTP API alongside the metrics server for querying live bot state. This enables:
- Automation scripts to monitor positions and balances
- Custom dashboards to display real-time data
- Alert integrations with external monitoring systems
- Programmatic position management workflows
Base URL
http://localhost:9090
The port is configurable via WEALTH__OBSERVABILITY__METRICS_PORT (default: 9090).
Data Freshness
| Endpoint | Data Source | API Quota Impact |
|---|---|---|
/api/positions | Live exchange fetch | Consumes quota |
/api/funding_rates | Cached repository | None (fast) |
/api/balances | Cached repository | None (may be stale) |
/api/arbitrage_positions | Cached repository | None (fast) |
Endpoints
GET /api/positions
Fetches current open positions directly from exchanges. This endpoint queries each configured exchange in parallel.
⚠️ Note: This endpoint consumes exchange API quota. Use
/api/arbitrage_positionsfor cached data without API impact.
Request:
curl http://localhost:9090/api/positions
Response:
{
  "positions": [
    {
      "exchange": "BinanceFutures",
      "position": {
        "symbol": "BTCUSDT",
        "side": "Long",
        "quantity": "0.1",
        "entry_price": "95000",
        "mark_price": "96000",
        "unrealized_pnl": "100",
        "leverage": "10",
        "liquidation_price": "86000"
      }
    },
    {
      "exchange": "Bybit",
      "position": {
        "symbol": "BTCUSDT",
        "side": "Short",
        "quantity": "0.1",
        "entry_price": "95100",
        "mark_price": "96000",
        "unrealized_pnl": "-90",
        "leverage": "10",
        "liquidation_price": "104500"
      }
    }
  ],
  "timestamp": "2024-12-27T10:30:00Z"
}
Response Fields:
| Field | Type | Description |
|---|---|---|
positions | array | List of positions with exchange info |
positions[].exchange | string | Exchange name (BinanceFutures, Bybit, HyperLiquid, Aster) |
positions[].position.symbol | string | Trading pair symbol |
positions[].position.side | string | Long or Short |
positions[].position.quantity | decimal | Position size in base asset |
positions[].position.entry_price | decimal | Average entry price |
positions[].position.mark_price | decimal | Current mark price |
positions[].position.unrealized_pnl | decimal | Unrealized P&L in quote asset |
positions[].position.leverage | decimal | Current leverage |
positions[].position.liquidation_price | decimal | Liquidation price (null if not available) |
timestamp | datetime | ISO 8601 timestamp of response |
Error Handling:
The endpoint returns partial results if some exchanges fail. Only returns an error if all exchanges fail:
{
  "error": "Failed to fetch positions from all exchanges"
}
Check logs for details on individual exchange failures.
GET /api/funding_rates
Returns cached funding rates from the in-memory repository. Fast and does not consume API quota.
Request:
curl http://localhost:9090/api/funding_rates
Response:
{
  "rates": [
    {
      "exchange": "BinanceFutures",
      "symbol": "BTCUSDT",
      "rate": "0.0001",
      "next_funding_time": "2024-12-27T16:00:00Z",
      "last_updated": "2024-12-27T10:25:00Z"
    },
    {
      "exchange": "Bybit",
      "symbol": "BTCUSDT",
      "rate": "-0.00015",
      "next_funding_time": "2024-12-27T16:00:00Z",
      "last_updated": "2024-12-27T10:25:30Z"
    },
    {
      "exchange": "HyperLiquid",
      "symbol": "BTCUSDT",
      "rate": "0.00008",
      "next_funding_time": "2024-12-27T11:00:00Z",
      "last_updated": "2024-12-27T10:29:00Z"
    }
  ],
  "timestamp": "2024-12-27T10:30:00Z"
}
Response Fields:
| Field | Type | Description |
|---|---|---|
rates | array | List of funding rate entries |
rates[].exchange | string | Exchange name |
rates[].symbol | string | Trading pair symbol |
rates[].rate | decimal | Current funding rate (e.g., 0.0001 = 0.01%) |
rates[].next_funding_time | datetime | Next funding settlement time |
rates[].last_updated | datetime | When this rate was last fetched |
timestamp | datetime | ISO 8601 timestamp of response |
Note: Funding rate values are in decimal form. Multiply by 100 to get percentage (e.g., 0.0001 = 0.01%).
GET /api/balances
Returns cached balances from the balance repository. Fast response but may be slightly stale.
Request:
curl http://localhost:9090/api/balances
Response:
{
  "balances": [
    {
      "exchange": "BinanceFutures",
      "asset": "USDT",
      "free": "10000",
      "total": "12000",
      "wallet_balance": "11500",
      "reserved": "2000"
    },
    {
      "exchange": "Bybit",
      "asset": "USDT",
      "free": "8500",
      "total": "8500",
      "wallet_balance": "8200",
      "reserved": "0"
    },
    {
      "exchange": "HyperLiquid",
      "asset": "USDC",
      "free": "5000",
      "total": "7500",
      "wallet_balance": "7000",
      "reserved": "2500"
    }
  ],
  "timestamp": "2024-12-27T10:30:00Z"
}
Response Fields:
| Field | Type | Description |
|---|---|---|
balances | array | List of balance entries |
balances[].exchange | string | Exchange name |
balances[].asset | string | Asset symbol (e.g., USDT, USDC) |
balances[].free | decimal | Available balance for trading (use for position sizing) |
balances[].total | decimal | Total balance including unrealized P&L |
balances[].wallet_balance | decimal | Deposited capital (stable, excludes unrealized P&L) |
balances[].reserved | decimal | Balance locked in orders/positions |
timestamp | datetime | ISO 8601 timestamp of response |
Balance Types:
freeis the correct balance for position sizing as it respects locked margin and automatically de-risks when positions are underwater.wallet_balanceprovides stable deposited capital for reporting/tracking that doesn't fluctuate with unrealized P&L.
GET /api/arbitrage_positions
Returns cached arbitrage positions with cumulative funding collected. This is the recommended endpoint for monitoring active arbitrage pairs.
Request:
curl http://localhost:9090/api/arbitrage_positions
Response:
{
  "positions": [
    {
      "symbol": "BTCUSDT",
      "long_exchange": "Bybit",
      "short_exchange": "BinanceFutures",
      "entry_spread": "0.00025",
      "position_size": "0.1",
      "entry_time": "2024-12-26T08:00:00Z",
      "funding_collected": "12.50"
    },
    {
      "symbol": "ETHUSDT",
      "long_exchange": "HyperLiquid",
      "short_exchange": "BinanceFutures",
      "entry_spread": "0.0003",
      "position_size": "1.5",
      "entry_time": "2024-12-25T16:00:00Z",
      "funding_collected": "28.75"
    }
  ],
  "total_funding_collected": "41.25",
  "timestamp": "2024-12-27T10:30:00Z"
}
Response Fields:
| Field | Type | Description |
|---|---|---|
positions | array | List of active arbitrage positions |
positions[].symbol | string | Trading pair symbol |
positions[].long_exchange | string | Exchange holding long position |
positions[].short_exchange | string | Exchange holding short position |
positions[].entry_spread | decimal | Funding spread at entry |
positions[].position_size | decimal | Position size in base asset |
positions[].entry_time | datetime | When position was opened |
positions[].funding_collected | decimal | Cumulative funding collected (USD) |
total_funding_collected | decimal | Sum of all positions' funding |
timestamp | datetime | ISO 8601 timestamp of response |
Health Endpoints
In addition to the data API, the metrics server exposes health check endpoints for monitoring and container orchestration:
| Endpoint | Description | Use Case |
|---|---|---|
/health | Overall health status with details (JSON) | Human monitoring, dashboards |
/ready | Kubernetes readiness probe | K8s readiness gate |
/live | Kubernetes liveness probe | K8s container restart decisions |
/metrics | OpenTelemetry metrics info | OTLP configuration verification |
GET /health
Returns comprehensive health status including exchange connectivity and system metrics.
Request:
curl http://localhost:9090/health | jq
Response:
{
  "status": "healthy",
  "exchanges": {
    "binance": "connected",
    "bybit": "connected",
    "hyperliquid": "connected"
  },
  "uptime_seconds": 3600
}
Response Fields:
| Field | Type | Description |
|---|---|---|
status | string | Overall status: healthy, degraded, or unhealthy |
exchanges | object | Per-exchange connection status |
uptime_seconds | integer | Bot uptime in seconds |
Status Meanings:
healthy- All exchanges connected, bot operating normallydegraded- Some exchanges unavailable, bot still operatingunhealthy- Critical failure, bot not functioning
GET /ready
Kubernetes-style readiness probe. Returns HTTP 200 when the bot is ready to accept traffic.
Request:
curl -s -o /dev/null -w "%{http_code}" http://localhost:9090/ready
Response:
200 OK- Bot is ready (connected to at least one exchange)503 Service Unavailable- Bot is not ready (still initializing or all exchanges failed)
Body (when ready):
{
  "ready": true,
  "timestamp": "2024-12-27T10:30:00Z"
}
GET /live
Kubernetes-style liveness probe. Returns HTTP 200 if the bot process is alive and responsive.
Request:
curl -s -o /dev/null -w "%{http_code}" http://localhost:9090/live
Response:
200 OK- Bot is alive503 Service Unavailable- Bot is unresponsive (should trigger container restart)
Body:
{
  "alive": true,
  "timestamp": "2024-12-27T10:30:00Z"
}
GET /metrics
Returns information about the OpenTelemetry metrics configuration (not Prometheus scrape format).
Request:
curl http://localhost:9090/metrics | jq
Response:
{
  "status": "operational",
  "backend": "OpenTelemetry OTLP",
  "endpoint": "http://localhost:4317",
  "protocol": "gRPC"
}
Note: For Prometheus-style metrics, configure OTLP export to your observability backend (Grafana Cloud, etc.) and query metrics there. See Monitoring Guide for details.
Kubernetes Deployment Example
apiVersion: apps/v1
kind: Deployment
metadata:
  name: wealth-deployment
spec:
  replicas: 1
  selector:
    matchLabels:
      app: wealth
  template:
    metadata:
      labels:
        app: wealth
    spec:
      containers:
        - name: wealth
          image: ghcr.io/thiras/wealth:latest
          ports:
            - containerPort: 9090
          livenessProbe:
            httpGet:
              path: /live
              port: 9090
            initialDelaySeconds: 10
            periodSeconds: 30
          readinessProbe:
            httpGet:
              path: /ready
              port: 9090
            initialDelaySeconds: 5
            periodSeconds: 10
Usage Examples
Shell Scripts
Monitor total balance across exchanges:
#!/bin/bash
curl -s http://localhost:9090/api/balances | jq '
  .balances
  | group_by(.asset)
  | map({asset: .[0].asset, total: (map(.total | tonumber) | add)})
'
Get current funding spread for a symbol:
#!/bin/bash
SYMBOL="BTCUSDT"
curl -s http://localhost:9090/api/funding_rates | jq --arg sym "$SYMBOL" '
  .rates
  | map(select(.symbol == $sym))
  | sort_by(.rate)
  | {min: .[0], max: .[-1], spread: ((.[-1].rate | tonumber) - (.[0].rate | tonumber))}
'
Python Integration
import requests
from datetime import datetime

BASE_URL = "http://localhost:9090"

def get_positions():
    """Fetch current positions from all exchanges."""
    response = requests.get(f"{BASE_URL}/api/positions")
    response.raise_for_status()
    return response.json()

def get_arbitrage_summary():
    """Get arbitrage positions with funding collected."""
    response = requests.get(f"{BASE_URL}/api/arbitrage_positions")
    response.raise_for_status()
    data = response.json()

    print(f"Active positions: {len(data['positions'])}")
    print(f"Total funding collected: ${data['total_funding_collected']}")

    for pos in data['positions']:
        print(f"  {pos['symbol']}: {pos['long_exchange']} ↔ {pos['short_exchange']}, "
              f"funding: ${pos['funding_collected']}")

def check_funding_opportunity(symbol: str, min_spread: float = 0.0004):
    """Check if funding spread exceeds threshold."""
    response = requests.get(f"{BASE_URL}/api/funding_rates")
    response.raise_for_status()

    rates = [r for r in response.json()['rates'] if r['symbol'] == symbol]
    if len(rates) < 2:
        return None

    rates_sorted = sorted(rates, key=lambda x: float(x['rate']))
    spread = float(rates_sorted[-1]['rate']) - float(rates_sorted[0]['rate'])

    if spread >= min_spread:
        return {
            'symbol': symbol,
            'spread': spread,
            'long_exchange': rates_sorted[0]['exchange'],
            'short_exchange': rates_sorted[-1]['exchange']
        }
    return None

if __name__ == "__main__":
    get_arbitrage_summary()
Prometheus/Alertmanager Integration
While the bot exports native Prometheus metrics, you can also create custom scrapers:
# prometheus.yml
scrape_configs:
  - job_name: 'wealth-api'
    metrics_path: /metrics
    static_configs:
      - targets: ['localhost:9090']
For custom alerts based on API data, use a script with Alertmanager webhook receiver.
Rate Limiting
The HTTP API itself has no rate limiting. However:
/api/positionstriggers exchange API calls (subject to exchange rate limits)- Other endpoints use cached data with no external API impact
Recommendation: Poll /api/positions no more than once per minute. Use /api/arbitrage_positions for frequent monitoring.
Error Responses
All endpoints return standard HTTP status codes:
| Code | Meaning |
|---|---|
200 | Success |
500 | Internal error (check logs) |
Error responses include a message:
{
  "error": "Failed to fetch positions from all exchanges"
}
Configuration
Binding Address
By default, the API binds to all interfaces (0.0.0.0). For production, restrict to localhost:
[observability]
metrics_bind_address = "127.0.0.1"
metrics_port = 9090
Or via environment:
export WEALTH__OBSERVABILITY__METRICS_BIND_ADDRESS=127.0.0.1
Reverse Proxy
For external access, use a reverse proxy (nginx, Caddy) with authentication:
location /api/ {
    auth_basic "Wealth API";
    auth_basic_user_file /etc/nginx/.htpasswd;
    proxy_pass http://127.0.0.1:9090;
}
See Also
- CLI Reference - Command-line interface for the same data
- Monitoring & Metrics - Prometheus metrics and Grafana dashboards
- Configuration Guide - Server configuration options
TUI Dashboard
Interactive terminal interface for real-time monitoring and control
The Wealth Trading System includes a powerful terminal user interface (TUI) built with Ratatui. It provides real-time monitoring of your trading bot with an intuitive keyboard-driven interface.
Dashboard Navigation
flowchart LR
    subgraph Tabs["TUI Dashboard Tabs"]
        direction TB
        T1["📊 Dashboard<br/>Overview & Opportunities"]
        T2["📈 Positions<br/>Active Positions"]
        T3["🔗 Pairs<br/>Trading Pairs"]
        T4["💰 Funding<br/>Funding Rates"]
        T5["📊 Statistics<br/>Analytics"]
    end

    T1 --> T2
    T2 --> T3
    T3 --> T4
    T4 --> T5
    T5 -.-> T1

    style T1 fill:#e3f2fd
    style T2 fill:#e8f5e9
    style T3 fill:#fff3e0
    style T4 fill:#f3e5f5
    style T5 fill:#ffcdd2
Quick Start
# Run the TUI dashboard
wealth dashboard

# With dynamic pair discovery enabled
wealth dashboard --enable-discovery

# Custom refresh rate (for slow connections)
wealth dashboard --tick-rate 500
Building with TUI Support
The TUI feature must be enabled at compile time:
cargo build --release --features tui
Pre-built binaries from GitHub releases include TUI support by default.
Header Bar
The top header bar displays key metrics at a glance:
| Metric | Description |
|---|---|
| Status | Bot state (Running, Paused, Starting, Shutting Down) with active pair count |
| Bal | Deposited capital across all exchanges (stable, excludes unrealized P&L) |
| Fund | Session funding collected from all positions (including closed) |
| Fees | Session trading fees paid |
| Net | Session cash flow from funding operations (Funding − Fees) |
| Next(1h/8h) | Countdown to next funding window (1h for HyperLiquid, 8h for others) |
Note on Header vs Stats Tab: The header's "Net" shows funding minus fees only (cash flow from funding operations). The Stats tab's "Total P&L" includes price spread gains/losses as well, providing the complete P&L picture.
Dashboard Tabs
The dashboard has six main tabs, accessible with Tab and Shift+Tab:
📊 Dashboard Tab
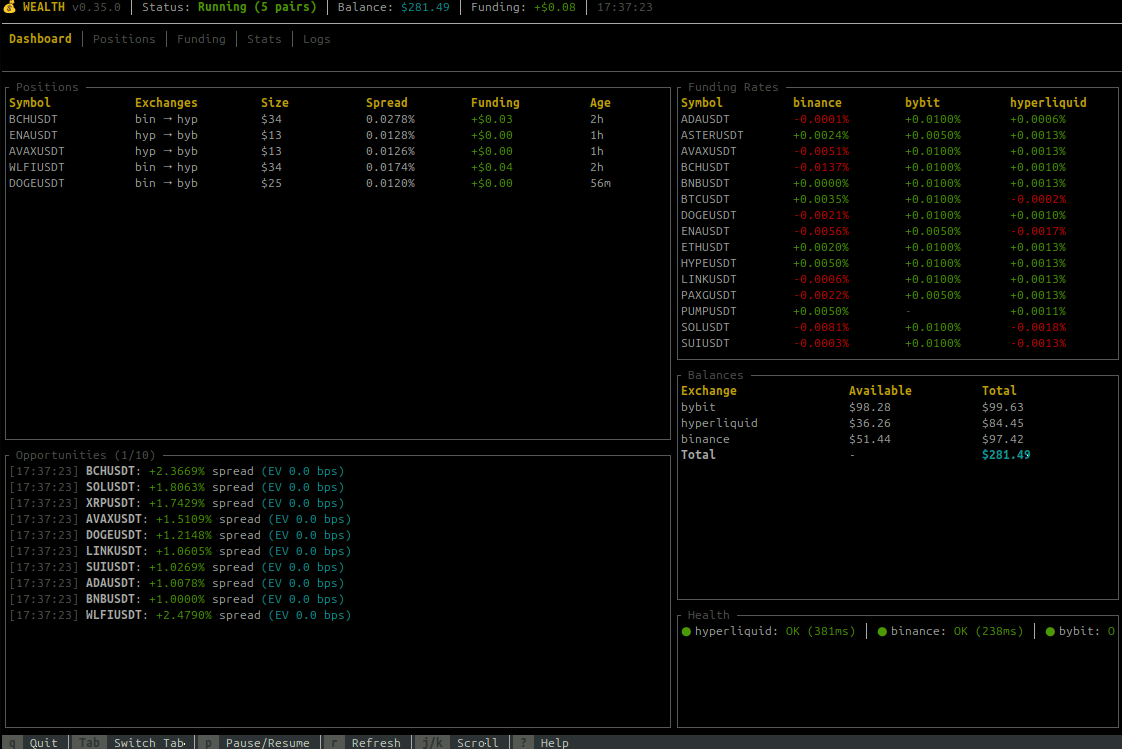
The overview tab shows:
- Bot Status - Running state, uptime, mode (paper/live)
- Health Summary - Exchange connectivity, WebSocket status
- Key Metrics - Total P&L, open positions, funding collected
- Recent Opportunities - Latest arbitrage opportunities with individual funding rates and EV
The opportunities panel displays:
- Validity indicator: Shows whether an opportunity meets trading thresholds
✓(green) - Executed opportunity●(cyan) - Valid opportunity (meets spread and EV thresholds)○(gray) - Invalid opportunity (below thresholds, shown for market context)
- Quality stars: Premium opportunities show ★★★ (gold) or ★★ (yellow)
- Symbol and exchange pair (long/short)
- Individual funding rates per leg (color-coded by magnitude)
- Leverage - Configured leverage for this symbol (e.g., "10x") or "max" if not configured
- Spread percentage
- Expected Value (EV) estimate
The title shows counts: Opportunities (1/50) [3● 1✓] means position 1 of 50, 3 valid opportunities, 1 executed.
📈 Positions Tab
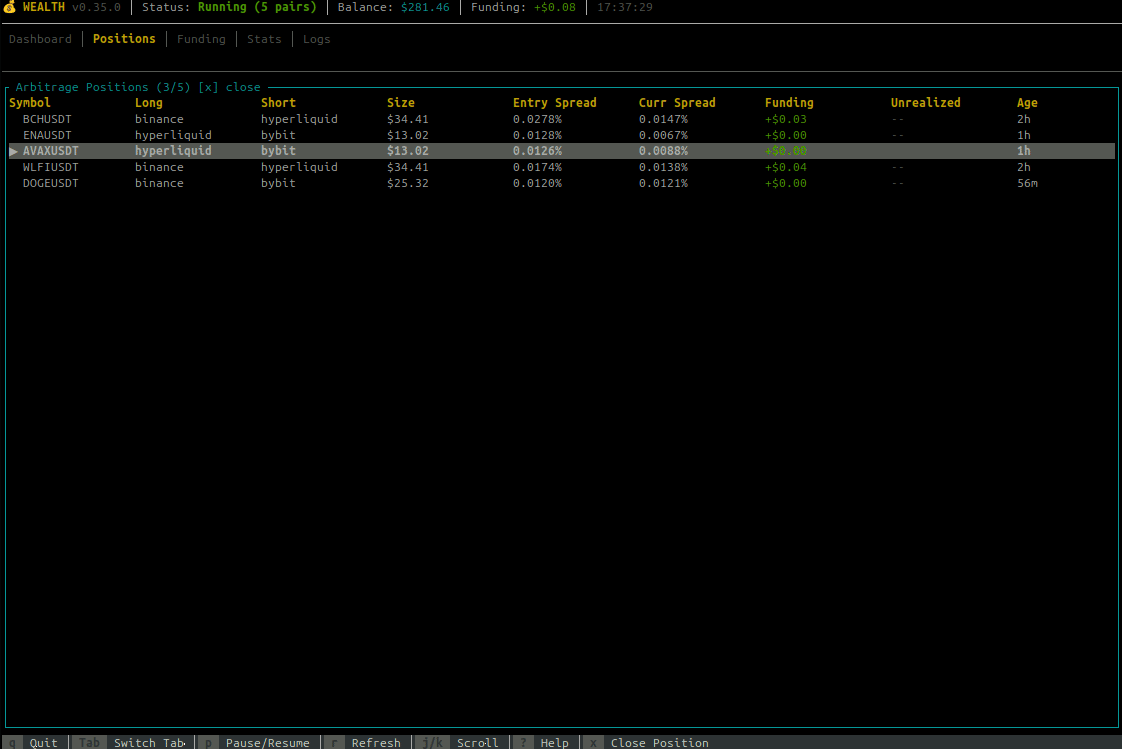
Monitor your active positions with comprehensive metrics and risk indicators:
Column Reference (Full View)
| Column | Description |
|---|---|
| Symbol | Trading pair with selection indicator (▶) |
| S | Status indicator (see below) |
| Route | Exchange pair (e.g., "Bin→Byb" for Binance→Bybit) |
| Size | Position size in USD |
| Lev | Leverage used (e.g., "10x") or "—" for legacy |
| Net | Net funding rate (short - long), what you earn per period |
| Spread | Current funding rate spread between exchanges |
| Trend | Sparkline showing spread history (last 8 data points) |
| APR | Annualized Percentage Rate based on current spread |
| PnL | Funding payments collected (USD) |
| ROI | Return on Investment percentage (fee-adjusted) |
| Next | Time until next funding payment |
| Liq% | Liquidation distance percentage |
| Age | Position duration |
Status Indicators (S Column)
| Icon | Meaning | Color |
|---|---|---|
| 🔒 | Position is held (bypass auto-close) | Yellow |
| ⚠ | Critical liquidation risk (<5%) | Red |
| ! | Warning liquidation risk (<10%) | Yellow |
| ✨ | Spread widening significantly | Green |
| ↓ | Spread narrowing significantly | Red |
| · | Normal status | Gray |
APR Color Coding
The APR column shows annualized returns with color-coded quality:
| APR Range | Color | Assessment |
|---|---|---|
| ≥100% | Bright Green | Exceptional |
| 50-100% | Green | Great |
| 20-50% | Cyan | Good |
| 10-20% | Yellow | Moderate |
| 0-10% | Gray | Low |
| <0% | Red | Negative |
Next Funding Countdown
Color-coded urgency for upcoming funding payments:
| Time Remaining | Color | Urgency |
|---|---|---|
| ≤5 minutes | Green | Imminent |
| ≤30 minutes | Yellow | Soon |
| ≤2 hours | Cyan | Upcoming |
| >2 hours | Gray | Normal |
Liquidation Distance (Liq%)
Estimated distance to liquidation based on leverage:
| Distance | Color | Risk Level |
|---|---|---|
| <5% | Red | Critical |
| 5-10% | Yellow | Warning |
| 10-20% | Cyan | Moderate |
| >20% | Green | Safe |
Spread Trend Sparkline
The Trend column displays a mini-chart using Unicode block characters (▁▂▃▄▅▆▇█) showing how the spread has evolved over recent data points. Rising patterns indicate improving opportunity, falling patterns suggest declining returns.
ROI Status Indicators
| Display | Meaning |
|---|---|
X.XX% | Actual ROI with confirmed fees from exchange |
X.XX%* | ROI with estimated fees (asterisk indicates estimation) |
... | Fees being fetched from exchange |
N/A | Legacy position without fee data |
Totals Row
A fixed summary row at the bottom shows portfolio totals:
- Total position count
- Combined size value
- Average APR (weighted by size)
- Total PnL
- Overall ROI percentage
Sorting Positions
Press s to cycle through sort columns:
Symbol → Size → PnL → ROI → Spread → APR → Age → Next Funding → (back to Symbol)
- The current sort column and direction (▲ ascending, ▼ descending) are shown in the title bar
- Direction toggles when cycling back to Symbol
Position Actions
Use j/k or arrow keys to select a position, then:
hto toggle hold status (held positions bypass auto-close)xto manually close the positionsto change sort order
Note: Scrolling is smart—arrow keys only scroll when there are more items than fit on screen.
🔗 Pairs Tab
Monitor and manage your trading pairs dynamically:
- Symbol - Trading pair symbol (e.g., BTCUSDT)
- Exchange - Exchange where the pair is tracked
- Status - Health status with color coding:
- 🟢 Healthy - Pair is functioning normally
- 🟡 Degraded - Some issues but still usable
- 🔴 Unhealthy - Pair has significant issues
- ⚪ Disabled - Pair has been manually disabled
- Enabled - Whether the pair is enabled for trading (✓ Yes / ✗ No)
- WS Disc - Consecutive WebSocket disconnection count
- API Err - Consecutive API error count
- Last FR Update - Time since last funding rate update
- Error - Last error message if any
Filtering Pairs
Press / to open the filter input. Type to filter pairs by symbol or exchange name:
- Filter matches both symbol (e.g., "BTC") and exchange (e.g., "binance")
- Case-insensitive matching
- Press
EnterorEscto close filter input - Press
cto clear the filter
The title bar shows the active filter: [filter: btc]
Sorting Pairs
Press s to cycle through sort columns:
Symbol → Exchange → Status → Enabled → WS Disc → API Err → (back to Symbol)
- The current sort column shows an indicator in the header (▲ ascending, ▼ descending)
- Direction toggles when cycling back to Symbol
Pair Management Controls
| Key | Action |
|---|---|
/ | Toggle filter mode (type to search) |
s | Cycle sort column |
c | Clear filter |
e | Toggle enable/disable for selected pair |
a | Add a new pair (opens input dialog) |
x or Del | Remove selected pair (with confirmation) |
j/k or ↑/↓ | Navigate between pairs |
Dynamic Pair Management
Pairs can be added or removed at runtime without restarting the bot:
- Enable/Disable: Temporarily stop trading a pair while keeping it tracked
- Add Pair: Add a new trading pair to the active list
- Remove Pair: Remove a pair from trading entirely
Note: Runtime changes are not persisted to config.toml. To permanently add/remove pairs, update your configuration file.
💰 Funding Tab
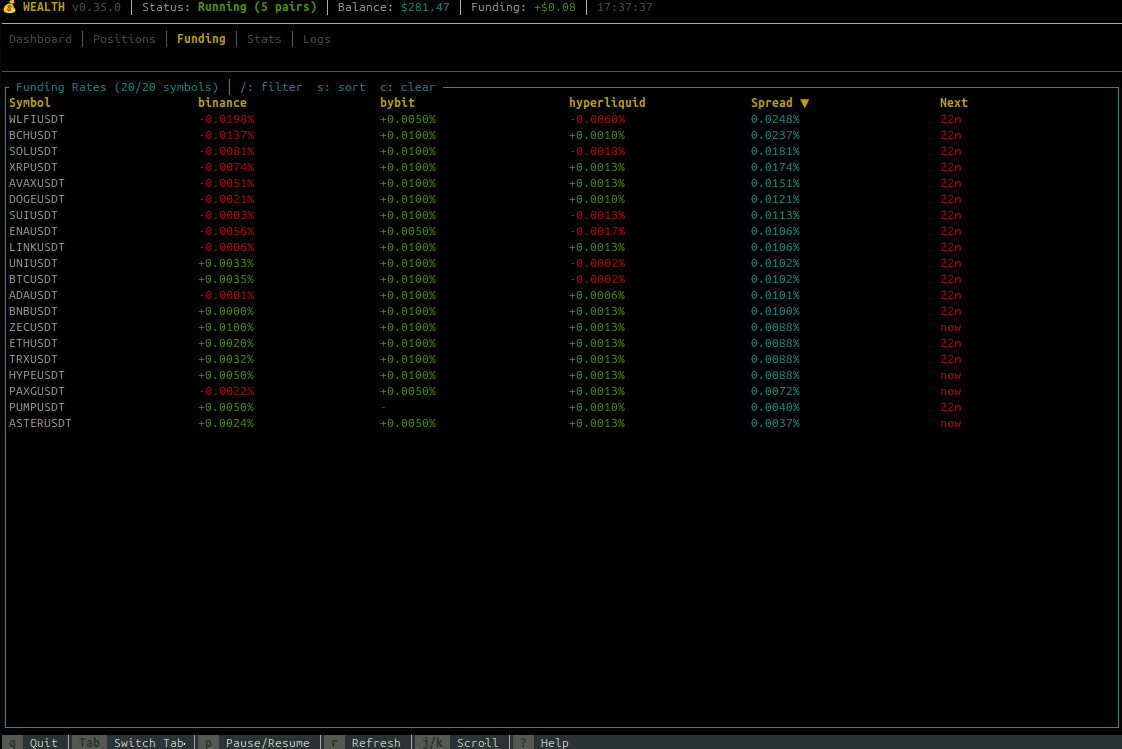
Live funding rates across all exchanges:
- Real-time rates updated every tick
- Color-coded rates (green for positive, red for negative)
- Annualized rate display
- Next funding countdown timer
- Spread between exchanges highlighted
Positions/Opportunities Rate Colors: The individual funding rates in Positions and Opportunities panels use a gradient color scheme:
- Bright green: ≤ -0.05% (receiving significant funding)
- Green: Negative rates (receiving)
- Yellow: 0% to < 0.05% (low cost)
- Orange: 0.05% to < 0.1% (moderate cost)
- Red: ≥ 0.1% (high cost)
Note: Scrolling is dynamic—only activates when funding pairs exceed the visible area.
📊 Statistics Tab
Comprehensive trading analytics and metrics dashboard with six sections.
Responsive Layout: The Stats tab adapts to terminal size:
- ≥35 rows: All sections visible
- 25-34 rows: Session Activity hidden
- <25 rows: Session Activity + Risk Metrics hidden
Overview, Performance, and Breakdown sections are always visible.
Overview Section
- Active Positions - Currently open positions count
- Position Value - Sum of all active position sizes in USD (not total wallet balance)
- Total P&L - Net session P&L including price spread gains, funding collected, and fees paid (with trend indicator ▲/▼)
- Uptime - Duration since bot/session start
Performance Section
- PnL % - Percentage profit/loss relative to position value
- Win Rate - Percentage of profitable trades (green ≥50%, yellow 30-50%, red <30%)
- Daily P&L - Extrapolated daily profit/loss based on current performance
- Funding Collected - Total funding payments received this session
- Fees Paid - Total trading fees paid this session (shown as negative cost)
Risk Metrics Section
- Max Drawdown - Peak-to-trough decline in USD (stat box, not gauge)
- Current DD - Current drawdown from last peak in USD (stat box)
- Portfolio Util - Positions used vs max allowed (visual gauge, shows X/Y)
- Exposure Util - Current exposure vs total balance (visual gauge, shows $XK/$YK or "N/A" if balance data unavailable)
Visual gauges provide at-a-glance risk assessment with color-coded thresholds:
- Green (<50%): Safe operating range
- Yellow (50-80%): Moderate utilization
- Cyan (≥80%): High utilization
Session Activity Section
- Trades Executed - Total trades executed this session (opens + closes)
- Pos. Opened - Positions opened this session
- Pos. Closed - Positions closed this session
- Funding Events - Number of funding payments received this session
Exchange Breakdown Section
A detailed table showing per-exchange statistics:
| Column | Description |
|---|---|
| Exchange | Exchange name |
| Long | Number of long positions on this exchange |
| Short | Number of short positions on this exchange |
| Value | Position exposure on this exchange (half of total position value since each position spans two exchanges) |
| Funding | Funding collected (split 50/50 between exchanges as approximation) |
Position Breakdown Section
Groups positions by exchange pair (e.g., "Binance ↔ Bybit") showing:
- Number of positions in that pair
- Combined size value
- Total funding collected from active positions (may differ from session total if positions were closed)
Scrollable with position indicator when content exceeds visible area.
P&L Trend Indicator: The Total P&L displays a colored arrow showing recent direction:
- ▲ (green): P&L increasing
- ▼ (red): P&L decreasing
�📜 Logs Tab
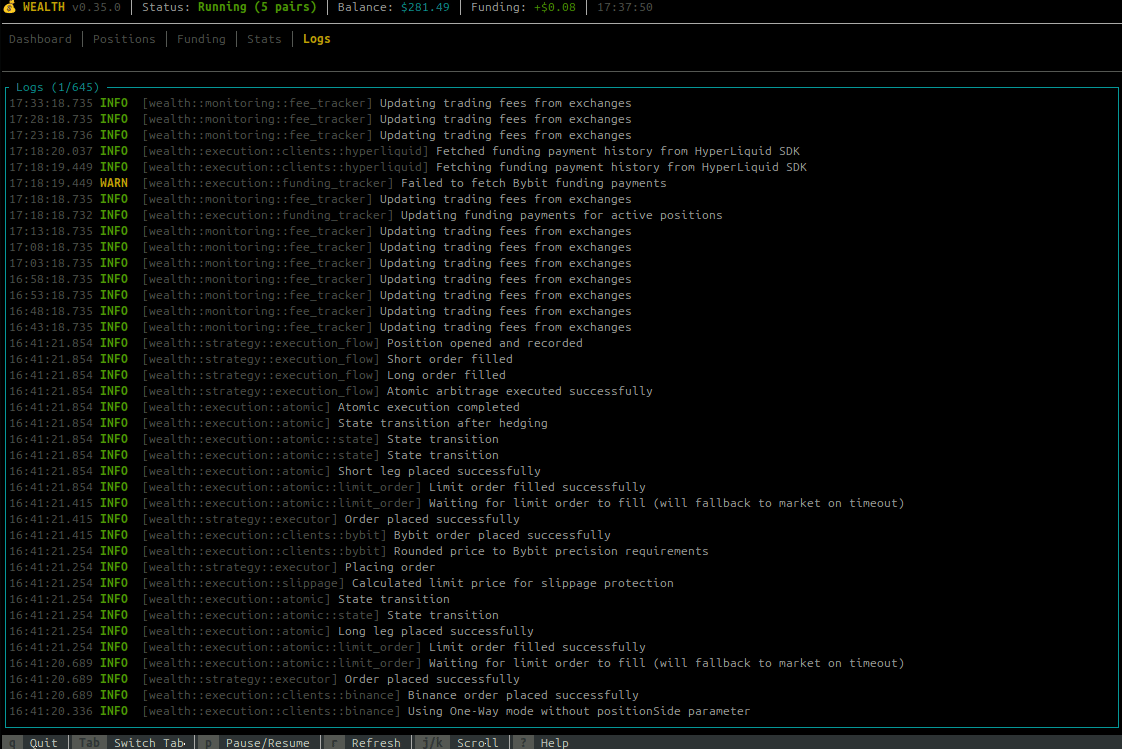
Real-time event viewer:
- Scrollable log history
- Color-coded log levels (INFO, WARN, ERROR)
- Trade executions, funding payments, system events
- Use
j/kto scroll through history
Keybindings
Navigation
| Key | Action |
|---|---|
Tab | Switch to next tab |
Shift+Tab | Switch to previous tab |
1-5 | Jump to specific tab |
Scrolling
| Key | Action |
|---|---|
j or ↓ | Scroll down / Next item |
k or ↑ | Scroll up / Previous item |
g or Home | Go to top |
G or End | Go to bottom |
Page Up | Scroll up one page |
Page Down | Scroll down one page |
Smart Scrolling: Scroll keys only have effect when content exceeds the visible area. If all items fit on screen, scrolling is automatically disabled to prevent hiding content.
Actions
| Key | Action |
|---|---|
p | Pause/Resume trading bot |
r | Force refresh data |
s | Cycle sort column (Positions, Pairs & Funding tabs) |
/ | Toggle filter mode (Pairs & Funding tabs) |
c | Clear filter (Pairs & Funding tabs) |
h | Toggle hold status (Positions tab) |
x or Del | Close selected position / Remove pair |
e | Toggle pair enable/disable (Pairs tab) |
a | Add new pair (Pairs tab) |
l | Cycle log level filter (Logs tab) |
? or F1 | Toggle help overlay |
q | Quit dashboard |
Hold Position Feature
The hold feature allows you to protect specific positions from being automatically closed by the bot's exit conditions (profit target, spread reversal, trailing stop, etc.).
How to Use
- Navigate to the Positions tab
- Select a position using
j/kor arrow keys - Press
hto toggle the hold status
Visual Indicators
- 🔒 - Lock icon appears in the "H" column for held positions
- The title bar shows the count of held positions (e.g., "│ 2 held")
Behavior
When a position is held:
- ✅ Continues collecting funding payments normally
- ✅ Displayed in TUI with all metrics
- ✅ Preserved during graceful shutdown (not closed on Ctrl+C)
- ❌ Bypassed by all auto-close mechanisms:
- Spread reversal exits
- Duration-based exits
- Trailing stop triggers
- Profit target exits
- Spread narrowing exits
To close a held position, you must manually press x or Del.
Note: Held positions persist across bot restarts. When you restart the bot, held positions remain open on exchanges and will be tracked again.
Use Cases
- Strong conviction: Hold positions you believe will continue earning
- Temporary protection: Prevent premature closing during volatile periods
- Manual management: Take full control of specific high-value positions
Closing Positions
When you press x on a selected position, a confirmation dialog appears:
┌─ Close Position ─────────────────┐
│ Close position BTCUSDT?          │
│                                  │
│ Long: Binance                    │
│ Short: Bybit                     │
│ Size: $1000.00                   │
│                                  │
│ [Y] Yes  [N] No  [Esc] Cancel    │
└──────────────────────────────────┘
- Press
Yto confirm and close the position - Press
NorEscto cancel
The bot will atomically close both legs of the position with rollback protection.
Configuration Options
Command Line Options
wealth dashboard [OPTIONS]

Options:
  --enable-discovery     Enable dynamic pair discovery
  --tick-rate <MS>       UI refresh rate in milliseconds (default: 250)
  -v, -vv, -vvv          Verbosity level
  -c, --config <FILE>    Custom config file
Tick Rate Recommendations
| Environment | Tick Rate | Notes |
|---|---|---|
| Local | 100-250ms | Smooth updates |
| LAN | 250-500ms | Good balance |
| Remote/SSH | 500-1000ms | Reduces bandwidth |
| Slow connection | 1000-2000ms | Minimal updates |
Dashboard vs Headless Mode
| Feature | wealth dashboard | wealth run |
|---|---|---|
| Interface | Interactive TUI | Headless (logs only) |
| Resource usage | Higher (rendering) | Lower |
| Best for | Development, monitoring | Production, servers |
| Position management | Visual with keyboard | API/CLI only |
Troubleshooting
TUI Not Available
If you see "TUI feature not enabled":
# Check if binary was built with TUI
wealth dashboard
# Error: TUI feature not enabled

# Rebuild with TUI feature
cargo build --release --features tui
Display Issues
Garbled output:
# Reset terminal
reset

# Try different terminal emulator
# Recommended: kitty, alacritty, wezterm, iTerm2
Colors not showing:
# Ensure TERM is set correctly
export TERM=xterm-256color
wealth dashboard
Too small:
# Minimum recommended size: 80x24
# Resize terminal or reduce font size
SSH/Remote Issues
# Use slower tick rate
wealth dashboard --tick-rate 1000

# Enable SSH compression
ssh -C user@host

# Use mosh for better responsiveness
mosh user@host -- wealth dashboard
Related
- CLI Reference - Full command documentation
- Getting Started - Initial setup
- Monitoring - Grafana dashboards for production
Monitoring Guide
Monitor your Wealth trading bot's performance with built-in dashboards and AI-powered queries.
Table of Contents
- Overview
- Quick Health Check
- AI-Powered Monitoring
- Grafana Dashboards
- Key Metrics
- Alerts
- Log Viewing
- Kubernetes Metrics Flow
- Docker Compose Monitoring Stack
Overview
flowchart TB
    subgraph Bot["Wealth Bot"]
        STRAT[Strategy Engine]
        METRICS[Metrics Exporter]
        LOGS[Structured Logs]
        HEALTH[Health Endpoint]
    end

    subgraph Collection["Data Collection"]
        OTEL[OpenTelemetry Collector]
        PROM_EXP[Prometheus Exporter<br/>:8889/metrics]
    end

    subgraph Storage["Storage Backends"]
        PROM[Prometheus]
        LOKI[Loki]
        TEMPO[Tempo]
    end

    subgraph Viz["Visualization"]
        GRAF[Grafana Dashboards]
        AI[AI Queries via MCP]
        ALERTS[Alert Manager]
    end

    STRAT --> METRICS
    STRAT --> LOGS
    STRAT --> HEALTH

    METRICS -->|OTLP| OTEL
    LOGS -->|OTLP| OTEL
    HEALTH --> GRAF

    OTEL --> PROM_EXP
    PROM -->|scrape| PROM_EXP
    OTEL --> LOKI
    OTEL --> TEMPO

    PROM --> GRAF
    LOKI --> GRAF
    TEMPO --> GRAF
    GRAF --> AI
    GRAF --> ALERTS

    style Bot fill:#e3f2fd
    style Collection fill:#fff3e0
    style Storage fill:#e8f5e9
    style Viz fill:#f3e5f5
The bot provides multiple monitoring options:
- 🤖 AI Queries - Ask questions in natural language via Grafana MCP
- 📊 Dashboards - Visual monitoring in Grafana
- 📈 Metrics - Real-time performance data via OpenTelemetry
- 🔔 Alerts - Automated notifications for important events
- ❤️ Health Endpoint - Quick status checks
Monitoring Options
flowchart LR
    subgraph Options["Monitoring Options"]
        CLI[CLI Commands]
        HEALTH[Health Endpoint]
        DASH[Grafana Dashboards]
        AI[AI Queries]
        ALERTS[Automated Alerts]
    end

    CLI --> |"wealth positions"| STATUS[Quick Status]
    HEALTH --> |":9090/health"| STATUS
    DASH --> |"Visual"| DEEP[Deep Analysis]
    AI --> |"Natural Language"| DEEP
    ALERTS --> |"Notifications"| AUTO[Automated Response]

    style CLI fill:#e3f2fd
    style HEALTH fill:#e3f2fd
    style DASH fill:#c8e6c9
    style AI fill:#f3e5f5
    style ALERTS fill:#fff3e0
Quick Health Check
CLI Commands
# Overall health status
curl http://localhost:9090/health | jq

# Check positions
wealth positions

# Check balances
wealth balance

# View configuration
wealth config
Health Endpoint Response
{
  "status": "healthy",
  "timestamp": "2024-01-15T10:30:00Z",
  "uptime_seconds": 3600,
  "components": {
    "websockets": {
      "binance": { "connected": true, "last_update": "2024-01-15T10:29:58Z", "error_count": 0 },
      "bybit": { "connected": true, "last_update": "2024-01-15T10:29:59Z", "error_count": 0 },
      "aster": { "connected": true, "last_update": "2024-01-15T10:29:57Z", "error_count": 0 }
    },
    "exchanges": {
      "binance_api": { "reachable": true, "consecutive_failures": 0 },
      "bybit_api": { "reachable": true, "consecutive_failures": 0 },
      "aster_api": { "reachable": true, "consecutive_failures": 0 }
    },
    "strategy": {
      "active_positions": 2,
      "fresh_funding_rates": 15
    }
  }
}
AI-Powered Monitoring
Ask your AI assistant (GitHub Copilot, Claude, etc.) natural language questions:
Examples:
- "What's my current P&L?"
- "Show funding rates for BTCUSDT"
- "Are there any firing alerts?"
- "Which exchange has the best execution performance?"
- "What's the average position holding time?"
No need to write queries or navigate dashboards - AI queries metrics automatically.
Setup (5 minutes)
-
Start services:
docker compose up -d -
Generate Grafana token at
http://localhost:3000 -
Add to
.env:GRAFANA_SERVICE_ACCOUNT_TOKEN=glsa_... -
Restart MCP:
docker compose restart grafana-mcp
Grafana Dashboards
Accessing Dashboards
- Open Grafana:
http://localhost:3000 - Default credentials:
admin/admin - Navigate to Dashboards → Wealth Trading Bot
Key Dashboard Panels
| Panel | Description |
|---|---|
| P&L Overview | Total profit/loss across all exchanges |
| Active Positions | Current open positions with entry prices |
| Funding Rate Spread | Spread between exchanges |
| Execution Success Rate | Order fill rate and latency |
| Balance by Exchange | USDT balance per exchange |
| WebSocket Status | Connection health for each exchange |
Setting Up Grafana Cloud
For cloud monitoring (recommended for production):
- Create free Grafana Cloud account
- Configure OTLP export
- Import dashboard templates
See Grafana Cloud Setup for full instructions.
Key Metrics
Trading Performance
| Metric | Description | Good Value |
|---|---|---|
| Win Rate | % of profitable trades | > 60% |
| Average P&L | Mean profit per trade | > 0 |
| Fill Rate | % of orders filled | > 95% |
| Execution Latency | Order placement time | < 100ms |
System Health
| Metric | Description | Good Value |
|---|---|---|
| WebSocket Uptime | Connection stability | > 99% |
| API Success Rate | Exchange API health | > 99% |
| Memory Usage | RAM consumption | < 500MB |
| Error Rate | Errors per minute | < 1 |
Error Types
Order errors are classified by type for easier diagnosis:
| Error Type | Description |
|---|---|
insufficient_balance | Not enough margin/USDT |
rate_limit | Too many API requests |
authentication | Invalid API key/secret |
validation_error | Invalid order parameters |
market_unavailable | Symbol delisted or market closed |
position_mode_error | Hedge/one-way mode mismatch |
position_limit_exceeded | Max position count reached |
timestamp_error | Clock sync issue |
network_error | Connection failure |
timeout | Request timed out |
server_error | Exchange-side issue |
Rejection Reasons
Opportunities can be rejected for various reasons:
| Reason | Description |
|---|---|
spread_below_threshold | Funding spread too small |
ev_below_threshold | Expected value not profitable |
pair_unhealthy | Symbol marked unhealthy (delisting, etc.) |
View in Terminal
# Metrics info endpoint
curl http://localhost:9090/metrics | jq
Alerts
Built-in Alert Types
| Alert | Severity | Trigger |
|---|---|---|
| Low Balance | Critical | Account balance < $1,000 |
| High Error Rate | Warning | API errors > 10% |
| Position Stuck | Warning | Position open > 24 hours |
| High Slippage | Warning | Slippage > 50 bps |
| Connection Failure | Critical | WebSocket disconnected |
Configuring Alerts in Grafana
- Go to Alerting → Alert rules
- Create new alert rule
- Set condition (e.g.,
wealth_balance_total < 1000) - Add notification channel (email, Slack, Discord)
Example Alert Rule
# Low Balance Alert
condition: wealth_balance_total{exchange="binance"} < 1000
for: 5m
severity: critical
Log Viewing
Real-time Logs
# Follow bot logs
wealth run 2>&1 | tee -a bot.log

# Or with Docker
docker compose logs -f wealth
Log Levels
| Level | Example |
|---|---|
| INFO | `Bot running |
| WARN | Rate limit approaching |
| ERROR | Order placement failed |
Searching Logs in Grafana (Loki)
# All errors
{service="wealth-bot"} |= "ERROR"

# Order execution logs
{service="wealth-bot"} |= "arbitrage"

# WebSocket issues
{service="wealth-bot"} |= "WebSocket"
Kubernetes Metrics Flow
When deploying to Kubernetes with the Helm chart, metrics flow through the OpenTelemetry Collector sidecar:
App → OTLP (gRPC :4317) → OTEL Collector → Prometheus Exporter (:8889) → Prometheus scrape
Configuration
The Helm chart enables the Prometheus exporter by default:
otelCollector:
  enabled: true
  prometheus:
    enabled: true   # Exposes :8889/metrics for Prometheus scraping
    port: 8889
How It Works
- App exports OTLP - The wealth bot sends metrics via OTLP to the collector sidecar
- Collector processes - Batching, resource enrichment, and format conversion
- Prometheus scrapes - ServiceMonitor scrapes
/metricsfrom the collector (port 8889) - Grafana queries - Dashboards query Prometheus for visualization
Note: The app's
/metricsendpoint returns JSON info about OTLP config, not Prometheus format. For Prometheus-compatible metrics, enableotelCollector.prometheus.enabled=true.
Docker Compose Monitoring Stack
The included compose.yml provides:
- Grafana - Dashboards and visualization
- OpenTelemetry Collector - Metrics aggregation
- Prometheus - Metrics storage
- Loki - Log aggregation
- Tempo - Distributed tracing
Starting the Stack
# Start all services
docker compose up -d

# Check service status
docker compose ps

# View logs
docker compose logs -f
Accessing Services
| Service | URL | Credentials |
|---|---|---|
| Grafana | http://localhost:3000 | admin / admin |
| Prometheus | http://localhost:9090 | - |
| Bot Health | http://localhost:9090/health | - |
Recommended Monitoring Setup
Development / Paper Trading
- Local Grafana (Docker Compose)
- Terminal logs
- Health endpoint checks
Production / Live Trading
- Grafana Cloud (free tier available)
- Alert notifications (email/Slack)
- AI-powered monitoring (MCP)
- 24/7 uptime monitoring
Quick Reference
# Health check
curl http://localhost:9090/health | jq

# View positions
wealth positions

# View balances
wealth balance

# Start monitoring stack
docker compose up -d

# View Grafana
open http://localhost:3000

# Follow logs
docker compose logs -f wealth
Related Documentation
| Topic | Guide |
|---|---|
| Cloud monitoring | Grafana Cloud Setup |
| Log queries | Log Collection (Loki) |
| Metrics config | Configuration Guide |
| Hot-reload | Hot-Reload Guide |
| Issues | Troubleshooting |
Grafana Cloud Setup Guide
Quick 15-Minute Setup for Fully Managed Observability
Overview
This guide shows you how to migrate from self-hosted monitoring (Docker Compose) to Grafana Cloud - a fully managed observability platform with free tier (14-day trial, then free tier available).
Benefits:
- ✅ Zero infrastructure - No Prometheus, Grafana, Loki, or Tempo containers to manage
- ✅ Automatic scaling - Handles any volume of metrics/logs/traces
- ✅ High availability - 99.9% uptime SLA
- ✅ Global CDN - Fast dashboard loading worldwide
- ✅ Built-in alerting - Email, Slack, PagerDuty integrations
- ✅ Long-term retention - Metrics for 13 months (free tier)
Table of Contents
- Quick Start (15 Minutes)
- Prerequisites
- Step 1: Create Grafana Cloud Account
- Step 2: Get Your Cloud Credentials
- Step 3: Update OpenTelemetry Collector
- Step 4: Update Docker Compose
- Step 5: Configure Environment Variables
- Step 6: Test the Connection
- Step 7: Import Dashboards
- Step 8: Set Up Alerts
- Migration Checklist
- Architecture Comparison
- Cost Optimization
- Troubleshooting
Quick Start (15 Minutes)
TL;DR - Fast track to Grafana Cloud:
- Create account → https://grafana.com/auth/sign-up/create-user
- Get OTLP endpoint → Your stack → Send Data → OpenTelemetry → Copy endpoint URL
- Configure collector (credentials already in
otel-collector-grafana-cloud.yaml):# Verify endpoint in otel-collector-grafana-cloud.yaml matches your region # File already configured with prod-eu-central-0 credentials - Deploy:
docker compose up -d # Update .env to point bot to local collector OTLP_ENDPOINT=http://localhost:4317 # Run bot export CREDENTIALS_PASSPHRASE="your_passphrase" wealth run - View → https://YOUR-STACK.grafana.net → Explore → Query:
wealth_funding_rate
Important: Do NOT send telemetry directly from the bot to Grafana Cloud's managed OTLP gateway. Always use a local OTLP Collector as a proxy (see Architecture and Troubleshooting for why).
For detailed instructions, continue reading below.
Prerequisites
- ✅ Wealth trading bot installed (see Getting Started)
- ✅ Docker and Docker Compose installed
- ✅ Credit card (for Grafana Cloud trial - free tier available after)
Step 1: Create Grafana Cloud Account
1.1 Sign Up
- Go to https://grafana.com/auth/sign-up/create-user
- Click "Start for free"
- Fill in your details:
- Email address
- Company name (can use "Personal" or your name)
- Password
- Verify your email
1.2 Create a Stack
After email verification:
- You'll be prompted to create a stack (your isolated Grafana Cloud instance)
- Choose:
- Stack name:
wealth-trading-bot(or any name you prefer) - Region: Choose closest to you (e.g.,
us-east-1,eu-west-1) - Plan: Start with Free Trial (14 days, then free tier)
- Stack name:
- Click "Launch Stack"
1.3 Access Your Stack
Your stack will be created with a URL like:
https://YOUR-STACK-NAME.grafana.net
Save this URL - you'll need it later.
Step 2: Get Your Cloud Credentials
Note: The repository includes pre-configured credentials for prod-eu-central-0 region in otel-collector-grafana-cloud.yaml. If you're using a different region or want to use your own credentials, follow these steps.
2.1 Find Your OTLP Endpoint
- In Grafana Cloud UI, go to your stack homepage
- Click "Send Data" or "Connections"
- Search for "OpenTelemetry" or "OTLP"
- You'll see an endpoint like:
https://otlp-gateway-YOUR-REGION.grafana.net/otlp
Example regions:
prod-eu-central-0(Europe - Frankfurt)prod-us-east-0(US East - Virginia)prod-us-central-0(US Central)
2.2 Create an Access Token
- Go to "Administration" → "Access Policies"
- Click "Create access policy"
- Set:
- Name:
wealth-bot-telemetry - Realms: Your stack
- Scopes:
metrics:writelogs:writetraces:write
- Name:
- Click "Create"
- Click "Add token" → Copy the token (starts with
glc_)
2.3 Get Your Instance ID
Your instance ID (username) is visible in the OTLP configuration:
- Usually a 6-7 digit number (e.g.,
1446931) - Found in: "Send Data" → "OpenTelemetry" → Look for "Instance ID" or "Username"
2.4 Update Collector Configuration
Edit otel-collector-grafana-cloud.yaml:
exporters:
  otlphttp/grafana_cloud:
    endpoint: "https://otlp-gateway-YOUR-REGION.grafana.net/otlp"  # Update region
    auth:
      authenticator: basicauth/grafana_cloud

extensions:
  basicauth/grafana_cloud:
    client_auth:
      username: "YOUR_INSTANCE_ID"      # Update with your instance ID
      password: "YOUR_API_TOKEN"         # Update with your token (glc_...)
Security Note: These credentials are in the Docker Compose config file, not .env, as they're only used by the OTLP Collector container, not the bot itself.
Step 3: Configure Bot to Use Local Collector
The bot should send telemetry to the local OTLP Collector, not directly to Grafana Cloud.
3.1 Update Environment Variables
In your .env file:
# Point bot to LOCAL collector (NOT Grafana Cloud directly)
OTLP_ENDPOINT=http://localhost:4317

# Optional: Set service metadata
ENVIRONMENT=production
SERVICE_NAME=wealth-bot
Critical: Do NOT set OTLP_ENDPOINT to Grafana Cloud's managed gateway URL. Direct connections from the Rust SDK have compatibility issues. See Troubleshooting for details.
Step 4: Start the OTLP Collector
3.1 Collector Configuration Overview
The repository includes a pre-configured OTLP Collector at otel-collector-grafana-cloud.yaml. This collector:
- Receives OTLP data from the bot (gRPC on port 4317, HTTP on 4318)
- Processes telemetry (batching, resource detection, filtering)
- Exports to Grafana Cloud via OTLP/HTTP endpoint
- Generates additional metrics from traces (span metrics, service graphs)
Key Features:
- Uses
grafanacloudconnector for automatic span metrics generation - Drops unnecessary resource attributes to reduce cardinality
- Adds deployment environment and service version to metrics
- Health check endpoint on port 13133
Configuration is already complete - you only need to update credentials if using a different region (see Step 2).
Step 4: Start the OTLP Collector
4.1 Start the Collector
The Docker Compose configuration is already in your repository at compose.yml (Grafana Cloud is now the default).
# Start the OTLP Collector
docker compose up -d

# Verify it's healthy
curl http://localhost:13133
# Expected: {"status":"Server available","upSince":"..."}

# Check logs
docker compose logs otel-collector
# Look for: "Everything is ready. Begin running and processing data."
What this deploys:
- Single container: OpenTelemetry Collector (
otel/opentelemetry-collector-contrib:latest) - Ports exposed:
4317- OTLP gRPC (bot connects here)4318- OTLP HTTP (alternative)13133- Health check endpoint
- Credentials: Read from
otel-collector-grafana-cloud.yaml(hardcoded, not from.env)
Step 5: Configure and Run the Bot
5.1 Update Bot Configuration
In your .env file:
# Point to LOCAL collector (NOT Grafana Cloud)
OTLP_ENDPOINT=http://localhost:4317

# Optional: Service metadata
ENVIRONMENT=production
SERVICE_NAME=wealth-bot
Critical: The bot should connect to localhost:4317 (local collector), NOT to Grafana Cloud's managed gateway. The collector handles the connection to Grafana Cloud.
5.2 Verify .env is Gitignored
# Check if .env is gitignored
grep "\.env" .gitignore

# If not, add it
echo ".env" >> .gitignore
Step 6: Test the Connection
6.1 Verify Collector is Running
# Check collector health
curl http://localhost:13133
# Expected: {"status":"Server available","upSince":"..."}

# Check collector logs
docker compose logs otel-collector | tail -20
# Look for: "Everything is ready. Begin running and processing data."

# Check for export errors
docker compose logs otel-collector | grep -i error
# Should be empty or only show benign warnings
6.2 Run the Bot
# Set required credentials
export CREDENTIALS_PASSPHRASE="your_passphrase"
# Ensure OTLP_ENDPOINT points to local collector
echo $OTLP_ENDPOINT
# Should output: http://localhost:4317
# Run the bot
wealth run
6.3 Verify Bot is Exporting
# Check bot health endpoint
curl http://localhost:9090/health | jq
# Look for: "otlp_status": "connected" or similar
# Watch bot logs for OTLP connection
# Should see: "OpenTelemetry OTLP export enabled to: http://localhost:4317"
# Should NOT see: "BatchLogProcessor.ExportError" or "Timeout expired"
6.4 Verify Data in Grafana Cloud
- Open your Grafana Cloud instance:
https://YOUR-STACK.grafana.net - Go to "Explore"
- Select data source: Prometheus (or "grafanacloud-YOUR-STACK-prom")
- Run query:
{__name__=~"wealth.*"} - You should see metrics appearing within 10-30 seconds
If no data appears, see Troubleshooting or OTLP Export Issues.
Step 7: Import Dashboards
7.1 Import Pre-built Dashboard
Your repository includes a pre-built dashboard at grafana/grafana-dashboard.json:
- In Grafana Cloud UI, go to "Dashboards" → "Import"
- Click "Upload JSON file"
- Select
grafana/grafana-dashboard.jsonfrom your repository - Configure:
- Name: Keep default or rename (e.g., "Wealth Trading Bot")
- Folder: Select or create a folder
- Prometheus: Select your Grafana Cloud Prometheus data source
- Click "Import"
7.2 Verify Dashboard Data
After import:
- Dashboard should populate with data within 30 seconds
- Check panels for:
- Funding Rates by symbol and exchange
- Account Balances by exchange
- Trade Execution Metrics (success rate, errors)
- WebSocket Connection Status
7.3 Dashboard Variables (if needed)
If variables need adjustment:
- Open imported dashboard
- Click ⚙️ (Settings) → "Variables"
- Update
$pairvariable if needed:- Query:
label_values(wealth_funding_rate, symbol) - Data source:
grafanacloud-YOUR-STACK-prom
- Query:
- Save dashboard
Migration Checklist
Use this checklist to track your migration progress:
Pre-Migration
-
Current self-hosted setup working (
docker compose ps) -
Bot exporting metrics (
curl http://localhost:9090/health) - Optional: Export existing dashboards for backup
Grafana Cloud Setup
- Create Grafana Cloud account
- Create stack (save URL)
- Get Prometheus endpoint + credentials
- Get Loki endpoint (can reuse same credentials)
- Get Tempo endpoint (can reuse same credentials)
Configuration
-
Copy
.env.exampleto.env -
Uncomment and fill
GRAFANA_CLOUD_*variables -
Set
GRAFANA_CLOUD_USERNAMEandGRAFANA_CLOUD_API_TOKEN -
Verify
.envis in.gitignore
Deployment
-
Stop old stack:
docker compose down -
Start Cloud stack:
docker compose up -d -
Verify collector health:
curl http://localhost:13133 - Check collector logs for errors
-
Run bot:
wealth run -
Verify bot health:
curl http://localhost:9090/health
Verification
- Open Grafana Cloud: https://YOUR-STACK.grafana.net
-
Query
wealth_funding_ratein Explore - Check metrics appearing (10-30 seconds)
- Verify logs in Loki
- Check traces in Tempo (if enabled)
Dashboard & Alerts
-
Import
grafana/grafana-dashboard.json - Update dashboard data source to Grafana Cloud Prometheus
- Create alert rules (low balance, WebSocket down, etc.)
- Set up notification channels (email, Slack)
- Test notifications
Post-Migration
- Monitor for 24 hours
- Check usage: Administration → Usage insights
- Optional: Clean up old Docker images
- Update team documentation
Time estimate: ~45 minutes total (~15 minutes active work)
Step 8: Set Up Alerts
8.1 Create Alert Rules
Grafana Cloud has built-in alerting:
- In dashboard, click any panel → "Edit"
- Click "Alert" tab → "Create alert rule from this panel"
- Configure:
- Name:
Low Balance Alert - Query:
sum(wealth_account_balance{type="total"}) < 1000 - Threshold: Below 1000
- Evaluation interval: 1m
- Name:
- Click "Save"
8.2 Notification Channels
Set up notifications:
- Go to "Alerting" → "Contact points"
- Click "Add contact point"
- Choose:
- Email (free)
- Slack (requires webhook)
- PagerDuty (requires integration key)
- Test notification → Save
8.3 Recommended Alerts
| Alert | Query | Threshold | Severity |
|---|---|---|---|
| Low Balance | sum(wealth_account_balance{type="total"}) < 1000 | < $1,000 | Critical |
| High Error Rate | rate(wealth_order_errors_total[5m]) > 0.1 | > 10% | Warning |
| WebSocket Down | wealth_websocket_status == 0 | == 0 | Critical |
| Low Win Rate | wealth_trades_win_rate < 40 | < 40% | Warning |
Architecture Comparison
Before (Self-Hosted)
┌─────────────────────────────────────────────────────┐
│ Docker Compose (5 containers) │
├─────────────────────────────────────────────────────┤
│ Wealth Bot → OTLP Collector │
│ ↓ │
│ ├→ Prometheus (metrics) │
│ ├→ Tempo (traces) │
│ └→ Loki (logs) │
│ ↓ │
│ Grafana (dashboards) │
└─────────────────────────────────────────────────────┘
Resource Usage:
- CPU: ~500-800 MB RAM (all containers)
- Disk: ~1-5 GB (retention depends on volume)
- Maintenance: Manual updates, backups, scaling
After (Grafana Cloud)
┌─────────────────────────────────────────────────────────────┐
│ Wealth Bot (Rust) │
│ ↓ OTLP gRPC (localhost:4317) │
│ OTLP Collector (Docker) │
│ ↓ OTLP/HTTP + Basic Auth │
│ Grafana Cloud │
│ ├→ Prometheus (metrics) │
│ ├→ Loki (logs) │
│ └→ Tempo (traces) │
└─────────────────────────────────────────────────────────────┘
Architecture Benefits:
- ✅ Local Collector as Proxy: Handles batching, retries, and Grafana Cloud-specific requirements
- ✅ No Direct Bot → Cloud Connection: Avoids SDK compatibility issues (see Why Use a Collector)
- ✅ Single Point of Auth: Credentials managed in one place (collector config)
- ✅ Debugging Layer: Collector logs show exactly what's sent to Grafana Cloud
Resource Usage:
- CPU: ~100-200 MB RAM (OTLP Collector only)
- Disk: Minimal (no local storage)
- Maintenance: Zero (fully managed)
- Network: ~5-10 MB/hour (compressed telemetry)
Why This Architecture?
According to Grafana's best practices:
"We advise that you send directly to an OTLP endpoint in testing or small scale development scenarios only. Use a collector for production."
Direct SDK → Grafana Cloud connections are unreliable due to:
- Rate limiting on managed endpoints
- SDK-specific compatibility issues
- Missing batching/compression optimizations
- No retry buffer for network failures
See OTLP Troubleshooting for detailed explanation.
Cost Optimization
Free Tier Limits (Grafana Cloud)
| Service | Free Tier Quota | Overage Cost |
|---|---|---|
| Metrics | 10k series, 13 months retention | $0.30/1k series/month |
| Logs | 50 GB ingestion, 2 weeks retention | $0.50/GB |
| Traces | 50 GB ingestion, 2 weeks retention | $0.50/GB |
| Dashboards | 10 users, unlimited dashboards | Free |
Current Bot Usage (Estimated)
Based on your metrics:
- Metrics: ~500 series (well within free tier)
- Logs: ~1-2 GB/month (within free tier)
- Traces: ~500 MB/month (within free tier)
Expected Cost: $0/month (free tier) 🎉
Tips to Stay Within Free Tier
-
Reduce log volume:
# In .env, set log level to INFO (not DEBUG) RUST_LOG=info -
Sample traces (if you enable tracing heavily):
# In otel-collector-grafana-cloud.yaml processors: probabilistic_sampler: sampling_percentage: 10 # Only send 10% of traces -
Monitor usage:
- Go to "Administration" → "Usage insights"
- Check monthly consumption
Troubleshooting
Issue: "Connection refused" to Grafana Cloud
Symptom: OTLP Collector logs show connection errors
Solutions:
-
Check endpoints in
.env:grep GRAFANA_CLOUD .env # Verify URLs match your region (e.g., us-east-1, eu-west-1) -
Test connectivity:
# Test Prometheus endpoint curl -u "$GRAFANA_CLOUD_USERNAME:$GRAFANA_CLOUD_API_TOKEN" \ "$GRAFANA_CLOUD_PROMETHEUS_ENDPOINT" # Expected: 401 (auth works), 404 (endpoint works), or 200 (success) # Not expected: Connection refused, timeout -
Check firewall:
# Ensure outbound HTTPS (443) is allowed telnet prometheus-us-east-1.grafana.net 443
Issue: "Unauthorized" (401) from Grafana Cloud
Symptom: OTLP Collector logs show 401 errors
Solutions:
-
Verify credentials:
echo $GRAFANA_CLOUD_API_TOKEN # Should start with "glc_" -
Regenerate token:
- Go to Grafana Cloud → "Administration" → "Access Policies"
- Delete old token
- Create new token with
metrics:write,logs:write,traces:writescopes - Update
.env
-
Restart collector:
docker compose restart otel-collector
Issue: No metrics in Grafana Cloud
Symptom: Dashboard shows "No data"
Solutions:
-
Check bot is exporting:
curl http://localhost:9090/metrics # Should show: "backend": "OpenTelemetry OTLP" -
Check collector is receiving:
docker compose logs otel-collector | grep "Metric" # Should show: "Metrics" ... "sent": true -
Check data source in Grafana:
- Go to "Connections" → "Data sources"
- Click on Prometheus data source
- Scroll down → "Save & test"
- Should show: "Data source is working"
-
Query directly:
# Query Grafana Cloud API curl -u "$GRAFANA_CLOUD_USERNAME:$GRAFANA_CLOUD_API_TOKEN" \ "https://prometheus-us-east-1.grafana.net/api/v1/query?query=wealth_funding_rate"
Issue: High data usage
Symptom: Approaching free tier limits
Solutions:
-
Check current usage:
- Grafana Cloud → "Administration" → "Usage insights"
-
Reduce metric cardinality:
# In otel-collector-grafana-cloud.yaml processors: filter: metrics: exclude: match_type: strict metric_names: - wealth_websocket_message_latency_milliseconds -
Aggregate metrics:
processors: metricstransform: transforms: - include: wealth_.* match_type: regexp action: aggregate_labels aggregation_type: sum label_set: [exchange] -
Reduce log verbosity:
# In .env RUST_LOG=warn # Only warnings and errors
Migration Checklist
Before switching to Grafana Cloud:
- Create Grafana Cloud account
- Get Prometheus, Loki, and Tempo credentials
-
Create
otel-collector-grafana-cloud.yaml -
Grafana Cloud is now default (
compose.yml) -
Self-hosted stack available at
compose.stack.yml -
Update
.envwith Grafana Cloud credentials -
Test connection:
docker compose up -d - Verify metrics in Grafana Cloud
- Import dashboards
- Set up alerts
- Configure notification channels
- Update documentation (if team project)
-
Stop old local stack (if running):
docker compose -f compose.stack.yml down
Next Steps
After successful migration:
-
Explore Grafana Cloud features:
- Pre-built dashboards
- SLO (Service Level Objectives) tracking
- Incident management
- OnCall rotation
-
Enable advanced features:
- Grafana Machine Learning - Anomaly detection
- Grafana Asserts - Automated root cause analysis
- Grafana Faro - Frontend observability (if you add a web UI)
-
Integrate with CI/CD:
- Use Grafana Cloud API for automated dashboard updates
- Add monitoring checks to GitHub Actions
-
Join Grafana Community:
- Slack: https://slack.grafana.com
- Forum: https://community.grafana.com
Related Documentation
- Monitoring Guide - All available metrics
- Deployment Guide - Production deployment
- Configuration Guide - Bot configuration
Support
If you encounter issues:
- Check collector logs:
docker compose logs otel-collector - Verify credentials:
grep GRAFANA_CLOUD .env - Test Grafana Cloud API: See troubleshooting section above
- Consult Grafana Cloud docs: https://grafana.com/docs/grafana-cloud/
Grafana Cloud Support:
- Free tier: Community support (Slack, forum)
- Paid plans: Email and chat support
Still stuck? Open an issue in the project repo with:
- OTLP Collector logs
- Bot health check output:
curl http://localhost:9090/health - Grafana Cloud stack URL (redact credentials)
Log Collection Guide
This guide covers log configuration, formats, and querying. For the complete observability setup including OpenTelemetry, metrics, and Grafana dashboards, see Monitoring Guide.
Table of Contents
Quick Start
Enable OTLP Export (Recommended)
# Point to OpenTelemetry Collector (local or Grafana Cloud)
export OTLP_ENDPOINT=http://localhost:4317
wealth run
Logs, metrics, and traces are exported via OTLP gRPC. For complete OpenTelemetry setup, see Monitoring Guide - OpenTelemetry Metrics.
Local-Only Mode
If OTLP_ENDPOINT is not set, logs output to stdout/stderr:
# Optional: Enable file logging
export WEALTH__OBSERVABILITY__LOG_FILE=/tmp/wealth.log
wealth run
Log Query Examples
Basic Queries
# All logs from wealth bot
{job="wealth-bot"}
# Filter by log level
{job="wealth-bot"} |= "ERROR"
{job="wealth-bot"} |= "WARN"
{job="wealth-bot"} |= "INFO"
# Filter by level label (if parsed)
{job="wealth-bot", level="ERROR"}
{job="wealth-bot", level="INFO"}
# Filter by module
{job="wealth-bot"} |= "wealth::strategy"
{job="wealth-bot"} |= "wealth::execution"
{job="wealth-bot"} |= "wealth::market_data"
# Search for specific text
{job="wealth-bot"} |= "WebSocket"
{job="wealth-bot"} |= "arbitrage"
{job="wealth-bot"} |= "position"
Advanced Queries
# Errors in the last hour
{job="wealth-bot", level="ERROR"} [1h]
# Rate of errors per minute
rate({job="wealth-bot", level="ERROR"}[5m])
# Count logs by level
sum by (level) (count_over_time({job="wealth-bot"}[1h]))
# Logs containing correlation_id
{job="wealth-bot"} |~ "correlation_id=\\w+"
# WebSocket connection issues
{job="wealth-bot"} |~ "WebSocket.*error|WebSocket.*failed|WebSocket.*timeout"
# Order execution logs
{job="wealth-bot"} |= "Executing arbitrage" or |= "Order placed"
# Strategy-related logs
{job="wealth-bot", module=~"wealth::strategy.*"}
Event-Based Queries (Recommended)
All key log messages include a structured event field for precise filtering:
# Parse JSON and filter by event type
{service="wealth-bot"} | json | event="opportunity_detected"
{service="wealth-bot"} | json | event="arbitrage_executed"
{service="wealth-bot"} | json | event="position_close_succeeded"
# Trade skipped events (all use _skipped suffix)
{service="wealth-bot"} | json | event="quantity_validation_failed_skipped"
{service="wealth-bot"} | json | event="precision_mismatch_skipped"
{service="wealth-bot"} | json | event="unhedged_positions_skipped"
{service="wealth-bot"} | json | event="insufficient_balance_skipped"
# All skipped events
{service="wealth-bot"} | json | event=~".*_skipped"
# All position lifecycle events
{service="wealth-bot"} | json | event=~"position_.*"
# WebSocket and connection events
{service="wealth-bot"} | json | event=~"websocket_.*"
# Circuit breaker activity
{service="wealth-bot"} | json | event=~"circuit_breaker_.*"
# Error events requiring attention
{service="wealth-bot"} | json | event="unhedged_position_detected"
{service="wealth-bot"} | json | event="size_discrepancy_detected"
# Count opportunities vs executions
sum by (event) (count_over_time({service="wealth-bot"} | json | event=~"opportunity_detected|arbitrage_executed" [1h]))
Pattern Matching
# Extract values from logs using regex
{job="wealth-bot"}
| regexp "correlation_id=(?P<cid>\\w+)"
| line_format "{{.cid}}: {{.message}}"
# Parse structured data
{job="wealth-bot"}
| pattern `<_> <level> <module>: <message>`
| level = "ERROR"
Creating a Logs Dashboard
1. Log Volume Panel
Query:
sum(rate({job="wealth-bot"}[1m])) by (level)
Visualization: Time series graph showing log rate by level
2. Error Rate Panel
Query:
sum(rate({job="wealth-bot", level="ERROR"}[5m]))
Visualization: Stat panel with alert threshold at > 0
3. Recent Errors Table
Query:
{job="wealth-bot", level="ERROR"}
Visualization: Logs panel (table view) Options: Show time, level, and message columns
4. Log Level Distribution
Query:
sum by (level) (count_over_time({job="wealth-bot"}[1h]))
Visualization: Pie chart
5. Module Activity
Query:
sum by (module) (count_over_time({job="wealth-bot"}[1h]))
Visualization: Bar chart
Log File Rotation
To prevent log files from growing too large:
Using logrotate (Linux)
Create /etc/logrotate.d/wealth:
/tmp/wealth*.log {
daily
rotate 7
compress
delaycompress
missingok
notifempty
create 0640 thiras thiras
postrotate
# Send SIGHUP to reload (if bot supports it)
# pkill -HUP -f wealth || true
endscript
}
Test configuration:
sudo logrotate -d /etc/logrotate.d/wealth
sudo logrotate -f /etc/logrotate.d/wealth
Using truncate
Simple script to truncate logs periodically:
#!/bin/bash
# truncate-logs.sh
LOG_FILE="/tmp/wealth.log"
MAX_SIZE_MB=100
if [ -f "$LOG_FILE" ]; then
SIZE=$(du -m "$LOG_FILE" | cut -f1)
if [ "$SIZE" -gt "$MAX_SIZE_MB" ]; then
echo "Truncating $LOG_FILE (${SIZE}MB > ${MAX_SIZE_MB}MB)"
> "$LOG_FILE"
fi
fi
Add to crontab:
# Run every hour
0 * * * * /path/to/truncate-logs.sh
Alerting on Logs
Create Alert Rule in Grafana
- Go to Alerting → Alert rules → New alert rule
- Set query:
sum(rate({job="wealth-bot", level="ERROR"}[5m])) > 0 - Set evaluation interval: 1m
- Set condition: Alert when query result > 0
- Add notification channel (email, Slack, etc.)
Common Alert Rules
High Error Rate:
sum(rate({job="wealth-bot", level="ERROR"}[5m])) > 0.1
WebSocket Connection Failures:
sum(count_over_time({job="wealth-bot"} |= "WebSocket" |= "failed" [5m])) > 3
No Logs Received (Bot Down):
absent_over_time({job="wealth-bot"}[5m]) == 1
Troubleshooting
Pull Model (Promtail)
No logs appearing in Loki
-
Check Promtail is running:
docker compose ps promtail docker compose logs promtail -
Verify log file exists and is readable:
ls -lah /tmp/wealth.log tail -f /tmp/wealth.log -
Check Promtail positions file:
docker compose exec promtail cat /tmp/positions.yaml -
Test Loki directly:
curl -s http://localhost:3100/loki/api/v1/label/job/values
Logs not parsing correctly
-
Check log format matches regex:
# Example log line echo "2025-11-10T01:23:45.123456Z INFO wealth::strategy: Message" | \ grep -oP '^\S+\s+\w+\s+[\w:]+:\s+.*$' -
View Promtail debug logs:
docker compose logs promtail | grep -i error
Push Model (Loki Direct)
No logs appearing in Loki via push
-
Check Loki is running:
docker compose ps loki docker compose logs loki # Check Loki health curl http://localhost:3100/ready -
Verify Loki endpoint is reachable:
# Test HTTP endpoint (note: the /loki/api/v1/push path is added by the library) curl -v http://localhost:3100/ready -
Check bot is configured correctly:
# Verify environment variable is set echo $OTLP_ENDPOINT # Should see startup message when running bot: # "OpenTelemetry initialized with endpoint: http://localhost:4317" -
Check Loki logs for errors:
docker compose logs loki | grep -i error docker compose logs loki | grep -i "push" -
Test OpenTelemetry Collector health:
# Check OTLP receiver is responding curl http://localhost:13133/ # Check metrics being exported to Prometheus curl http://localhost:8889/metrics | grep wealth
Push connection timeouts
-
Check network connectivity:
# Test OTLP gRPC endpoint telnet localhost 4317 # Or check if port is listening nc -zv localhost 4317 -
Check Docker network:
docker network inspect wealth_monitoring -
Check OpenTelemetry Collector configuration:
# View collector logs for errors docker compose logs otel-collector # Verify collector config (in compose.yml) docker compose config | grep -A 20 otel-collector
Logs delayed or missing
-
Check OTLP export is working:
- OpenTelemetry batches logs before sending
- Default batch timeout is 10 seconds
- Check bot logs for OTLP export errors
-
Monitor OpenTelemetry Collector:
# Check collector is receiving telemetry docker compose logs otel-collector | grep -i "logs" # Check collector metrics curl http://localhost:8888/metrics | grep otelcol_receiver -
Verify labels are correct:
# Check available labels in Loki curl http://localhost:3100/loki/api/v1/labels # Check values for 'service' label curl http://localhost:3100/loki/api/v1/label/service/values
General Issues
Performance issues
-
Check Loki disk usage:
docker compose exec loki df -h /loki -
Limit log retention in Loki config:
- Edit Loki config to set retention period
- Default: unlimited (until disk full)
Advanced: JSON Logging
For better log parsing and indexing, JSON logging is supported. This is configured automatically when using OTLP export.
Update Promtail Config
In compose.yml, update the pipeline_stages:
pipeline_stages:
- json:
expressions:
timestamp: timestamp
level: level
message: message
module: target
span: span
correlation_id: fields.correlation_id
- labels:
level:
module:
- timestamp:
source: timestamp
format: RFC3339Nano
Log Retention
Loki stores logs with automatic compaction. Configure retention in compose.yml:
loki:
command:
- -config.file=/etc/loki/local-config.yaml
- -config.expand-env=true
environment:
- LOKI_RETENTION_PERIOD=30d
Or create custom Loki config with retention limits.
Best Practices
- Use Loki direct push for production - Lower latency, simpler setup than OTLP
- Keep file logging for debugging - Hybrid mode provides redundancy
- Use structured logging - Include correlation_id, operation, etc.
- Set appropriate log levels - Use DEBUG for development, INFO for production
- Create dashboards - Visualize key metrics from logs
- Set up alerts - Get notified of critical errors
- Index important fields - Add labels for common filters (level, module)
- Monitor Loki performance - Check ingestion rate and query latency
- Configure log retention - Balance storage costs with retention needs
- Use correlation IDs - Automatically included in logs for tracing
Comparison: Pull vs Push
| Aspect | Pull (Promtail) | Push (Loki Direct) |
|---|---|---|
| Setup Complexity | Simple | Simpler (no Promtail needed) |
| Latency | 5-10 seconds | < 1 second |
| Disk I/O | Required (log files) | Optional |
| Network Efficiency | Lower (file polling) | Higher (batched HTTP) |
| Reliability | File-based buffering | In-memory buffering |
| Scalability | One agent per host | Direct to Loki |
| Dependencies | Promtail service | None (built into bot) |
| Production Ready | ✓ | ✓✓ (recommended) |
Migration Path: Pull → Push
-
Phase 1: Enable OpenTelemetry OTLP export
# Keep existing file logging if desired export WEALTH_LOG_FILE=/tmp/wealth.log # Add OTLP endpoint export OTLP_ENDPOINT=http://localhost:4317 wealth run -
Phase 2: Verify OTLP export in Grafana
- Check logs appear in Loki via Grafana Explore
- Verify metrics in Prometheus
- Check traces in Tempo
- Confirm correlation between logs/metrics/traces
-
Phase 3: Disable file logging (optional)
# Remove file logging for OTLP-only mode unset WEALTH_LOG_FILE # Keep OTLP export export OTLP_ENDPOINT=http://localhost:4317 wealth run -
Phase 4: Production deployment
# Ensure all observability services are running docker compose up -d # Configure bot for OTLP export OTLP_ENDPOINT=http://localhost:4317 export OTEL_RESOURCE_ATTRIBUTES="service.name=wealth-bot,deployment.environment=production" wealth run
Related Documentation
- Monitoring Guide - Complete observability with OpenTelemetry, metrics, and dashboards
- Grafana Cloud Setup - Production Grafana setup
- Troubleshooting - Common issues
External Resources
Configuration Hot-Reload
Overview
The Wealth trading bot supports hot-reload for configuration changes, allowing you to update trading parameters without restarting the bot. The system automatically detects changes to config.toml, validates them, and applies safe changes immediately while rejecting unsafe changes that require a full restart.
Hot-Reload Flow
flowchart LR
subgraph Detection["File Detection"]
EDIT[Edit config.toml] --> WATCH[File Watcher]
WATCH -->|"~500ms"| DEBOUNCE[Debounce]
end
subgraph Processing["Reload Processing"]
DEBOUNCE --> VALIDATE[Validate Config]
VALIDATE -->|Invalid| REJECT[Reject Changes]
VALIDATE -->|Valid| CLASSIFY[Classify Changes]
CLASSIFY --> SAFE[Safe Changes]
CLASSIFY --> UNSAFE[Unsafe Changes]
end
subgraph Apply["Application"]
SAFE -->|"~10-50ms"| APPLY[Apply Atomically]
UNSAFE --> LOG[Log Warning]
LOG --> RESTART[Requires Restart]
APPLY --> METRICS[Record Metrics]
APPLY --> EFFECT[Strategy Effect<br/>0-60s]
end
style SAFE fill:#c8e6c9
style UNSAFE fill:#ffcdd2
style APPLY fill:#e3f2fd
Features
- Automatic Detection: File system monitoring detects
config.tomlchanges within 500ms - Validation: New configuration is validated before applying
- Safe/Unsafe Classification: Changes are classified as safe (hot-reloadable) or unsafe (requires restart)
- Atomic Updates: All safe changes apply atomically with automatic rollback on failure
- Observability: Reload events are tracked via OpenTelemetry metrics and structured logs
- Zero Disruption: Active trades continue unaffected during reload
- Transaction Semantics: Rollback on validation failure ensures config consistency
Safe vs Unsafe Changes
flowchart TB
subgraph Safe["✅ Safe Changes - Hot-Reloadable"]
direction TB
T1[trading.min_funding_spread]
T2[trading.max_position_usd]
T3[trading.position_size_percent]
R1[risk.max_slippage_bps]
R2[risk.trailing_stops_enabled]
O1[observability.metrics_port]
I1[instruments add/remove*]
end
subgraph Unsafe["⚠️ Unsafe Changes - Require Restart"]
direction TB
E1[execution.mode]
L1[leverage.default]
L2[leverage.overrides]
RE1[execution.resilience.circuit_breaker_failures]
RE2[execution.resilience.circuit_breaker_timeout_secs]
RE3[execution.resilience.max_retries]
end
style Safe fill:#c8e6c9
style Unsafe fill:#ffcdd2
Safe Changes (Hot-Reloadable) ✅
These changes can be applied at runtime without restarting the bot:
Trading Parameters ([trading] section):
min_funding_spread = 0.05 # Minimum funding rate spread
min_expected_value = 0.06 # Minimum EV threshold
staleness_penalty = 0.03 # Penalty for stale data
staleness_haircut_threshold_secs = 120 # Apply haircut when data > this age
max_concurrent_positions = 5 # Max number of positions
position_size_percent = 0.30 # Position size as % of balance
max_position_usd = 10000 # Maximum position size (USD)
max_notional_per_symbol = 10000 # Max notional per symbol
use_kelly_criterion = true # Enable Kelly Criterion sizing
kelly_fraction = 0.25 # Kelly criterion fraction
max_exchange_utilization = 0.50 # Max balance utilization per exchange
target_profit_percent = 0.05 # Target profit %
update_interval_secs = 60 # Position update interval
max_hedge_attempts = 5 # Max hedging retry attempts
hedge_tolerance_percent = 0.001 # Hedge tolerance
fallback_price_usd = 100000 # Fallback price when WebSocket data unavailable
Risk Management ([risk] section):
max_slippage_bps = 50 # Maximum slippage (basis points)
min_slippage_bps = 10 # Minimum slippage
slippage_volatility_multiplier = 1.5 # Volatility multiplier
market_order_fallback_enabled = true # Enable market order fallback
limit_order_timeout_secs = 5 # Limit order timeout
trailing_stops_enabled = true # Enable trailing stops
trailing_stop_activation = 0.03 # Trailing stop activation threshold
trailing_stop_distance = 0.40 # Trailing stop distance
trailing_stop_min_lock = 0.02 # Minimum profit lock
# Fee estimates (nested under [risk.fees])
[risk.fees]
estimated_slippage = 0.001
Observability ([observability] section):
metrics_port = 9090 # Metrics server port (won't restart server)
otlp_endpoint = "http://localhost:4317" # OpenTelemetry endpoint
service_name = "wealth-bot" # Service name for telemetry
environment = "production" # Environment label
Licensing ([licensing] section):
license_key = "..." # License key (validated on next check)
account_id = "..." # Account ID
Trading Instruments ([[instruments]] sections) (v0.31+):
[[instruments]]
exchange = "binance"
symbol = "BTCUSDT"
base_asset = "BTC"
quote_asset = "USDT"
# Adding new instruments is always allowed
# Removing instruments is blocked if active positions exist
When instruments are changed:
- Added Instruments: Always allowed. Leverage is automatically set for new pairs and WebSocket streams restart to subscribe to new symbols.
- Removed Instruments: Blocked if the pair has active positions. Enable
force_remove_pairsto auto-cancel pending orders before removal.
[instrument_discovery]
force_remove_pairs = false # Set to true to auto-cancel orders on pair removal
Unsafe Changes (Require Restart) ⚠️
These changes require a full bot restart to apply safely:
Execution Mode ([execution] section):
mode = "live" # paper → live or live → paper
Reason: Switching between paper and live trading requires reinitializing execution clients and ensuring clean state.
Leverage Settings ([leverage] section):
default = 3 # Default leverage
[leverage.overrides]
"binance:BTCUSDT" = 5 # Per-symbol overrides
Reason: Leverage changes require exchange API calls to update margin mode and may affect position calculations.
Resilience Settings ([execution.resilience] section):
[execution.resilience]
circuit_breaker_failures = 5
circuit_breaker_timeout_secs = 60
max_retries = 3
retry_initial_backoff_ms = 100
websocket_max_reconnects = 100
Reason: Changing resilience settings affects circuit breaker and retry state machines that require clean initialization.
Usage
Editing Configuration
-
Edit
config.tomlwith your preferred editor:vim config.toml # or nano config.toml -
Save the file - The bot will automatically detect the change within 500ms
-
Check logs for reload status:
INFO wealth::config::watcher: Configuration file changed, reloading... config_path="/etc/wealth/config.toml" INFO wealth::config::reload_handler: Processing config reload safe_changes=3 unsafe_changes=0 requires_restart=false INFO wealth::config::reload_handler: Configuration reloaded successfully changes_applied=3 duration_ms=12
Kubernetes / Helm Deployment
When running in Kubernetes with the official Helm chart, hot-reload works automatically with ConfigMap changes:
How it works:
- The Helm chart mounts configuration as a ConfigMap at
/etc/wealth/config.toml - The
WEALTH_CONFIGenvironment variable points to this path - When
hotReload.enabled: true(default), Kubernetes can update the ConfigMap in-place - The file watcher detects changes and applies them
Helm values for hot-reload:
# Hot-reload is enabled by default
hotReload:
enabled: true # Mount ConfigMap as directory (allows in-place updates)
config:
enabled: true
# Configuration values here...
Updating configuration:
# Option 1: Update via helm upgrade
helm upgrade wealth oci://ghcr.io/thiras/charts/wealth \
--reuse-values \
--set config.trading.min_funding_spread=0.06
# Option 2: Edit HelmChart CRD directly (K3s)
kubectl edit helmchart wealth -n kube-system
# Edit valuesContent, save - K3s will update the ConfigMap
# Option 3: Patch the ConfigMap directly
kubectl patch configmap wealth-config -n wealth --type merge \
-p '{"data":{"config.toml":"..."}}'
Timing:
- ConfigMap update → ~30-60 seconds for Kubernetes to propagate to pod
- File watcher detection → ~500ms after file change
- Total: ~30-90 seconds for config to take effect
Verify reload in logs:
kubectl logs -f deployment/wealth -n wealth | grep -E "config|reload"
Note: If
hotReload.enabled: false, the chart adds achecksum/configannotation that triggers pod restart on ConfigMap changes instead of hot-reload.
Safe Change Example
Before (config.toml):
[trading]
min_funding_spread = 0.04
max_position_usd = 10000
After (edit and save):
[trading]
min_funding_spread = 0.0006 # Increased spread threshold
max_position_usd = 15000 # Increased position limit
Result:
- Config file change detected within ~500ms (debounce)
- Validation and application: ~10-50ms
- Strategy effect: On next evaluation cycle (typically within 60s)
- No restart required
- Metrics recorded:
wealth_config_reloads_total{status="success"}
Effect Timing: Configuration changes are applied in two phases:
- Shared Config Update (~500ms): Config validated and updated after debounce
- Strategy Effect (0-60s): Strategy reads config on next evaluation cycle
Instrument Hot-Reload Example (v0.31+)
Adding a New Trading Pair:
Before:
[[instruments]]
exchange = "binance"
symbol = "BTCUSDT"
base_asset = "BTC"
quote_asset = "USDT"
After (add ETHUSDT):
[[instruments]]
exchange = "binance"
symbol = "BTCUSDT"
base_asset = "BTC"
quote_asset = "USDT"
[[instruments]]
exchange = "binance"
symbol = "ETHUSDT"
base_asset = "ETH"
quote_asset = "USDT"
Result:
INFO wealth::app::task_manager: Processing instrument update callback added=["ETHUSDT"] removed=[]
INFO wealth::app::task_manager: Setting leverage for newly added instrument symbol="ETHUSDT" leverage=3
INFO wealth::strategy::market_data: Updating instruments via hot-reload symbols_count=2 symbols=["BTCUSDT", "ETHUSDT"]
INFO wealth::market_data: Updating active symbols for WebSocket streams old_count=1 new_count=2 added=["ETHUSDT"]
INFO wealth::market_data: WebSocket streams restarted successfully symbols_count=2
Removing a Trading Pair (with active position):
If you try to remove BTCUSDT while there's an active position:
WARN wealth::config::reload_handler: Instrument removal blocked due to active positions blocked_symbols=["BTCUSDT"]
The removal is blocked to prevent orphaned positions. Close the position first or enable force_remove_pairs to auto-cancel pending orders.
Unsafe Change Example
Before:
[execution]
mode = "paper"
After (edit and save):
[execution]
mode = "live" # Attempting to switch to live trading
Result:
WARN wealth::config::reload_handler: Configuration contains unsafe changes - restart required unsafe_changes=[ExecutionModeChanged { old: Paper, new: Live }]
- Changes NOT applied
- Current config remains unchanged
- Bot continues running with old config
- Manual restart required to apply changes
Monitoring & Observability
Metrics
The following OpenTelemetry metrics track reload operations:
wealth_config_reloads_total (Counter)
- Labels:
status=success,restart_required,no_changes,error - Tracks total reload attempts and their outcomes
wealth_config_reload_duration_seconds (Histogram)
- Tracks time taken to process reload (validation + application)
- Typical values: 10-50ms for safe changes
wealth_config_reload_errors_total (Counter)
- Labels:
error_type=load_failed,validation_failed,apply_failed - Tracks reload failures by error type
Instrument Hot-Reload Metrics (v0.31+):
wealth_instruments_added_total (Counter)
- Tracks total instruments added via hot-reload
wealth_instruments_removed_total (Counter)
- Tracks total instruments removed via hot-reload
wealth_active_instruments (Gauge)
- Current number of active trading instruments
Logs
Hot-reload events generate structured logs with full context:
File Change Detected:
INFO wealth::config::watcher: Configuration file changed, reloading...
config_path="config.toml"
Reload Processing:
INFO wealth::config::reload_handler: Processing config reload
safe_changes=3
unsafe_changes=0
requires_restart=false
Success:
INFO wealth::config::reload_handler: Configuration reloaded successfully
changes_applied=3
duration_ms=12
changes=["MinFundingSpreadChanged { old: 0.04, new: 0.06 }", "MaxPositionChanged { old: 10000, new: 15000 }", "KellyFractionChanged { old: 0.25, new: 0.30 }"]
Restart Required:
WARN wealth::config::reload_handler: Configuration contains unsafe changes - restart required
unsafe_changes=["ExecutionModeChanged { old: Paper, new: Live }"]
Validation Failure:
ERROR wealth::config::watcher: Failed to load new config, keeping current config
error="TOML parse error: invalid value for field 'min_funding_spread'"
Grafana Dashboards
Query examples for monitoring hot-reload in Grafana:
Reload Success Rate:
rate(wealth_config_reloads_total{status="success"}[5m])
/ rate(wealth_config_reloads_total[5m])
Reload Latency (p95):
histogram_quantile(0.95,
rate(wealth_config_reload_duration_seconds_bucket[5m])
)
Rejected Reloads (requires restart):
increase(wealth_config_reloads_total{status="restart_required"}[1h])
Best Practices
1. Test Changes in Paper Mode First
# Start in paper mode
export WEALTH__EXECUTION__MODE=paper
wealth run
# Edit config.toml with safe changes
vim config.toml
# Verify logs show successful reload
# Then test with live trading
2. Make Incremental Changes
# Good: Change one parameter at a time
[trading]
min_funding_spread = 0.05 # Changed from 0.04
# Avoid: Changing many parameters simultaneously
# (harder to debug if something goes wrong)
3. Monitor Metrics After Reload
# Check metrics endpoint
curl http://localhost:9090/metrics | grep config_reload
# Verify success
wealth_config_reloads_total{status="success"} 1
4. Keep Backup Configurations
# Before making changes
cp config.toml config.toml.backup
# If reload fails, restore quickly
mv config.toml.backup config.toml
5. Use Environment Variables for Sensitive Changes
# Avoid putting live API keys in config.toml
export WEALTH__EXECUTION__MODE=paper
# Edit config.toml safely
# Restart manually when ready for live trading
Troubleshooting
Reload Not Detected
Symptom: File changes don't trigger reload
Possible Causes:
- Editor uses atomic write (creates temp file, then renames)
- File watcher not initialized (check logs for "File watcher initialized")
- Insufficient debounce time (rapid successive writes)
Solution:
- Wait 1-2 seconds after saving
- Check logs for file watcher errors
- Verify file permissions on
config.toml
Invalid Configuration
Symptom: Reload rejected with validation error
Log:
ERROR wealth::config::watcher: Failed to load new config, keeping current config
error="missing field `min_funding_spread`"
Solution:
- Fix validation error in
config.toml - Refer to
config.example.tomlfor correct format - Run validation manually: check logs during bot startup
Restart Required Warning
Symptom: Changes not applied, logs show "restart required"
Log:
WARN wealth::config::reload_handler: Configuration contains unsafe changes - restart required
unsafe_changes=["ExecutionModeChanged { old: Paper, new: Live }"]
Solution:
- Review Unsafe Changes section above
- Restart bot to apply unsafe changes:
# Stop bot (Ctrl+C) # Edit config.toml with unsafe changes wealth run
Unexpected Behavior After Reload
Symptom: Bot behavior changed but not as expected
Possible Causes:
- Multiple safe changes applied simultaneously
- Cached values in strategy (future: notify strategy)
- Timing of reload during trade execution
Solution:
- Check logs for exact changes applied
- Verify current config values via metrics/logs
- Consider restarting for clean state
Implementation Details
Architecture
The hot-reload system uses a shared configuration architecture:
Data Flow:
1. User edits config.toml
↓
2. File system detects change
↓
3. Wait 500ms (debounce rapid edits)
↓
4. Load and validate new config
↓
5. Classify changes:
├─→ Safe changes → Apply immediately
└─→ Unsafe changes → Reject (restart required)
↓
6. Strategy uses new config on next cycle (0-60s)
Key Features
- Atomic Updates: Config changes apply all-or-nothing with automatic rollback on failure
- Zero Downtime: Active trades continue unaffected during reload
- Background Integration: Hot-reload watcher starts automatically with other tasks
Performance Impact
Minimal impact on trading performance:
- Reload processing: 10-50ms for safe changes
- No interruption to active trades
- No additional latency for order execution
Limitations
Current Limitations
-
Strategy Effect Delay: Strategy reads config on each evaluation cycle
- Safe changes update shared config immediately (~500ms)
- Strategy effect occurs on next evaluation (0-60s delay)
- This is by design - avoids mid-evaluation config changes
-
Metrics Server Port: Changing
metrics_portrequires restart- Port binding happens once at startup
- Change is logged but doesn't take effect until restart
-
Credentials: API credentials are not hot-reloadable
- Loaded once at startup from encrypted file
- Require full restart to change
Future Enhancements
- Explicit Strategy Notification: Call
strategy.apply_config_change()for immediate effect - Per-Component Reload: Selective component reinitialization for some unsafe changes
- Configuration History: Track config change history for audit trail
- Dynamic Instrument Updates: Add/remove instruments without restart
Security Considerations
- File Permissions: Ensure
config.tomlhas appropriate permissions (600 recommended) - Validation: All configs are validated before applying (invalid configs rejected)
- Credentials: API keys should be in encrypted
credentials.encrypted.json, notconfig.toml - Audit Trail: All reload events logged with timestamps and change details
See Also
- Configuration Reference - Complete config schema
- Monitoring Guide - Metrics and observability setup
- Troubleshooting - Common issues and solutions
Deployment Guide
This guide covers deployment strategies, production configurations, and operational best practices.
Table of Contents
- Pre-Deployment Checklist
- Production Deployment Options
- Systemd Service
- Docker Deployment
- Kubernetes
- Related Documentation
Pre-Deployment Checklist
Security
- ✅ API keys stored in environment variables (not hardcoded)
- ✅ Use IP whitelisting on Binance
- ✅ Enable withdrawal whitelist
- ✅ Use sub-account for trading
- ✅ Rotate API keys regularly
See: Security Guide for detailed credential management
Testing
- ✅ Test on testnet first
- ✅ Verify order placement/cancellation
- ✅ Test with small position sizes
- ✅ Monitor for 24 hours before scaling
See: Getting Started for testing procedures
Monitoring
- ✅ Set up log aggregation (Loki/Elasticsearch)
- ✅ Configure alerts for errors
- ✅ Monitor API response times
- ✅ Track position P&L
- ✅ Set up Grafana MCP for AI-powered monitoring
See: Monitoring Guide for comprehensive observability setup
Infrastructure
- ✅ Run on reliable server (not laptop)
- ✅ Use systemd for process management
- ✅ Configure automatic restarts
- ✅ Set up backup strategies
Production Deployment Options
Choose the deployment method that best fits your infrastructure:
graph LR
A[Deployment Options] --> B[Systemd Service]
A --> C[Docker Container]
A --> D[Kubernetes Pod]
B --> B1[Single Server<br/>Minimal Complexity<br/>systemctl management]
C --> C1[Docker Compose<br/>Local/Cloud<br/>With monitoring stack]
D --> D1[High Availability<br/>Auto-scaling<br/>Production scale]
style B fill:#90caf9
style C fill:#a5d6a7
style D fill:#ce93d8
Systemd Service (Recommended for Single Server)
Best for single-server deployments with minimal complexity.
Service Configuration
Create /etc/systemd/system/wealth.service:
[Unit]
Description=Wealth Trading Bot
After=network.target
[Service]
Type=simple
User=trader
WorkingDirectory=/home/trader
Environment="CREDENTIALS_PASSPHRASE=your-secure-passphrase"
Environment="WEALTH__EXECUTION__MODE=live"
Environment="WEALTH__LICENSING__LICENSE_KEY=your-license-key"
ExecStart=/usr/local/bin/wealth run
Restart=always
RestartSec=10
[Install]
WantedBy=multi-user.target
Enable and Start
# Reload systemd configuration
sudo systemctl daemon-reload
# Enable service to start on boot
sudo systemctl enable wealth
# Start the service
sudo systemctl start wealth
# Check service status
sudo systemctl status wealth
# View logs
sudo journalctl -u wealth -f
Management Commands
# Stop the service
sudo systemctl stop wealth
# Restart the service
sudo systemctl restart wealth
# Check service health
sudo systemctl is-active wealth
# View recent logs
sudo journalctl -u wealth -n 100
Docker Deployment
Best for containerized environments and cloud deployments.
Using Pre-built Image (Recommended)
# Pull the latest image
docker pull ghcr.io/thiras/wealth:latest
# Run with encrypted credentials
docker run -d --name wealth \
-v $(pwd)/config.toml:/app/config.toml \
-v $(pwd)/credentials.encrypted.json:/app/credentials.encrypted.json \
-e CREDENTIALS_PASSPHRASE=your-passphrase \
-e WEALTH__EXECUTION__MODE=live \
-e WEALTH__LICENSING__LICENSE_KEY=your-license-key \
ghcr.io/thiras/wealth:latest
Docker Compose (Recommended)
See compose.yml in the project root for a complete setup including OpenTelemetry Collector and Grafana.
# Download compose file
curl -LO https://raw.githubusercontent.com/thiras/wealth/main/compose.yml
# Start all services
docker compose up -d
# View logs
docker compose logs -f wealth
# Stop all services
docker compose down
Building Custom Image
Kubernetes (Advanced)
Best for production-scale deployments requiring high availability and orchestration.
Using the Helm Chart (Recommended)
The official Helm chart provides a complete Kubernetes deployment with security best practices:
# Login to GitHub Container Registry
helm registry login ghcr.io -u YOUR_GITHUB_USERNAME
# Install the chart
helm install wealth oci://ghcr.io/thiras/charts/wealth \
--version 0.52.3 \
--namespace wealth \
--create-namespace \
--set credentials.existingSecret=wealth-secrets \
--set wealth.executionMode=live
# Verify the installation
helm list -n wealth
kubectl get pods -n wealth
Create secrets first:
# Create namespace
kubectl create namespace wealth
# Create secrets for credentials
kubectl create secret generic wealth-secrets \
--namespace wealth \
--from-literal=CREDENTIALS_PASSPHRASE=your-passphrase \
--from-literal=BINANCE_API_KEY=xxx \
--from-literal=BINANCE_SECRET_KEY=yyy
Verify chart signature (recommended):
# Verify with Cosign
cosign verify oci://ghcr.io/thiras/charts/wealth:0.52.3 \
--certificate-identity-regexp="https://github.com/thiras/wealth/.github/workflows/helm-release.yml@.*" \
--certificate-oidc-issuer="https://token.actions.githubusercontent.com"
For chart configuration options, see:
helm show values oci://ghcr.io/thiras/charts/wealth --version 0.52.3
tmux Session (Optional)
For terminal-based access with detach support, enable tmux. The dashboard runs inside a tmux session, allowing you to detach (Ctrl+B D) and reattach without stopping the bot.
wealth:
command: dashboard # Required for tmux mode
tmux:
enabled: true
sessionName: wealth # Custom session name (optional)
Access the dashboard:
# Attach to the pod (connects to tmux session)
kubectl attach -it <pod-name>
# To detach: Press Ctrl+B, then D
# The bot continues running in the background
# To reattach later:
kubectl attach -it <pod-name>
Note: tmux and ttyd are mutually exclusive. If both are enabled, ttyd takes precedence.
ttyd Web Terminal (Optional)
The Helm chart supports browser-based access to the TUI dashboard via ttyd. When enabled, ttyd runs as the main process and spawns the wealth dashboard, allowing you to view and interact with the TUI from your browser. This provides proper detach support - just close the browser tab and the bot continues running.
# Enable ttyd web terminal for dashboard access
ttyd:
enabled: true
port: 7681
# Optional: Enable basic authentication (recommended for production)
auth:
enabled: true
username: "admin"
password: "secure-password" # Use --set or external secrets, not in VCS
# Optional: Expose via ingress (path added to all configured hosts)
ingress:
enabled: true
path: /terminal
pathType: Prefix
Access the dashboard:
# Port forward to the pod
kubectl port-forward pod/<pod-name> 7681:7681
# Open in browser
open http://localhost:7681
You can also access via ingress if configured: https://wealth.example.com/terminal
Security Note: ttyd provides full terminal access to the dashboard. Use authentication and network policies in production.
OpenTelemetry Collector Sidecar
The Helm chart includes an OTEL Collector sidecar for metrics, logs, and traces. With the Prometheus exporter enabled (default), metrics can be scraped by in-cluster Prometheus:
otelCollector:
enabled: true
# Prometheus exporter for ServiceMonitor scraping (default: enabled)
prometheus:
enabled: true # Exposes :8889/metrics for Prometheus
port: 8889
# In-cluster endpoints (no auth required)
lokiEndpoint: "http://loki-gateway.meta.svc.cluster.local:3100"
tempoEndpoint: "tempo.meta.svc.cluster.local:4317"
# OR Grafana Cloud (with auth)
grafanaCloud:
username: "123456"
apiToken: "glc_xxx..."
prometheusEndpoint: "https://prometheus-xxx.grafana.net/api/prom/push"
lokiEndpoint: "https://logs-xxx.grafana.net"
tempoEndpoint: "https://tempo-xxx.grafana.net:443"
Metrics flow:
App → OTLP → OTEL Collector → Prometheus Exporter (:8889) → ServiceMonitor scrape
Note: The app's
/metricsendpoint returns JSON config info, not Prometheus format. EnableotelCollector.prometheus.enabled=truefor Prometheus-compatible metrics.
See Monitoring Guide for details on the metrics architecture.
Manual Deployment (Without Helm)
For environments where Helm is not available:
apiVersion: apps/v1
kind: Deployment
metadata:
name: wealth-trading-bot
spec:
replicas: 1
selector:
matchLabels:
app: wealth
template:
metadata:
labels:
app: wealth
spec:
containers:
- name: wealth
image: wealth:latest
env:
- name: CREDENTIALS_PASSPHRASE
valueFrom:
secretKeyRef:
name: wealth-secrets
key: credentials-passphrase
- name: WEALTH__LICENSING__LICENSE_KEY
valueFrom:
secretKeyRef:
name: wealth-secrets
key: license-key
- name: WEALTH__EXECUTION__MODE
value: "live"
volumeMounts:
- name: credentials
mountPath: /app/credentials.encrypted.json
subPath: credentials.encrypted.json
readOnly: true
- name: credentials
mountPath: /app/.credentials.salt
subPath: .credentials.salt
readOnly: true
resources:
requests:
memory: "256Mi"
cpu: "250m"
limits:
memory: "512Mi"
cpu: "500m"
Secrets Management
# Create secret for API credentials
kubectl create secret generic exchange-credentials \
--from-literal=binance-api-key=xxx \
--from-literal=binance-secret-key=yyy
# Apply deployment
kubectl apply -f deployment.yaml
# Check pod status
kubectl get pods -l app=wealth
# View logs
kubectl logs -l app=wealth -f
Deployment Best Practices
1. Environment Separation
Maintain separate configurations for different environments:
# Development
export WEALTH__EXECUTION__MODE=paper
# Configure testnet in config.toml or use encrypted credentials with testnet keys
# Staging
export WEALTH__EXECUTION__MODE=paper
# Use production API endpoints with paper mode for testing
# Production
export WEALTH__EXECUTION__MODE=live
export WEALTH__LICENSING__LICENSE_KEY=your-license-key
# Use encrypted credentials with production API keys
2. Graceful Shutdown
The bot implements graceful shutdown (6-8 seconds typical):
What happens:
- Stop accepting - No new trades initiated
- Close positions - All active positions closed safely
- Cleanup - Statistics printed, connections closed
Trigger Options:
# Interactive mode
Ctrl+C
# Send graceful shutdown signal
kill -SIGTERM $(pidof wealth)
# Docker/Kubernetes (automatic on stop)
docker stop wealth # Sends SIGTERM, waits 10s, then SIGKILL
Monitoring Shutdown:
- Watch logs for "Shutdown signal received" messages
- Verify "All positions closed successfully" message
- Check final statistics in logs before exit
Configuration:
# Docker Compose
services:
wealth:
stop_grace_period: 10s
# Kubernetes
terminationGracePeriodSeconds: 10
3. Health Checks
Use the health endpoint for container orchestration:
# Check bot health
curl http://localhost:9090/health
# Kubernetes liveness probe
livenessProbe:
httpGet:
path: /health
port: 9090
initialDelaySeconds: 30
periodSeconds: 10
4. Log Rotation
Configure log rotation to prevent disk space issues:
# systemd journal rotation
sudo journalctl --vacuum-time=7d
sudo journalctl --vacuum-size=500M
5. Backup Strategies
- Backup configuration files regularly
- Document API key rotation procedures
Related Documentation
- Configuration Guide - Environment variables and settings
- Security Guide - Credential management and best practices
- Monitoring Guide - Observability and alerting
- Troubleshooting - Common deployment issues
- Getting Started - Initial setup and testing
Next Steps
After deployment:
- Monitor logs for the first 24 hours
- Verify metrics are being collected
- Test graceful shutdown and automatic restart
- Set up alerting for critical errors
- Document your deployment-specific configurations
For ongoing operations, see the Monitoring Guide.
Security & Credentials Guide
Guide to credential management, encryption, and security best practices
Overview
The bot implements comprehensive security measures to protect your API credentials:
- AES-256-GCM encryption for stored credentials
- PBKDF2 key derivation with 100,000 iterations
- Automatic secret redaction in logs
- Secure memory handling for sensitive data
Encryption Flow
flowchart TB
subgraph Encryption["Credential Encryption Flow"]
PASS[Your Passphrase] --> PBKDF2[PBKDF2<br/>100k iterations]
PBKDF2 --> KEY[Encryption Key]
CREDS[API Credentials] --> AES[AES-256-GCM]
KEY --> AES
SALT[Unique Salt] --> AES
AES --> FILE[credentials.encrypted.json]
SALT --> SALTFILE[.credentials.salt]
end
style PASS fill:#fff3e0
style KEY fill:#e3f2fd
style FILE fill:#c8e6c9
style SALTFILE fill:#c8e6c9
Credential Setup Flow
sequenceDiagram
participant User
participant CLI as Wealth CLI
participant Crypto as Crypto Module
participant File as Encrypted File
User->>CLI: wealth credentials add binance
CLI->>User: Prompt for API Key
User->>CLI: Enter API Key (hidden)
CLI->>User: Prompt for Secret Key
User->>CLI: Enter Secret Key (hidden)
CLI->>Crypto: Encrypt with passphrase
Crypto->>File: Store encrypted
CLI->>User: Credentials saved securely
Encrypted Credentials (Recommended)
How It Works
Your exchange API credentials are encrypted using:
- Your passphrase → converted to encryption key via PBKDF2
- AES-256-GCM → industry-standard authenticated encryption
- Unique salt → stored separately for additional security
┌─────────────────┐ ┌─────────────────┐
│ Your Passphrase │────►│ PBKDF2 (100k) │────► Encryption Key
└─────────────────┘ └─────────────────┘
│
┌─────────────────┐ ▼
│ API Credentials │────► AES-256-GCM ────► credentials.encrypted.json
└─────────────────┘
Setup
# 1. Create the encrypted credentials file
wealth credentials create
# 2. Add your exchange credentials (interactive mode - recommended)
# You'll be prompted for passphrase if CREDENTIALS_PASSPHRASE is not set
wealth credentials add binance
wealth credentials add bybit
wealth credentials add hyperliquid
wealth credentials add aster
# Alternative: Add credentials with CLI args (less secure - appears in shell history)
# wealth credentials add binance --api-key YOUR_API_KEY --secret-key YOUR_SECRET_KEY
# 3. Verify everything works
wealth credentials verify
Interactive Passphrase Prompt
When running wealth run or wealth dashboard, the bot will automatically prompt for your passphrase if:
credentials.encrypted.jsonexists (you've set up encrypted credentials)CREDENTIALS_PASSPHRASEenvironment variable is not set
$ wealth dashboard
🔐 Enter credentials passphrase: ********
This allows you to run the bot without storing the passphrase in environment variables or shell history.
Behavior on cancellation: If you press Ctrl+C or enter an empty passphrase, the bot will attempt to fall back to environment-based credentials (legacy mode). If neither method provides valid credentials, the bot will fail with an error.
For automation: Set the CREDENTIALS_PASSPHRASE environment variable to skip the interactive prompt:
export CREDENTIALS_PASSPHRASE="your-secure-passphrase-here"
wealth run # No prompt, uses env var
Security Note: Always prefer the interactive mode (without --api-key and --secret-key flags) as it prevents credentials from appearing in your shell history. The bot will prompt you securely for these values.
Files Created
| File | Purpose | Security |
|---|---|---|
credentials.encrypted.json | Encrypted credentials | AES-256-GCM encrypted |
.credentials.salt | Encryption salt | Required for decryption |
⚠️ Both files are required for decryption. Back them up securely!
Production Best Practices
File Permissions
# Set restrictive permissions
chmod 600 credentials.encrypted.json
chmod 600 .credentials.salt
# Verify
ls -la credentials.encrypted.json .credentials.salt
# Should show: -rw------- (owner read/write only)
Passphrase Management
DO NOT:
- ❌ Store passphrase in plain text files
- ❌ Commit passphrase to version control
- ❌ Share passphrase in chat/email
- ❌ Use weak passphrases (< 12 characters)
- ❌ Reuse passphrases across environments
DO:
- ✅ Use secrets management systems (AWS Secrets Manager, HashiCorp Vault)
- ✅ Use strong passphrases (12+ characters, mixed case, numbers, symbols)
- ✅ Rotate passphrases regularly
- ✅ Different passphrases for testnet/mainnet
- ✅ Audit access to encrypted files
Examples:
# AWS Secrets Manager
export CREDENTIALS_PASSPHRASE="$(aws secretsmanager get-secret-value \
--secret-id prod/wealth/passphrase \
--query SecretString \
--output text)"
# HashiCorp Vault
export CREDENTIALS_PASSPHRASE="$(vault kv get \
-field=passphrase \
secret/wealth/prod)"
# Kubernetes Secret
export CREDENTIALS_PASSPHRASE="$(kubectl get secret wealth-passphrase \
-o jsonpath='{.data.passphrase}' | base64 -d)"
Version Control
Add to .gitignore:
# Encrypted credentials
credentials.encrypted.json
.credentials.salt
# Environment files
.env
.env.local
.env.*.local
Backup Strategy
What to backup:
.credentials.salt- CRITICAL - Cannot decrypt without thiscredentials.encrypted.json- Encrypted credentials- Passphrase - Store separately in secrets manager
Backup procedure:
# Backup to secure storage
aws s3 cp .credentials.salt s3://secure-backups/wealth/$(date +%Y%m%d)/
aws s3 cp credentials.encrypted.json s3://secure-backups/wealth/$(date +%Y%m%d)/
Docker Deployment
See Deployment Guide - Docker for complete Docker setup including Docker Compose configuration.
Kubernetes Deployment
See Deployment Guide - Kubernetes for complete K8s manifests and secrets management.
Security Audit Checklist
Before Production Deployment:
- Credentials encrypted with strong passphrase (12+ chars)
-
Salt file exists and backed up (
.credentials.salt) - File permissions set to 600
- Encrypted files excluded from version control
- Passphrase stored securely (not in plaintext files)
- No hardcoded credentials
-
Verification test passed (
wealth credentials verify) - Backup strategy implemented
- Credential rotation procedure documented
Troubleshooting
"Failed to decrypt credentials" error:
- Check passphrase is correct
- Verify
.credentials.saltfile exists and hasn't been modified - Ensure
credentials.encrypted.jsonhasn't been corrupted
"Salt file not found" error:
- Verify
.credentials.saltfile exists in current directory - Check file permissions (should be readable)
- Restore from backup if missing
Secrets still appearing in logs:
- Verify using
Secret<String>wrapper types - Check custom Debug implementation is present
- Grep logs for credential patterns:
grep -i "api_key" logs/ - Should only show
[REDACTED]
See Also
- CLI Reference - Credential management commands
- Configuration Guide - Environment variables
- Deployment Guide - Production deployment
Frequently Asked Questions
Quick answers to common questions about Wealth trading bot
General Questions
What is funding rate arbitrage?
Funding rate arbitrage exploits the difference in funding rates between perpetual futures exchanges. When one exchange has a high positive funding rate and another has a lower (or negative) rate for the same asset, you can:
- Go long on the exchange with the lower/negative rate (receive funding or pay less)
- Go short on the exchange with the higher rate (receive funding)
Since positions are hedged (equal and opposite), you're delta-neutral — price movements don't affect you, but you collect the funding rate difference.
📖 Learn more: Trading Strategy
Is this risk-free?
No. While delta-neutral positions eliminate directional price risk, other risks remain:
| Risk | Description | Mitigation |
|---|---|---|
| Liquidation | Extreme price moves can liquidate one leg | Use conservative leverage (5-10x) |
| Exchange risk | Exchange hack, downtime, or insolvency | Diversify across exchanges |
| Execution risk | Partial fills leaving unhedged exposure | Atomic execution with rollback |
| Funding reversal | Funding rates can flip direction | Exit strategy with narrow_spread_exit_periods |
| Slippage | Entry/exit costs eating into profits | Min spread thresholds, slippage limits |
📖 Learn more: Strategy Formulas
How much capital do I need?
Minimum recommended: $5,000–$10,000 per exchange
With smaller amounts:
- Position sizes are too small for meaningful returns
- Fixed costs (fees) eat a larger percentage of profits
- Diversification across multiple pairs is limited
Optimal: $20,000+ total across exchanges for better position sizing and diversification.
Which exchanges are supported?
| Exchange | Type | Funding Interval |
|---|---|---|
| Binance Futures | Centralized | 8 hours |
| Bybit | Centralized | 4-8 hours* |
| HyperLiquid | Decentralized | 1 hour |
| Aster | Decentralized | 4-8 hours* |
*Bybit and Aster funding intervals vary per symbol (fetched automatically by the bot)
📖 Setup: Getting Started
Paper trading vs Live trading — what's the difference?
| Mode | Orders | Fills | Use Case |
|---|---|---|---|
| Paper | Simulated | Instant at mark price | Testing, learning |
| Live | Real exchange orders | Actual market execution | Production |
| Dryrun | Logged only | None | Strategy validation |
Start with paper mode to understand the bot's behavior before risking real funds.
# Paper trading (default)
wealth run
# Live trading
export WEALTH__EXECUTION__MODE=live
wealth run
Configuration Questions
What's a good min_funding_spread setting?
| Setting | Risk/Reward | Best For |
|---|---|---|
0.02 (2 bps) | Low profit, high frequency | High-volume, low-fee accounts |
0.04 (4 bps) | Balanced | Most users (default) |
0.06 (6 bps) | Higher profit, fewer trades | Conservative, higher fees |
0.10 (10 bps) | Very selective | VIP fee tiers only |
Remember: This is the minimum spread before accounting for fees. The bot also calculates expected value (EV) factoring in all costs.
Should I use Kelly Criterion for position sizing?
Yes for most users. Kelly Criterion dynamically sizes positions based on:
- Win probability (historical funding capture rate)
- Expected return vs. risk
Use fixed sizing (use_kelly_criterion = false) if you prefer:
- Predictable, consistent position sizes
- Simpler mental accounting
- New to the strategy
[trading]
use_kelly_criterion = true
kelly_fraction = 0.25 # Quarter-Kelly (conservative)
How do I set leverage?
Conservative: 5-10x (recommended for beginners) Moderate: 10-15x (experienced traders) Aggressive: 15-20x (requires active monitoring)
[leverage]
default = 10
[leverage.overrides]
BTCUSDT = 5 # Lower for BTC (less volatile)
SOLUSDT = 8 # Medium for SOL
⚠️ Never use maximum leverage unless you fully understand liquidation risks and have stop-losses.
What does max_exchange_utilization do?
Limits total capital deployed per exchange as a percentage of balance:
[trading]
max_exchange_utilization = 0.50 # Use max 50% of exchange balance
Why limit?
- Reserve capital for margin maintenance during volatility
- Allow opening new positions when opportunities arise
- Prevent over-concentration on one exchange
Operations Questions
How do I check if the bot is running correctly?
# Check health endpoint
curl http://localhost:9090/health | jq
# View current positions
wealth positions
# Check balances
wealth balance
# Validate configuration
wealth verify
📖 More: Monitoring Guide
Why isn't the bot opening positions?
Common reasons:
-
Spread too low — Current funding spreads don't meet
min_funding_spreadwealth funding # Check current rates -
Insufficient balance — Not enough margin on exchanges
wealth balance -
Max positions reached — Already at
max_concurrent_positionslimitwealth positions -
Paper mode — Running in simulation (positions won't show on exchange)
wealth config show | grep execution.mode -
Pair not configured — Symbol not in
[[instruments]]config
📖 Debug: Troubleshooting
How do I close all positions?
# Close all positions across all exchanges (requires confirmation)
wealth close --all --confirm
# Close positions for a specific symbol
wealth close --symbol BTCUSDT --confirm
# Close positions on a specific exchange
wealth close --exchange binance --all --confirm
Can I run multiple bot instances?
Not recommended with the same API keys. Issues:
- Race conditions on position sizing
- Conflicting order management
- Rate limit exhaustion
If needed:
- Use separate API keys per instance
- Configure different symbols per instance
- Use different
service_namefor observability
How do I update the bot?
# Download latest release
curl -L https://github.com/thiras/wealth/releases/latest/download/wealth-linux-x86_64 -o wealth
# Make executable
chmod +x wealth
# Verify version
./wealth --version
# Restart
./wealth run
⚠️ Check Changelog for breaking changes before updating.
Troubleshooting Questions
"Timestamp out of sync" error?
Your system clock is drifting. Exchanges reject requests with timestamps >1 second off.
# Sync clock
sudo ntpdate -s time.nist.gov
# Or install chrony (recommended)
sudo apt install chrony
sudo systemctl enable chrony
"Margin insufficient" error?
Not enough balance for the requested position size.
# Check balances
wealth balance
# Reduce position size in config
[trading]
max_position_usd = 5000 # Lower this
Or transfer more funds to your futures wallet on the exchange.
WebSocket keeps disconnecting?
-
Check internet stability
ping fapi.binance.com -
Verify firewall allows WebSocket (port 443)
-
Check exchange status pages for maintenance
The bot auto-reconnects, but persistent issues indicate network problems.
How do I read the logs?
# Run with verbose logging
wealth run --verbose
# Or set log level via environment
RUST_LOG=debug wealth run
# Save to file
wealth run 2>&1 | tee bot.log
Key log patterns:
Opportunity detected— Found potential tradePosition opened— Trade executedFunding collected— Received funding paymentPosition closed— Exited trade
📖 More: Logging Guide
Performance Questions
What returns can I expect?
Typical ranges (highly variable based on market conditions):
| Market Condition | Annualized Return |
|---|---|
| High volatility (bull/bear) | 20-50% APY |
| Normal conditions | 10-25% APY |
| Low volatility (sideways) | 5-15% APY |
Factors affecting returns:
- Funding rate spreads (market-dependent)
- Exchange fee tier (VIP levels reduce costs)
- Position sizing efficiency
- Number of active pairs
⚠️ Past performance doesn't guarantee future results. Funding rates are highly variable.
How can I reduce fees?
- Upgrade exchange tier — VIP levels significantly reduce fees
- Use maker orders — Lower fees than taker orders
- Choose HyperLiquid — 0% maker fees
- Increase minimum spread — Only take higher-margin opportunities
[risk.fees.binance]
maker = 0.0001 # Update to your actual VIP tier
taker = 0.0003
See Also
- Getting Started - Initial setup guide
- Configuration Guide - All settings explained
- Troubleshooting - Problem resolution
- Trading Strategy - Strategy deep dive
Troubleshooting Guide
Common issues and solutions when running the Wealth trading bot.
Troubleshooting Flow
flowchart TB
START[Issue Detected] --> AUTH{Authentication<br/>Error?}
AUTH -->|Yes| AUTHFIX[Check API Keys<br/>IP Whitelist<br/>Permissions]
AUTH -->|No| TIME{Timestamp<br/>Error?}
TIME -->|Yes| TIMEFIX[Sync System Clock<br/>Install NTP/Chrony]
TIME -->|No| BAL{Balance<br/>Error?}
BAL -->|Yes| BALFIX[Check Balance<br/>Transfer Funds<br/>Reduce Position Size]
BAL -->|No| CONN{Connection<br/>Error?}
CONN -->|Yes| CONNFIX[Check Internet<br/>Firewall Rules<br/>Exchange Status]
CONN -->|No| CONFIG{Config<br/>Error?}
CONFIG -->|Yes| CONFIGFIX[Run wealth verify<br/>Run wealth init<br/>Check TOML Syntax]
CONFIG -->|No| HELP[Contact Support<br/>Check Logs]
style START fill:#ffcdd2
style AUTHFIX fill:#c8e6c9
style TIMEFIX fill:#c8e6c9
style BALFIX fill:#c8e6c9
style CONNFIX fill:#c8e6c9
style CONFIGFIX fill:#c8e6c9
style HELP fill:#e3f2fd
Table of Contents
- Authentication Errors
- Timestamp Errors
- Insufficient Balance
- Market Unavailable / Delisting Errors
- Position Closing Issues
- Stuck Executions & Auto-Shutdown
- Rate Limiting
- WebSocket Issues
- Connection Issues
- Configuration Issues
- Getting Help
Authentication Errors
Error: Binance API error (status=401, code=-2015): Invalid API-key
Causes:
- Incorrect API key or secret
- API key not enabled for futures trading
- IP address not whitelisted
- API key expired or revoked
Solutions:
-
Verify API key is correct:
wealth config show -
Check IP whitelist on your exchange (Binance → API Management → Edit API)
-
Ensure API permissions include "Futures Trading"
-
Regenerate keys if unsure and update configuration
Prevention:
- Use encrypted credentials instead of environment variables
- Enable IP whitelisting after creating API keys
- Test on testnet before live trading
Timestamp Errors
Error: Binance API error (status=400, code=-1021): Timestamp out of sync
Causes:
- System clock drift
- NTP service not running
- Network latency issues
Solutions:
# Sync system clock with NTP
sudo ntpdate -s time.nist.gov
# Or use systemd-timesyncd
sudo systemctl restart systemd-timesyncd
sudo timedatectl status
# Install chrony (recommended for production)
sudo apt install chrony
sudo systemctl enable chrony
sudo systemctl start chrony
Verification:
timedatectl
# Should show: System clock synchronized: yes
Insufficient Balance
Error: Binance API error (status=400, code=-2019): Margin insufficient
Causes:
- Insufficient USDT in futures wallet
- Existing positions using available margin
- Position size exceeds available balance
Solutions:
-
Check current balance:
wealth balance -
Transfer funds to your futures wallet on the exchange
-
Reduce position size in
config.toml:[trading] max_position_usd = 5000 # Lower this value -
Close existing positions if needed:
wealth close --all
Market Unavailable / Delisting Errors
Error: Market closed or unavailable or Bybit API error (code 30228) (delisting)
Causes:
- Symbol is being delisted from the exchange
- Market is temporarily closed for maintenance
- Exchange has disabled trading for the symbol
What Happens:
- The bot automatically marks the affected symbol as "unhealthy" on the specific exchange
- Future attempts to trade this symbol on that exchange are blocked
- Other exchanges remain unaffected (the unhealthy status is exchange-specific)
Symptoms in Logs:
event = "pair_marked_unhealthy"
symbol = "DAMUSDT"
exchange = "BybitPerpetualsUsd"
reason = "market_unavailable"
Solutions:
-
Check exchange announcements for delisting notices
-
Remove the symbol from your instruments configuration:
[instruments] symbols = ["BTCUSDT", "ETHUSDT"] # Remove the delisted symbol -
Use dynamic discovery instead of manual instrument lists:
[instrument_discovery] enabled = true min_volume_24h_usd = 10_000_000 # Filter low-volume symbols -
Monitor pair health in the TUI dashboard or logs:
grep "pair_marked_unhealthy\|market_unavailable" ~/.wealth/logs/wealth.log -
Check rejection metrics in Grafana/Prometheus:
# Count of opportunities skipped due to unhealthy pairs wealth_opportunity_rejections_total{reason="pair_unhealthy"} # Order errors due to market unavailable wealth_order_errors_total{error_type="market_unavailable"}
Prevention:
- Enable dynamic pair discovery to automatically filter out low-liquidity pairs
- Set appropriate volume thresholds to avoid trading symbols near delisting
- The bot will automatically recover when a symbol becomes available again
- Monitor the
pair_unhealthyrejection metric for early warning signs
Position Closing Issues
Error: reduce_only orders had zero fill but positions still exist or MANUAL INTERVENTION REQUIRED
Causes:
- Position state mismatch between bot and exchange (e.g., partial liquidation)
- ADL (Auto-Deleveraging) reduced position size externally
- Partial or full liquidation occurred
- Manual trades outside the bot modified positions
- Network issues during position close
- Exchange API returning stale data
Pre-Close Position Verification (v0.52+)
Before attempting to close positions, the bot now verifies actual position quantities from exchanges. This prevents close failures from quantity mismatch:
Detection Flow:
flowchart TB
CLOSE[Close Position Triggered] --> QUERY[Query Actual Positions]
QUERY --> COMPARE{Compare Stored<br/>vs Actual}
COMPARE -->|Match| PROCEED[Close with Stored Qty]
COMPARE -->|Drift >10%| ALERT[Log Drift Alert]
COMPARE -->|Both Gone| CLEANUP[Remove from Tracking]
ALERT --> ADJUST[Use Safe Quantity]
ADJUST --> PROCEED2[Close with Adjusted Qty]
style ALERT fill:#ffcdd2
style CLEANUP fill:#c8e6c9
style PROCEED fill:#c8e6c9
style PROCEED2 fill:#fff9c4
Position Drift Events:
position_drift_alert- Significant drift detected (>10%)long_position_missing- Long position completely gone (liquidated?)short_position_missing- Short position completely gone (liquidated?)positions_already_closed- Both sides already closed externally
Force Close Fallback
When reduce_only orders fail with zero fill, the bot automatically attempts a force_close_position fallback:
- Fetches current position state directly from the exchange
- Uses configurable slippage (
hyperliquid_close_slippage, default 5%) - Retries the close with accurate position data
When Manual Intervention is Required:
If both reduce_only and force_close fallback fail, you'll see MANUAL INTERVENTION REQUIRED in the logs. This can happen due to:
- Exchange API downtime
- Network connectivity issues
- Extreme market volatility
Solutions:
-
Check current positions on exchanges:
wealth positions -
Manually close positions on the exchange UI if needed
-
Increase slippage for more reliable closes (default 5%):
[execution.reconciliation] hyperliquid_close_slippage = 0.10 # 10% -
Check metrics for fallback frequency:
wealth_position_force_close_fallback_total -
Enable orphan position cleanup if bot is sole user of accounts:
[execution.reconciliation] auto_close_orphans = true
Stuck Executions & Auto-Shutdown (v0.53+)
Warning: Auto-shutdown triggered after N consecutive emergency close failures
What This Means:
Starting with v0.53, the bot automatically shuts down when emergency close operations repeatedly fail. This is a safety mechanism to prevent:
- Unhedged positions accumulating
- Liquidation risk from stuck executions
- Cascading failures across exchanges
What Causes This:
- Exchange API outages preventing position closes
- Position limit reached on hedge exchange (e.g., Aster
-5018error) - Circuit breaker blocking closes (mitigated in v0.53 with bypass)
- Network connectivity issues
Emergency Actions:
-
Manually close positions immediately on exchange UIs before liquidation:
- Binance Futures: futures.binance.com
- HyperLiquid: app.hyperliquid.xyz
- Aster: app.aster.finance
-
Check for unhedged positions:
wealth positions -
Review logs for root cause:
grep "emergency_close\|PartialFill\|RollingBack" ~/.wealth/logs/wealth.log
Configuration Options:
[execution.reconciliation]
# How long before execution is considered stuck (default: 60s, was 300s pre-v0.53)
stuck_execution_threshold_secs = 60
# Auto-shutdown after this many consecutive emergency close failures
emergency_close_failure_threshold = 3 # Set to 0 to disable
What Changed in v0.53:
- Per-exchange circuit breakers: Aster failures no longer block Binance closes
- Circuit breaker bypass: Emergency closes bypass open circuit breakers
- Faster stuck detection: 60s default (was 300s)
- Auto-shutdown: Prevents runaway liquidation risk
Rate Limiting
Error: Rate limit exceeded or 429 Too Many Requests
Causes:
- Too many API requests in short time
- Aggressive polling settings
- Multiple bot instances sharing API keys
Solutions:
-
Wait and retry - Rate limits typically reset in 1-5 minutes
-
Check for multiple instances:
ps aux | grep wealth -
Upgrade exchange tier for higher limits (Binance VIP, Bybit API tier)
-
Spread API keys across different bots if running multiple
WebSocket Issues
Error: WebSocket connection failed or WebSocket disconnected
Causes:
- Unstable internet connection
- Firewall blocking WebSocket connections
- Exchange maintenance
Solutions:
-
Check internet connection:
ping fapi.binance.com ping api.bybit.com -
Allow WebSocket connections through firewall (port 443)
-
Check exchange status:
- Binance: https://www.binance.com/en/support/announcement
- Bybit: https://announcements.bybit.com/
-
Restart the bot - It auto-reconnects, but a restart ensures clean state:
# Stop with Ctrl+C, then restart wealth run
Rate Limit Exceeded (v0.58.4+)
Error: WebSocket reconnection rate limit exceeded - entering cooldown
Causes:
- Exchange experiencing outage or maintenance
- Network connectivity issues causing rapid disconnections
- DNS resolution failures
What Happens:
- After 10 failed reconnection attempts within 60 seconds, the bot enters a 5-minute cooldown
- A Critical severity alert is triggered
- The bot logs the cooldown duration and waits before retrying
- Other exchanges continue operating normally (per-exchange isolation)
Solutions:
-
Wait for cooldown to expire - The bot will automatically retry after 5 minutes
-
Check if the exchange is down:
curl -I https://fstream.binance.com curl -I https://stream.bybit.com -
Check your network: Persistent DNS or routing issues can cause rapid failures
-
Monitor logs for the root cause:
# Look for the underlying connection error grep "websocket_connection_error" wealth.log | tail -20
Prevention: The rate limiter prevents "death spiral" scenarios where rapid reconnection attempts exhaust API limits and cause cascade failures across all exchanges.
Connection Issues
Error: Failed to connect to exchange or Network error
Causes:
- DNS resolution failure
- Network timeout
- Exchange API down
Solutions:
-
Test connectivity:
curl -I https://fapi.binance.com curl -I https://api.bybit.com curl -I https://api.hyperliquid.xyz curl -I https://fapi.asterdex.com -
Check DNS:
nslookup fapi.binance.com -
Use alternative DNS (Google: 8.8.8.8, Cloudflare: 1.1.1.1)
Configuration Issues
Error: Configuration validation failed or Configuration file not found
Solutions:
-
Initialize configuration (creates from embedded template):
wealth init -
Validate existing configuration:
wealth verify -
Check config file syntax:
cat config.toml -
Reset to defaults (overwrites existing):
wealth init --force
Credential Issues
Error: Failed to decrypt credentials
Causes:
- Wrong passphrase
- Missing credentials file
- Corrupted credentials file
Solutions:
- Check passphrase is set correctly
- Verify files exist:
ls -la credentials.encrypted.json .credentials.salt - Re-create if corrupted:
wealth credentials create && wealth credentials add binance
📖 For complete credential setup, see Security Guide.
Health Check
Quick diagnostic commands:
# Check bot health
curl http://localhost:9090/health | jq
# View positions and balances
wealth positions
wealth balance
# Verify configuration
wealth verify
📖 For detailed monitoring, see Monitoring Guide.
Common Log Messages
Normal Operation
Initializing bot | mode=paper_trading- Starting in paper modeWebSocket connected- Exchange connection establishedBot running | metrics_port=9090- Bot is operational
Warnings (Usually OK)
Opportunity detected but spread too low- Normal filteringSkipping execution: insufficient balance- Not enough funds for tradeRate limit approaching- Consider reducing activity
Errors (Need Attention)
Authentication failed- Check API credentialsOrder placement failed- Check balance and configurationWebSocket disconnected- Network issue, will auto-reconnect
Getting Help
If you can't resolve an issue:
-
Check logs for detailed error messages:
wealth run --verbose 2>&1 | tee bot.log -
Collect diagnostic info:
wealth --version wealth verify curl http://localhost:9090/health -
Test in paper mode first:
export WEALTH__EXECUTION__MODE=paper wealth run
See Also
- Configuration Guide - Settings reference
- Security Guide - Credential management
- Getting Started - Initial setup
Licensing
Proprietary Software - Copyright © 2025 Ant Somers. All Rights Reserved.
See LICENSE for full terms.
Wealth Trading Bot requires a valid license for production use.
Overview
- Development Mode: Licensing is optional (for testing)
- Production Mode: Valid license required
- Machine Binding: Each license can be activated on a limited number of machines
- Automatic Validation: License is re-validated periodically during runtime
Getting a License
- Contact: Visit wealth.thiras.net for licensing inquiries
- Receive License Key: You'll receive a license key via secure channel
- Configure: Set the license key environment variable
export WEALTH__LICENSING__LICENSE_KEY="YOUR-LICENSE-KEY-HERE"
- Run the Bot: License activates automatically on first run
wealth run
License Commands
Check License Status
wealth license check
Shows:
- License ID and status
- Expiration date
- Current machine activation
Show Machine Fingerprint
wealth license show-fingerprint
Use this when contacting support about licensing issues.
Validate License
wealth license validate
Tests license connectivity and configuration.
Deactivate License
wealth license deactivate --confirm
Use when transferring your license to a different machine.
Transferring Your License
Moving to a New Machine
-
On the old machine, deactivate:
wealth license deactivate --confirm -
On the new machine, configure and run:
export WEALTH__LICENSING__LICENSE_KEY="your-license-key" wealth run
The license will automatically activate on the new machine.
If You Can't Access the Old Machine
Contact support with your machine fingerprint:
wealth license show-fingerprint
They can remotely deactivate your old machine.
License Types
| Type | Use Case | Features |
|---|---|---|
| Development | Testing & development | Lower machine limits, shorter duration |
| Production | Live trading | Higher machine limits, longer duration |
| Kubernetes | Container deployments | Higher machine limits, supports pod scheduling |
Kubernetes Deployments
The Helm chart automatically handles license activation in Kubernetes environments. The fingerprint is generated from the node name and namespace, ensuring:
- Stable identity: Survives pod restarts on the same node
- Security compliant: Works with Pod Security Standards (no hostPath mounts)
- Proper tracking: Different nodes count as separate machines
Note: For multi-node clusters, ensure your license has sufficient machine activation slots for your expected cluster size.
Troubleshooting
"License key not configured"
Set your license key:
export WEALTH__LICENSING__LICENSE_KEY="your-license-key"
"Machine activation limit exceeded"
You've reached your activation limit. Either:
- Deactivate an old machine:
wealth license deactivate --confirm - Contact support to increase your limit
"License has expired"
Contact support to renew your license.
"Network error"
Ensure your firewall allows HTTPS connections to api.keygen.sh.
"Failed to get machine fingerprint" (Containers)
If running in Docker without the Helm chart, ensure /etc/machine-id is accessible or contact support for guidance.
Security Best Practices
- Never commit license keys to version control
- Use environment variables for license configuration
- Contact support if you suspect your key was compromised
FAQ
Q: Can I run the bot without a license for testing?
A: Yes, debug builds don't require a license.
Q: How many machines can I activate?
A: Depends on your license type. Check with sales.
Q: What happens if my license expires while running?
A: The bot will gracefully shut down within 6 hours, closing all positions safely.
Q: Can I transfer my license to a different machine?
A: Yes, deactivate on the old machine first, then activate on the new one.
Support
- Sales & Licensing: Visit wealth.thiras.net
- Technical Support: Open an issue on GitHub (include your machine fingerprint)
Changelog
All notable changes to this project will be documented in this file.
0.59.4 - 2026-01-16
♻️ Refactor
- Downgrade noisy logs to debug level (#383)
0.59.3 - 2026-01-16
🚀 Features
- helm: Sync chart values with config.example.toml v0.57 (#382)
⚙️ Miscellaneous Tasks
- Release v0.59.3
0.59.2 - 2026-01-15
🐛 Bug Fixes
- Reduce leverage resolution log level to trace (#381)
⚙️ Miscellaneous Tasks
- Release v0.59.2
0.59.1 - 2026-01-15
🚀 Features
- execution: Add targeted leverage resolution and show resolved leverage in TUI (#380)
⚙️ Miscellaneous Tasks
- Release v0.59.1
0.59.0 - 2026-01-15
🚀 Features
-
execution: Add targeted leverage setting for specific exchanges (#377)
-
balance: Add wallet_balance for stable deposited capital tracking (#378)
🐛 Bug Fixes
- Comprehensive bug fixes from codebase audit (#379)
⚙️ Miscellaneous Tasks
- Release v0.59.0
0.58.3 - 2026-01-15
🐛 Bug Fixes
- Rate-limit price stale warnings and add display threshold (#376)
⚙️ Miscellaneous Tasks
- Release v0.58.3
0.58.2 - 2026-01-15
🐛 Bug Fixes
-
tui: Throttle spread history sampling to 1-minute intervals (#370)
-
hyperliquid: Address mismatch bugs in subkey mode causing orphan position close failures (#373)
⚙️ Miscellaneous Tasks
- Release v0.58.2
0.58.1 - 2026-01-15
🚀 Features
- tui: Add responsive P&L to header and Aster fee tracking (#369)
🐛 Bug Fixes
-
tui: Resolve race conditions and edge cases in TUI (#365)
-
tui: Accumulate spread history for trend sparkline (#366)
-
hyperliquid: Use master wallet address for API queries (#368)
⚙️ Miscellaneous Tasks
- Release v0.58.1
0.58.0 - 2026-01-14
🚀 Features
- Implement post-only (maker) order execution (#364)
⚙️ Miscellaneous Tasks
- Release v0.58.0
0.57.1 - 2026-01-14
🐛 Bug Fixes
- Include price spread P&L in unrealized P&L calculation (#363)
📚 Documentation
- Update documentation and code comments to reflect current codebase state (#362)
⚙️ Miscellaneous Tasks
- Release v0.57.1
0.57.0 - 2026-01-14
🚀 Features
- config: Add startup validation for fee configurations (#360)
🐛 Bug Fixes
-
funding-rate: Fix 5 bugs in funding rate fetching and EV calculation (#356)
-
Critical bug fixes across execution and strategy layers (#357)
-
Address multiple bugs found during code review (#358)
-
Comprehensive bug fixes from codebase audit (#359)
-
changelog: Simplify commit listing in changelog body template
⚙️ Miscellaneous Tasks
-
Sync example configs and docs with code (#361)
-
Release v0.57.0
0.56.0 - 2026-01-14
🚀 Features
- Propagate WebSocket funding intervals to FundingIntervalCache (#355)
🐛 Bug Fixes
-
bybit: Correct API response parsing for instruments endpoint (#348)
-
tui: Resolve metrics discrepancies between header and stats tab (#349)
-
Normalize exchange names for funding rate consistency (#350)
-
monitoring: Comprehensive metrics bug fixes (#351)
-
funding: Correct exchange funding intervals and add units module (#352)
♻️ Refactor
-
execution: Split aster client into folder module (#353)
-
Remove dead code and deprecated items (#354)
⚙️ Miscellaneous Tasks
- Release v0.56.0
0.55.2 - 2026-01-13
🚀 Features
- funding: Add Aster funding payment tracking (#346)
🐛 Bug Fixes
- Correct Bybit funding fee sign convention (#347)
⚙️ Miscellaneous Tasks
- Release v0.55.2
0.55.1 - 2026-01-10
♻️ Refactor
- Lower price/funding update logs to trace level (#344)
⚙️ Miscellaneous Tasks
- Release v0.55.1
0.55.0 - 2026-01-10
🐛 Bug Fixes
-
tui: Pairs tab selector now follows selection properly (#336)
-
Handle zero exit price in P&L calculation (#338)
-
bybit: Support per-symbol funding intervals (4h/8h) (#339)
-
docs: Update error handling and classification sections in copilot instructions
-
Prevent false spread reversal exits when funding rates unavailable (#341)
♻️ Refactor
-
Improve logging consistency and reduce noise (#342)
-
Deprecate old error classification type aliases (#343)
⚙️ Miscellaneous Tasks
- Release v0.55.0
0.54.1 - 2026-01-09
🐛 Bug Fixes
-
tui: Improve pairs tab scrolling and ESC filter clearing (#319)
-
Correct Net calculation in header to show funding minus fees (#330)
-
strategy: Properly account for cross-exchange funding intervals (#333)
-
Stats tab "Active Positions" not updating after manual position close (#332)
-
Correct EV field naming and histogram conversion factor (#334)
-
Enable dynamic instrument discovery for opportunity trading (#335)
⚙️ Miscellaneous Tasks
- Release v0.54.1
0.54.0 - 2026-01-09
🚀 Features
-
funding: Clock-align funding tracker to on-hour + 2 minutes (#286)
-
#223 unify keyboard shortcuts (#303)
-
config: Implement TryFrom validation at load time (#313)
-
tui: Add sorting and search to pairs tab (#318)
🐛 Bug Fixes
-
Verify position exists before emergency close to prevent false positives (#284)
-
tui: Include realized price P&L in net calculation (#285)
-
Normalize stablecoins on balance read operations (#316) (#317)
📚 Documentation
- Add architecture decision records and sequence diagrams (#315)
♻️ Refactor
-
Split atomic execution module into focused submodules (#305)
-
Split position_management.rs into focused modules (#310)
-
Unify error classification modules (#308)
-
FundingRateStrategy to reduce field count (#309)
-
Split ExecutionClient trait into focused traits (#312)
-
Standardize Arc::clone() usage across codebase (#314)
🧪 Testing
-
Add unit tests for force_close_position and try_force_close_fallback (#287)
-
Add property-based tests for financial calculations (#311)
⚙️ Miscellaneous Tasks
-
Comment out macOS ARM64 build configuration in binary release workflow
-
Release v0.54.0
Refactor
- Split binance.rs and hyperliquid.rs into submodules (#306)
0.53.9 - 2026-01-08
🐛 Bug Fixes
- Improve error type classification and add pair_unhealthy metric (#283)
⚙️ Miscellaneous Tasks
- Release v0.53.9
0.53.8 - 2026-01-08
🚀 Features
- error: Add exchange field to ExecutionError::OrderFailed (#281)
🐛 Bug Fixes
- Use actual config path for hot-reload watcher instead of hardcoded constant (#282)
⚙️ Miscellaneous Tasks
- Release v0.53.8
0.53.7 - 2026-01-08
🚀 Features
- strategy: Add exit_reason to position_closed logs and metrics (#279)
🐛 Bug Fixes
-
billy: Update chart version to 0.53.6
-
dashboard: Use config_path for OTLP initialization (#280)
⚙️ Miscellaneous Tasks
-
Remove deprecated helm chart for wealth-billy
-
Release v0.53.7
Build
- deps: Bump the cargo group across 1 directory with 2 updates (#278)
0.53.6 - 2026-01-07
🐛 Bug Fixes
- helm: Mount config to /etc/wealth to avoid shadowing binary (#277)
⚙️ Miscellaneous Tasks
- Release v0.53.6
0.53.5 - 2026-01-07
🐛 Bug Fixes
- helm: Mount config.toml at correct path /app/config.toml (#276)
⚙️ Miscellaneous Tasks
- Release v0.53.5
0.53.4 - 2026-01-07
🐛 Bug Fixes
-
Remove example configuration copy from Dockerfile
-
Update helm chart version to 0.53.4 and enhance trading configuration
⚙️ Miscellaneous Tasks
- Release v0.53.4
0.53.3 - 2026-01-07
🐛 Bug Fixes
-
Add WebSocket heartbeats to prevent false health check failures (#273)
-
Track net funding instead of gross positive funding (#275)
-
Update trading fees for various exchanges in configuration files
📚 Documentation
- Fix broken cross-directory references and enforce user docs self-containment (#274)
⚙️ Miscellaneous Tasks
- Release v0.53.3
0.53.2 - 2026-01-07
🚀 Features
-
helm: Add wealth-billy Helm chart configuration
-
helm: Add hot-reload support to prevent pod restarts on config changes (#270)
🐛 Bug Fixes
- Per-exchange symbol filtering for WebSocket streams (#271)
♻️ Refactor
-
Remove unused pair_health config (#269)
-
tui: Fix UI consistency across tabs (#272)
⚙️ Miscellaneous Tasks
- Release v0.53.2
0.53.1 - 2026-01-07
🐛 Bug Fixes
- websocket: Implement per-exchange restart and heartbeat tracking (#268)
⚙️ Miscellaneous Tasks
- Release v0.53.1
0.53.0 - 2026-01-07
🚀 Features
-
tui: Add confirmation modal for quit actions (#265)
-
tui: Enhance position widget with sorting, APR, risk indicators, sparklines (#267)
🐛 Bug Fixes
-
market-data: Add Bybit WebSocket heartbeat to prevent disconnections (#262)
-
Include price spread P&L in realized profit calculation (#266)
♻️ Refactor
-
market_data: Unify WebSocket connector logic (#263)
-
execution: Extract shared exchange client infrastructure to base module (#264)
⚙️ Miscellaneous Tasks
- Release v0.53.0
0.52.21 - 2026-01-06
🚀 Features
- tui: Dynamic height for balances and health panels (#261)
🐛 Bug Fixes
-
Show exchanges in TUI even when no stablecoin balance found (#259)
-
Prevent infinite WebSocket restart loop in health check (#260)
⚙️ Miscellaneous Tasks
- Release v0.52.21
0.52.20 - 2026-01-04
🚀 Features
- helm: Add flexible config options and instrument discovery (#258)
🐛 Bug Fixes
-
helm: Keep container running after tmux detach (#256)
-
Add aster to balance fetching with DRY refactor (#257)
⚙️ Miscellaneous Tasks
- Release v0.52.20
0.52.19 - 2026-01-04
🚀 Features
- helm: Add tmux session support for detachable TUI access (#255)
⚙️ Miscellaneous Tasks
- Release v0.52.19
0.52.18 - 2026-01-04
🐛 Bug Fixes
- helm: Prevent ttyd from terminating process on disconnect (#254)
⚙️ Miscellaneous Tasks
- Release v0.52.18
0.52.17 - 2026-01-03
🚀 Features
- helm: Integrate ttyd into main container for web-based TUI access (#253)
⚙️ Miscellaneous Tasks
- Release v0.52.17
0.52.16 - 2026-01-03
🚀 Features
- helm: Add prometheus exporter to otel collector sidecar (#252)
🐛 Bug Fixes
- helm: Set distinct service name for otel-collector sidecar (#251)
⚙️ Miscellaneous Tasks
- Release v0.52.16
0.52.15 - 2026-01-02
🐛 Bug Fixes
- helm: Enable tty/stdin for dashboard command (#250)
⚙️ Miscellaneous Tasks
- Release v0.52.15
0.52.14 - 2026-01-02
🚀 Features
- helm: Use native sidecar for otel-collector startup ordering (#249)
⚙️ Miscellaneous Tasks
- Release v0.52.14
0.52.13 - 2026-01-02
🚀 Features
- Add helmlint pre-commit hook from gruntwork-io
🐛 Bug Fixes
- helm: Correct otlphttp exporter path for Loki OTLP ingestion (#248)
♻️ Refactor
- ci: Streamline build steps by consolidating test build and archive
⚙️ Miscellaneous Tasks
- Release v0.52.13
0.52.12 - 2026-01-02
🐛 Bug Fixes
-
helm: Replace removed lokiexporter with otlphttp (#247)
-
ci: Remove helm directory from paths-ignore in CI workflow
♻️ Refactor
- Switch to softprops/action-gh-release to eliminate 2min wait (#246)
⚙️ Miscellaneous Tasks
- Release v0.52.12
0.52.11 - 2026-01-02
🐛 Bug Fixes
- helm: Use loki exporter instead of otlphttp for Loki logs (#244)
⚙️ Miscellaneous Tasks
-
helm: Adjust leverage, slippage, and fees defaults for improved trading performance
-
Skip app build for helm/grafana/otel changes (#245)
-
Release v0.52.11
0.52.10 - 2026-01-02
🚀 Features
- helm: Add hostNetwork and dnsPolicy support (#243)
⚡ Performance
- ci: Optimize pipeline by merging clippy and using workflow_run (#242)
⚙️ Miscellaneous Tasks
- Release v0.52.10
0.52.9 - 2026-01-02
⚙️ Miscellaneous Tasks
- Release v0.52.9
0.52.8 - 2026-01-02
⚙️ Miscellaneous Tasks
- Release v0.52.8
0.52.7 - 2026-01-02
🚀 Features
- helm: Add standalone otlp_endpoint for direct Tempo connection (#238)
⚙️ Miscellaneous Tasks
- Release v0.52.7
0.52.6 - 2026-01-02
🚀 Features
- helm: Add ttyd web terminal sidecar support (#236)
⚙️ Miscellaneous Tasks
- Release v0.52.6
Build
-
deps: Bump clap from 4.5.51 to 4.5.53 (#228)
-
deps: Bump clap_complete from 4.5.61 to 4.5.64 (#230)
-
deps: Bump crossterm from 0.28.1 to 0.29.0 (#231)
-
deps: Bump reqwest from 0.12.24 to 0.12.28 (#232)
-
deps: Bump ratatui from 0.29.0 to 0.30.0 (#229)
0.52.5 - 2026-01-01
🐛 Bug Fixes
-
Add pre-close position verification to handle external position changes (#234)
-
Add force_close_position fallback when market price unavailable (#235)
⚙️ Miscellaneous Tasks
- Release v0.52.5
0.52.4 - 2026-01-01
🚀 Features
- Add Helm chart with secure OCI release workflow (#227)
🐛 Bug Fixes
- Prevent liquidation from cascading failures (#233)
⚙️ Miscellaneous Tasks
- Release v0.52.4
0.52.3 - 2025-12-29
🐛 Bug Fixes
- Ensure config.example.toml is copied in both build stages of Dockerfile
⚙️ Miscellaneous Tasks
- Release v0.52.3
0.52.2 - 2025-12-29
🚀 Features
- cli: Add init command to generate config from template (#225)
📚 Documentation
- Reorder Strategy & Trading section in user guide
⚡ Performance
- Optimize CI/CD pipeline efficiency (#224)
⚙️ Miscellaneous Tasks
-
ci: Update Docker release workflow to support versioned tags and enable latest tag
-
Release v0.52.2
0.52.1 - 2025-12-27
🐛 Bug Fixes
- docs: Remove footers from changelog template for squash-merge compatibility
📚 Documentation
-
Add Mermaid diagrams to user documentation (#215)
-
Reorganize SUMMARY.md to move Strategy & Trading section
-
Reorganize Strategy & Trading section in README.md
-
Improve user documentation DRY and navigation (#216)
-
Improve user documentation (#217)
-
Improve user documentation quality and accuracy (#220)
-
Enhance copilot instructions for clarity and detail
⚙️ Miscellaneous Tasks
-
ci: Enable macOS ARM64 target in binary release workflow
-
Release v0.52.1
Build
-
Pin hyperliquid_rust_sdk dependency to use specific revision
-
Bump alloy to 1.2, uuid to 1.19, and tempfile to 3.24
0.52.0 - 2025-12-26
🚀 Features
-
market_data: Implement Aster WebSocket price streaming (#205)
-
Add force_close_position for reliable orphan position closing (#209)
🐛 Bug Fixes
-
Add Aster credentials loading from environment variables (#204)
-
Subscribe each exchange to only its own symbols for funding rates (#213)
📚 Documentation
-
Update user documentation for production readiness (#214)
-
Fix HyperLiquid funding interval from 8 hours to 1 hour
♻️ Refactor
- Warn when force_close_position ignores slippage parameter (#212)
⚙️ Miscellaneous Tasks
- Release v0.52.0
0.51.6 - 2025-12-24
🐛 Bug Fixes
- Add Aster to Instrument.to_exchange() for funding rate discovery (#203)
⚙️ Miscellaneous Tasks
- Release v0.51.6
0.51.5 - 2025-12-24
🚀 Features
- loris: Add aster exchange mapping (#202)
⚙️ Miscellaneous Tasks
- Release v0.51.5
0.51.4 - 2025-12-24
🚀 Features
- Add Aster exchange to TUI dashboard (#201)
⚙️ Miscellaneous Tasks
- Release v0.51.4
0.51.3 - 2025-12-24
🐛 Bug Fixes
- Use total_cmp for f64 comparisons to prevent panic (#199)
⚙️ Miscellaneous Tasks
- Release v0.51.3
0.51.2 - 2025-12-24
🐛 Bug Fixes
- Filter exchange connections by instrument_discovery.exchanges (#198)
⚙️ Miscellaneous Tasks
- Release v0.51.2
0.51.1 - 2025-12-24
🚀 Features
- tui: Add leverage column to positions and opportunities (#197)
⚙️ Miscellaneous Tasks
- Release v0.51.1
0.51.0 - 2025-12-24
🚀 Features
-
Add Aster Futures exchange integration (#184)
-
Add periodic Loris pair refresh (6-hour interval) (#188)
-
leverage: Add automatic max leverage detection with symmetric resolution (#194)
-
Add interactive passphrase prompt for TUI and run commands (#195)
🐛 Bug Fixes
-
strategy: Use dynamic funding intervals in EV calculation (#185) (#186)
-
tui: Correct exposure util display for small values (#187)
-
tui: Match both symbol and route for executed indicator (#189)
-
docs: Improve markdown rendering in strategy-formulas.md (#192)
-
Remove position from repo after orphan auto-close (#196)
📚 Documentation
- Update user documentation for Aster exchange support (#193)
♻️ Refactor
- Remove dead code and unused functions (#191)
⚙️ Miscellaneous Tasks
- Release v0.51.0
0.50.5 - 2025-12-22
🐛 Bug Fixes
- tui: Improve dashboard layout and widget ordering (#183)
⚙️ Miscellaneous Tasks
- Release v0.50.5
0.50.4 - 2025-12-22
🚀 Features
-
tui: Display 3 decimal places for spreads in positions (#180)
-
Include trading fees in ROI calculation (#181)
🐛 Bug Fixes
- tui: Correct Exposure Util display with stablecoin normalization (#182)
⚙️ Miscellaneous Tasks
- Release v0.50.4
0.50.3 - 2025-12-21
🐛 Bug Fixes
- tui: Show net P&L (funding - fees) in Stats view (#179)
⚙️ Miscellaneous Tasks
- Release v0.50.3
0.50.2 - 2025-12-21
🐛 Bug Fixes
- tui: Remove double percentage conversion in position spread display (#178)
⚙️ Miscellaneous Tasks
- Release v0.50.2
0.50.1 - 2025-12-21
🚀 Features
- tui: Improve Stats tab with semantic colors and responsive layout
🐛 Bug Fixes
-
metrics: Remove erroneous 100x multiplier from funding spread metric
-
tui: Remove erroneous 100x multipliers from opportunity display
-
Correct positions panel rate display and update thresholds
-
config: Standardize all units to percentage form
-
Address PR review comments
-
env: Standardize funding rate and expected value thresholds to percentage form
-
tui: Remove empty row in Pairs tab header
📚 Documentation
-
Use more realistic examples in OpportunityDisplay comments
-
Update config examples to percentage form
-
Update Stats tab documentation for responsive layout and theme changes
♻️ Refactor
- tui: Address PR review feedback for stats layout
⚙️ Miscellaneous Tasks
- Release v0.50.1
0.50.0 - 2025-12-20
🚀 Features
-
Add orphan position detection and auto-close capability
-
Add orphan position detection and auto-close capability
🐛 Bug Fixes
-
Address PR review comments
-
Improve semaphore SAFETY comments per PR review
-
execution: Address PR review comments
-
Verify positions on exchanges when close orders have zero fill
-
Address PR review comments for position verification
📚 Documentation
-
Add orphan position detection documentation
-
Add orphan position detection documentation
♻️ Refactor
-
Eliminate unwrap/expect/panic from production code
-
execution: Extract common exchange client logic
-
Address PR review comments for orphan detection
⚙️ Miscellaneous Tasks
- Release v0.50.0
0.49.0 - 2025-12-18
🚀 Features
- tui: Derive exposure utilization from total available balance
🐛 Bug Fixes
-
TUI P&L calculation and Binance/Bybit fee tracking
-
Address PR review feedback for fee tracking
-
Remove .abs() from fee accumulation to properly handle rebates
-
tui: Address PR review feedback
-
execution: Address PR review feedback
-
Address PR review feedback for repository pattern
-
Improve error context messages for accuracy
-
Address PR review comments
-
Use separate mock to test default validate_inner behavior
📚 Documentation
-
Update repository pattern documentation
-
Remove export from commands module documentation
♻️ Refactor
-
Add From traits for Instrument type conversion
-
execution: Split Bybit client into modular structure
-
Implement generic repository pattern with DashMap
-
Remove unimplemented export command
-
Split market_data.rs into module directory
-
Address PR review feedback
-
Extract ExchangeClientCore trait with blanket impl
⚙️ Miscellaneous Tasks
-
Set default verbosity level to info for dashboard command
-
Release v0.49.0
0.48.0 - 2025-12-17
🚀 Features
-
config: Auto-disable stale pairs and per-symbol fallback prices
-
Add hot-reload support for instrument configuration
🐛 Bug Fixes
-
Address PR review comments for instrument hot-reload
-
Address second round of PR review comments
-
Address third round of PR review comments
📚 Documentation
-
Update documentation for v0.47.0
-
Use Prometheus metric format (underscores) for consistency
🧪 Testing
- strategy: Add tests for get_fallback_price method
⚙️ Miscellaneous Tasks
- Release v0.48.0
0.47.0 - 2025-12-16
🚀 Features
- config: Add configurable fallback price for position sizing
🐛 Bug Fixes
-
stats: Truncate decimal before parsing micro-USD values
-
stats: Use round() instead of trunc() for micro-USD conversion
-
Include closed positions PnL in TUI stats total
📚 Documentation
- Add fallback_price_usd to configuration and hot-reload docs
⚙️ Miscellaneous Tasks
- Release v0.47.0
0.46.1 - 2025-12-14
🐛 Bug Fixes
-
Populate pair_health_repo with autodiscovered instruments
-
Count actual initialized pairs instead of total instruments
⚙️ Miscellaneous Tasks
- Release v0.46.1
0.46.0 - 2025-12-14
🚀 Features
-
tui: Add session activity metrics to Statistics screen
-
tui: Add risk metrics to Statistics screen (Phase 2)
-
tui: Add exchange breakdown to Statistics screen (Phase 3)
-
tui: Add visual enhancements to Statistics screen (Phase 4)
-
Add pair health monitoring with TUI management
-
tui: Implement Add Pair dialog
🐛 Bug Fixes
-
tui: Address PR review comments
-
Address PR #152 review comments round 2
-
Address PR review comments for pair health monitoring
-
Address remaining PR review comments
-
tui: Ensure atomic pair add/remove with config consistency
📚 Documentation
- tui: Add Statistics tab documentation
⚙️ Miscellaneous Tasks
- Release v0.46.0
0.45.3 - 2025-12-11
🐛 Bug Fixes
-
Simplify binary release workflow
-
Use position_side when closing duplicate positions in Hedge Mode
-
Remove unused warn import in precision.rs
-
Hot-reload config propagation to strategy
-
Address PR review comments for hot-reload
🧪 Testing
- Add test coverage for close_duplicate_position method
⚙️ Miscellaneous Tasks
- Release v0.45.3
0.45.2 - 2025-12-11
🐛 Bug Fixes
- Update Ubuntu version in binary release workflow
⚙️ Miscellaneous Tasks
- Release v0.45.2
0.45.1 - 2025-12-11
🚀 Features
- Add binary release workflow and update release-tag comments
📚 Documentation
-
Remove commit links from user changelog
-
Update TUI tab screenshots from latest GIF frames
-
Update wealth.gif for improved user documentation
⚙️ Miscellaneous Tasks
- Release v0.45.1
0.45.0 - 2025-12-10
🚀 Features
- Add configurable reconciliation task
🐛 Bug Fixes
- Add validation for reconciliation config values
📚 Documentation
- Add reconciliation configuration documentation
⚙️ Miscellaneous Tasks
-
Disable automatic Docker image creation on releases
-
Remove config.example.json in favor of TOML format
-
Release v0.45.0
0.44.0 - 2025-12-10
🚀 Features
- tui: Add next funding rate countdown to header
🐛 Bug Fixes
-
tui: Address PR review feedback
-
tui: Improve opportunity status indicators visibility
-
tui: Address PR review feedback
📚 Documentation
- Update documentation for refactoring changes
♻️ Refactor
-
tests: Remove duplicate test_decimals_from_step_size tests
-
config: Split monolithic mod.rs into focused modules
-
execution: Add fetch_balances and set_leverage to ExecutionClient trait
-
strategy: Remove duplicate get_price_precision function
-
strategy: Extract FundingRateStrategy fields into sub-structs
⚙️ Miscellaneous Tasks
- Release v0.44.0
0.43.0 - 2025-12-10
🐛 Bug Fixes
-
Address PR review feedback for parallel leverage init
-
Add rate limit protection with per-exchange semaphores
-
Replace .unwrap() with .expect() for semaphore acquire
-
atomic: Handle zero-fill on close as success instead of failure
-
Address PR review comments
⚡ Performance
- Parallelize leverage initialization for faster startup
⚙️ Miscellaneous Tasks
- Release v0.43.0
0.42.2 - 2025-12-10
🐛 Bug Fixes
-
binance: Correct positionSide in Hedge Mode for position close
-
binance: Ensure all close paths pass position_side in Hedge Mode
⚙️ Miscellaneous Tasks
- Release v0.42.2
0.42.1 - 2025-12-09
🐛 Bug Fixes
- tui: Allow arrow key navigation in positions tab when items fit on screen
📚 Documentation
- Update README for clarity and organization
⚙️ Miscellaneous Tasks
- Release v0.42.1
0.42.0 - 2025-12-09
🚀 Features
-
tui: Show all opportunities with validity indicators
-
tui: Add entry spread column to positions views
📚 Documentation
- Update TUI dashboard documentation for opportunity validity indicators
♻️ Refactor
- strategy: Extract common opportunity computation logic
⚙️ Miscellaneous Tasks
- Release v0.42.0
0.41.1 - 2025-12-09
🐛 Bug Fixes
- Skip held positions during graceful shutdown
📚 Documentation
- Document held position preservation during shutdown
⚙️ Miscellaneous Tasks
- Release v0.41.1
0.41.0 - 2025-12-09
🚀 Features
-
tui: Add individual funding rates to positions and opportunities
-
tui: Implement dynamic scrolling based on visible height
🐛 Bug Fixes
-
tui: Increase column width for EV (bps) in opportunities feed
-
tui: Address PR review feedback
📚 Documentation
-
Update TUI dashboard documentation
-
Address PR review comments for funding rate display
⚙️ Miscellaneous Tasks
- Release v0.41.0
0.40.0 - 2025-12-09
🚀 Features
- tui: Add hold position feature to bypass auto-close
🐛 Bug Fixes
-
tui: Correct EV display and improve row visibility
-
Address PR review comments for hold position feature
-
Use stored entry_quantity for position close to prevent unhedged positions
-
Address PR review comments
📚 Documentation
- Add entry_quantity field and zero-fill validation documentation
🧪 Testing
- Improve zero-fill validation tests with state machine transitions
⚙️ Miscellaneous Tasks
- Release v0.40.0
0.39.0 - 2025-12-09
🚀 Features
- loris: Add arbitrage-based pair sorting with configurable strategy
🐛 Bug Fixes
-
bybit: Calculate available balance from margin fields
-
bybit: Address PR review comments
📚 Documentation
-
Fix documentation inconsistencies in arbitrage sorting
-
Add loris_sort_by configuration to user and dev documentation
⚙️ Miscellaneous Tasks
- Release v0.39.0
0.38.0 - 2025-12-09
🚀 Features
-
Enhance logging and metrics configuration for Grafana and Tempo integration for stack compose
-
Add Traefik reverse proxy configuration and update service exposure settings
-
tui: Improve positions and opportunities display
🐛 Bug Fixes
- tui: Address PR review feedback
⚙️ Miscellaneous Tasks
- Release v0.38.0
0.37.0 - 2025-12-07
🧪 Testing
- Add unit tests for signature verification error mapping
⚙️ Miscellaneous Tasks
- Release v0.37.0
0.36.2 - 2025-12-07
🐛 Bug Fixes
-
Respect CLI verbosity flags in dashboard command
-
Use reference pattern for cli.command match
⚙️ Miscellaneous Tasks
- Release v0.36.2
0.36.1 - 2025-12-07
🐛 Bug Fixes
- Prevent TUI from polluting opportunity metrics
♻️ Refactor
- Consolidate find_opportunities methods to reduce duplication
⚙️ Miscellaneous Tasks
- Release v0.36.1
0.36.0 - 2025-12-07
🚀 Features
-
tui: Add comprehensive UI improvements
-
ci: Add installation script for mdbook and plugins
🐛 Bug Fixes
-
tui: Correct log level cycle comment and improve resize handling
-
Remove .unwrap() in health command by reusing client from if-let
-
Use BORDER_HEIGHT constant for TUI widget sizing
-
Correct enable_traces and trace_sample_rate defaults
-
Update mdbook-katex version to use pre-built binaries from v0.9.3
-
Update mdbook-katex installation to use musl variant for compatibility with older glibc
-
Ensure cargo bin is added to PATH for Vercel builds
-
Add installation of mermaid.js assets for user and dev directories
-
tui: Convert health widget to vertical layout
-
tui: Use constant for maximum error display characters in health widget
📚 Documentation
-
Update health endpoints and configuration documentation
-
Add dedicated TUI dashboard documentation
⚙️ Miscellaneous Tasks
- Release v0.36.0
0.35.0 - 2025-12-07
🚀 Features
-
tui: Show shutdown logs when pressing q
-
tui: Remove row limit in funding rates compact view
🐛 Bug Fixes
-
tui: Stable sort order for funding rates widget
-
tui: Avoid race condition in shutdown wait
-
tui: Address PR review feedback
-
tui: Improve column count comment clarity
-
Orchestrator now listens to ShutdownCoordinator for graceful shutdown
-
Address PR review - fix TOCTOU race condition in shutdown
-
Properly handle Result types from signal receivers
-
Prevent opportunity widget flooding with snapshot updates
-
Address PR review comments
-
Make OpenTelemetry shutdown idempotent
-
tui: Sort position breakdown to prevent flickering
-
tui: Use dynamic sizing for widget row limits
-
tui: Clamp scroll offset in title display
♻️ Refactor
- tui: Unify funding widget and tab into single function
🧪 Testing
- Add idempotency test for shutdown_opentelemetry
⚙️ Miscellaneous Tasks
- Release v0.35.0
0.34.0 - 2025-12-05
🚀 Features
-
monitoring: Improve WebSocket metrics and add Grafana dashboard
-
Add ratatui TUI dashboard foundation
-
tui: Wire backend data to TUI via BackendMessageSender
-
tui: Add pause/resume functionality for strategy
-
tui: Add position close from TUI via 'c' key
-
tui: Add opportunity detection events to TUI
-
tui: Add exchange health check display
-
tui: Add error and event notifications to log viewer
-
tui: Add confirmation dialog for position close
-
tui: Implement current_spread calculation from live funding rates
-
tui: Add Stats tab and filter/sort for funding rates
🐛 Bug Fixes
-
monitoring: Address PR review feedback
-
monitoring: Add test coverage and fix stream_type
-
execution: Use Timeout and ServerError in exchange classifiers
-
Add Bybit to default exchanges for positions funding rate lookup
-
docs: Correct metric names to match OTel definitions
-
docs: Restore wealth_position_age_seconds metric name
-
Address PR review comments
-
Address additional PR review comments
-
tui: Address PR review comments for code quality
-
tui: Address all remaining PR review comments
-
tui: Address remaining PR review comments
-
tui: Address unresolved PR review comments
-
tui: Improve position field documentation and is_multiple_of clarity
-
Address remaining PR review comments
-
Address remaining PR review comments
-
tui: Improve funding rate accuracy and position selection
-
tui: Address PR review comments
-
tui: Address PR review feedback
-
tui: Capture logs to channel instead of stdout
-
tui: Address PR review feedback
📚 Documentation
-
Add TUI dashboard documentation
-
dev: Add TUI dashboard architecture documentation
⚙️ Miscellaneous Tasks
- Release v0.34.0
Build
- tui: Set default feature to include TUI dependencies
0.33.2 - 2025-12-04
🐛 Bug Fixes
- hyperliquid: Use master wallet address for order status queries in subkey mode
⚙️ Miscellaneous Tasks
- Release v0.33.2
0.33.1 - 2025-12-04
🚀 Features
- Improve CLI security and DRY refactoring
🐛 Bug Fixes
-
Use WEALTH__ prefix in config.example.toml env var examples
-
ci: Update docs job for split user/dev structure
-
ci: Add --force to mdbook install commands
-
docs: Correct mermaid.js path in book.toml
-
gitignore: Update to include mermaid.js files in docs directory
-
Address PR review comments
-
Address remaining PR review comments
-
Prevent double-fill race condition in limit order fallback
📚 Documentation
-
Consolidate duplicates and align with v0.33.0
-
Split documentation into user guide and developer docs
-
Clean user docs, add strategy guide, remove code examples
-
Simplify user quickstart to use binary/Docker
-
Move technical docs to dev, simplify user docs
-
Remove remaining technical details from user docs
-
user: Add strategy formulas documentation
⚙️ Miscellaneous Tasks
- Release v0.33.1
0.33.0 - 2025-12-03
🚀 Features
- Implement enhanced exit mechanisms (recommendations 1,2,7,8)
🐛 Bug Fixes
- Address PR review comments
⚙️ Miscellaneous Tasks
- Release v0.33.0
0.32.3 - 2025-12-03
🐛 Bug Fixes
- Emit shutdown_complete log before OTel shutdown
⚙️ Miscellaneous Tasks
- Release v0.32.3
0.32.2 - 2025-12-03
🐛 Bug Fixes
- Parse HyperLiquid funding rate as string instead of f64
⚙️ Miscellaneous Tasks
- Release v0.32.2
0.32.1 - 2025-12-02
🐛 Bug Fixes
- Add missing Hedging state transition in close_arbitrage_atomic
🧪 Testing
- Add test coverage for successful close state transition path
⚙️ Miscellaneous Tasks
- Release v0.32.1
0.32.0 - 2025-12-02
🚀 Features
- execution: Add reduce_only support for position closing
🐛 Bug Fixes
-
execution: Add metrics and cleanup for close_arbitrage_atomic
-
cli: Show earned funding in positions --pnl output
🧪 Testing
- execution: Add tests for reduce_only order methods
⚙️ Miscellaneous Tasks
- Release v0.32.0
0.31.1 - 2025-12-01
🐛 Bug Fixes
-
Use transaction-log API for Bybit funding rate tracking
-
Use strip_suffix instead of replace for USDT removal
⚙️ Miscellaneous Tasks
- Release v0.31.1
0.31.0 - 2025-12-01
🐛 Bug Fixes
-
bybit: Handle API errors before parsing position response
-
bybit: Address PR review comments
⚙️ Miscellaneous Tasks
- Release v0.31.0
Build
- Upgrade dependencies
0.30.2 - 2025-11-30
🐛 Bug Fixes
- Prevent Bybit funding rate from becoming stale
♻️ Refactor
-
logging: Reduce log noise and improve event naming
-
observability: Extract normalized_op to avoid duplicate replace calls
-
Use parking_lot::RwLock for consistency
⚙️ Miscellaneous Tasks
-
Speed up testing pipeline with parallel shards
-
Release v0.30.2
0.30.1 - 2025-11-30
🐛 Bug Fixes
- Address code review feedback
♻️ Refactor
- Improve logging strategy for reduced noise and better parsing
⚙️ Miscellaneous Tasks
- Release v0.30.1
0.30.0 - 2025-11-30
🚀 Features
- Add structured logging event fields for Loki filtering
🐛 Bug Fixes
-
Standardize event naming per PR review
-
Standardize event naming across entire repository
-
Address remaining PR review comments
-
Enhance funding rate message parsing to handle empty strings for futures contracts
📚 Documentation
- Update logging docs with comprehensive event reference
⚙️ Miscellaneous Tasks
- Release v0.30.0
0.29.1 - 2025-11-30
🐛 Bug Fixes
-
funding_rate: Preserve error chain in fetchers and fix docs example
-
funding_rate: Correct doc example return types to WealthError
-
Use safe default of 3 decimals for invalid step size input
-
Use actual tick_size for Binance price rounding
-
Address PR review comments
-
Relax debug_assert to allow zero tick_size in tests
📚 Documentation
- Update documentation for tick_size precision handling
♻️ Refactor
-
funding_rate: Introduce trait-based architecture and builder pattern
-
Extract duplicated precision cache logic into shared PrecisionCache
⚙️ Miscellaneous Tasks
- Release v0.29.1
0.29.0 - 2025-11-30
🚀 Features
- Add WebSocket-based funding rate streaming for all exchanges
🐛 Bug Fixes
-
Address PR review feedback
-
Address PR review comments
♻️ Refactor
- Trait-based WebSocket connector architecture
⚙️ Miscellaneous Tasks
- Release v0.29.0
0.28.0 - 2025-11-30
🚀 Features
-
Add exchange selector for autodiscovery
-
Add funding rate profit tracking to profit and positions commands
🐛 Bug Fixes
- Address PR review comments
📚 Documentation
-
Enhance copilot instructions with detailed architecture and critical patterns
-
Update CLI and API reference for funding profit tracking
♻️ Refactor
- Extract try_fetch_arbitrage_positions_from_api to common module
⚙️ Miscellaneous Tasks
- Release v0.28.0
0.27.0 - 2025-11-29
🐛 Bug Fixes
-
Address PR review comments for strategy module refactoring
-
Upgrade parse_decimal to ERROR level with metrics tracking
📚 Documentation
-
Add event field documentation for LogQL queries
-
Update documentation for strategy module refactoring
♻️ Refactor
-
Standardize logging for OpenTelemetry/Grafana
-
Split strategy.rs into focused modules
-
Remove deprecated CLI args and simplify logging API
⚙️ Miscellaneous Tasks
- Release v0.27.0
0.26.6 - 2025-11-29
🐛 Bug Fixes
-
Use dynamic minimum quantity fetching for Bybit
-
Address PR review comments
⚙️ Miscellaneous Tasks
- Release v0.26.6
0.26.5 - 2025-11-29
🐛 Bug Fixes
-
bybit: Query order status for market orders to get actual filled_quantity
-
bybit: Use avgPrice as fallback for position entry price
-
bybit: Address PR review comments
⚙️ Miscellaneous Tasks
- Release v0.26.5
0.26.4 - 2025-11-29
🐛 Bug Fixes
-
Batch HyperLiquid funding rate fetches to avoid 429 rate limits
-
Use Decimal::to_f64() instead of string parsing for metrics
⚙️ Miscellaneous Tasks
- Release v0.26.4
0.26.3 - 2025-11-29
🐛 Bug Fixes
-
Filter arbitrage opportunities by tradeable exchange pairs
-
Filter funding rate fetches to only tradeable (exchange, symbol) pairs
📚 Documentation
-
Update documentation for tradeable pairs filtering
-
Remove leftover impact lines from performance-tuning.md
♻️ Refactor
- Replace panic with Result in FundingRateAggregator constructors
🧪 Testing
- Add coverage for with_pairs() constructor
⚙️ Miscellaneous Tasks
- Release v0.26.3
0.26.2 - 2025-11-29
🐛 Bug Fixes
- Update Dockerfile to use Rust 1.91 for edition 2024 support
📚 Documentation
- Update documentation for modular atomic and strategy structure
♻️ Refactor
- Modularize atomic executor and strategy modules
⚙️ Miscellaneous Tasks
- Release v0.26.2
0.26.1 - 2025-11-29
🐛 Bug Fixes
- ci: Use clang linker with mold for proper ld discovery
📚 Documentation
-
Update CI documentation for sccache, mold, and cargo-chef optimizations
-
Update CI documentation for dual-profile strategy
⚡ Performance
-
ci: Optimize build pipeline with sccache, mold, and cargo-chef
-
ci: Optimize build pipeline with sccache, mold, and cargo-chef
-
ci: Chain test after lint to maximize sccache hits
-
ci: Run tests before lint for faster failure feedback
-
ci: Remove redundant release build job (tested during actual releases)
-
ci: Add faster ci-test profile for test compilation
-
ci: Run test and lint jobs in parallel
♻️ Refactor
- ci: Reorder jobs to match logical flow (test → lint → build)
⚙️ Miscellaneous Tasks
-
Trigger rebuild to test ci-test profile cache
-
Release v0.26.1
0.26.0 - 2025-11-29
🚀 Features
-
Add tradeability validation during pair discovery
-
funding: Enable FundingTracker for live trading mode
🐛 Bug Fixes
-
Resolve Bybit position parsing errors and add symbol validation
-
Improve Bybit order response error logging
-
Properly handle Bybit API error responses and reduce validation noise
-
Reduce operational validation noise from ERROR to success metrics
-
Address PR review comments
-
Handle Bybit WebSocket delta messages without lastPrice
-
Validate notional value after quantity rounding
-
Validate notional value after both quantity AND price rounding
-
Address PR review comments for precision abstraction
-
Address remaining PR review comments
📚 Documentation
-
Update copilot instructions for clarity and conciseness
-
Update precision documentation for SymbolPrecision API
♻️ Refactor
-
Unify precision handling with SymbolPrecision abstraction
-
Remove get_quantity_precision, use get_symbol_precision only
⚙️ Miscellaneous Tasks
-
Improve pair discovery observability
-
Release v0.26.0
0.25.6 - 2025-11-29
🐛 Bug Fixes
- Resolve Bybit position parsing failures and minimum order value validation
♻️ Refactor
- Address PR review feedback
⚙️ Miscellaneous Tasks
- Release v0.25.6
0.25.5 - 2025-11-29
🚀 Features
-
Implement dynamic precision fetching for Bybit
-
Implement price and quantity rounding for Bybit
🐛 Bug Fixes
-
Implement Bybit position fetching via REST API
-
Use consistent HMAC error message in fetch_open_positions
-
Address PR review feedback on Bybit implementation
⚙️ Miscellaneous Tasks
- Release v0.25.5
0.25.4 - 2025-11-29
🐛 Bug Fixes
- Treat Bybit error code 110043 as success
⚙️ Miscellaneous Tasks
- Release v0.25.4
0.25.3 - 2025-11-29
🚀 Features
- Add default log file path to /var/log/wealth.log
🐛 Bug Fixes
-
Correct Loris API deserialization for funding rates and OI rankings
-
Address PR review comments
-
Remove default log file path and align env var naming
-
Address PR review comments for backward compatibility
-
Add missing Rust toolchain setup in docs job
-
Disable sccache for docs job (not needed for mdbook)
-
Remove invalid multilingual field from book.toml
-
Install mdbook-mermaid for docs build
-
Install mdbook-katex for docs build
-
Correct rust-cache configuration per official docs
-
ci: Specify mdBook version in installation for consistency
-
ci: Specify version for mdbook-mermaid installation for consistency
-
Add cache-all-crates and save-if to rust-cache config
-
Restore Bybit balance fetching and correct signature generation
⚡ Performance
-
Optimize CI pipelines for speed and caching
-
Remove sccache (was adding overhead, not helping)
⚙️ Miscellaneous Tasks
-
Comment out deploy job in documentation workflow
-
Release v0.25.3
0.25.2 - 2025-11-28
🚀 Features
- Make --enable-discovery CLI flag optional
🐛 Bug Fixes
- Handle empty available balance fields in Bybit and Binance
📚 Documentation
-
Update dynamic-pair-discovery.md for optional CLI flag
-
Add empty balance display fix to troubleshooting guide
♻️ Refactor
- Address PR review comments
⚙️ Miscellaneous Tasks
- Release v0.25.2
0.25.1 - 2025-11-28
🚀 Features
- Allow empty instruments when autodiscovery is enabled
🧪 Testing
- Add validation tests for empty instruments with autodiscovery
⚙️ Miscellaneous Tasks
- Release v0.25.1
0.25.0 - 2025-11-28
🚀 Features
-
Dynamic pair discovery with volume filtering and safety controls (v0.30)
-
Complete dynamic pair discovery implementation (remaining 30%)
-
Add Loris.tools API integration for pair discovery
🐛 Bug Fixes
-
Address Copilot PR review comments
-
Resolve remaining 5 Copilot PR review comments
-
Address 5 key unresolved PR review comments
-
Address all 6 unresolved PR review comments
-
Resolve 2 unresolved PR review comments
-
Address PR review feedback on error handling
-
Address remaining PR review comments
-
Address final PR review comments
-
Update comment to match rank >= 1000 condition
📚 Documentation
-
Consolidate IMPLEMENTATION_STATUS.md into main documentation
-
Fix documentation and comments for consistency
-
Add Loris Tools attribution to README
♻️ Refactor
-
Address 8 remaining nitpick comments for polish
-
Improve error handling and validation in pair discovery
-
Improve code clarity based on review feedback
🧪 Testing
-
Add sentinel value filtering test and optimize binance performance
-
Add defensive checks for test assertions and uniqueness validation
⚙️ Miscellaneous Tasks
- Release v0.25.0
0.24.0 - 2025-11-28
🚀 Features
-
Add distributed tracing with configurable sampling
-
Add profit tracking CLI command
🐛 Bug Fixes
-
Address copilot review comments on distributed tracing PR
-
Address second review comments on distributed tracing PR
-
Implement comprehensive memory leak prevention
-
Address copilot pr review feedback - add missing metrics updates and clarify comments
-
Make alert_history metric update safe for tests without metrics initialization
-
Address code review feedback on memory leak prevention
-
Implement initial cleanup tasks to prevent stale data and ensure accurate metrics updates
-
Address PR review feedback for profit command
-
Replace vec! with arrays in tests to satisfy clippy
-
Address PR review feedback - lowercase exchange names and serial tests
📚 Documentation
- Add rationale comments for encapsulation and shutdown decisions
⚙️ Miscellaneous Tasks
- Release v0.24.0
0.23.1 - 2025-11-26
⚡ Performance
- Parallelize funding rate fetches across all symbol×exchange pairs
🧪 Testing
- Add panic handling coverage for parallel funding rate fetch
⚙️ Miscellaneous Tasks
- Release v0.23.1
0.23.0 - 2025-11-26
🚀 Features
-
Add enable/disable config for Kelly Criterion usage
-
Add funding rate PnL display to CLI commands
-
Add HTTP API endpoints for querying bot state
🐛 Bug Fixes
-
Remove redundant has_active_pair check that blocked concentration risk logic
-
Remove misleading realized funding display from CLI
-
Address Copilot PR review comments
📚 Documentation
-
Add use_kelly_criterion to .env.example
-
Document use_kelly_criterion configuration option
-
Clarify realized funding display limitations in CLI reference
-
Update for HTTP API endpoints and funding rate display
-
Fix API documentation inaccuracies and improve clarity
-
Fix /api/balances documentation and add test coverage note
♻️ Refactor
-
Optimize clone usage and enhance strategy risk management
-
Use ObservabilityConfig for API server
⚙️ Miscellaneous Tasks
- Release v0.23.0
0.22.6 - 2025-11-25
🐛 Bug Fixes
-
Prevent double execution in limit order timeout race condition
-
Skip wait loop for immediately-filled limit orders (taker fills)
-
Prevent runtime panic in scopeguard cleanup during shutdown
📚 Documentation
-
Add troubleshooting for taker fill and runtime panic fixes
-
Update limit order references for clarity in troubleshooting guide
⚙️ Miscellaneous Tasks
- Release v0.22.6
0.22.5 - 2025-11-25
🐛 Bug Fixes
-
Prevent race condition causing double execution and 2x position sizes
-
Address copilot PR review feedback
📚 Documentation
- Document race condition fix and in-flight execution tracker
⚙️ Miscellaneous Tasks
- Release v0.22.5
0.22.4 - 2025-11-25
🐛 Bug Fixes
-
Check order status BEFORE cancellation to prevent HyperLiquid double-fills
-
Close race window between status check and cancellation
-
Address Copilot review feedback on race condition handling
-
Address latest Copilot review comments
-
Address latest Copilot review comments
📚 Documentation
- Document HyperLiquid double-fill race condition fix (v0.22.4)
⚙️ Miscellaneous Tasks
- Release v0.22.4
0.22.3 - 2025-11-25
🚀 Features
- Copy config.example.toml to config.toml on deployment if not exists
🐛 Bug Fixes
-
Prevent double-fill in limit-to-market fallback
-
Combine fees from both limit and market orders
⚙️ Miscellaneous Tasks
-
Include config.*.toml in .gitignore to prevent sensitive config files from being tracked
-
Release v0.22.3
0.22.2 - 2025-11-25
🚀 Features
- Add position reconciliation check before opening trades
🐛 Bug Fixes
-
Remove hardcoded quantity precision validation
-
Address Copilot PR review comments
-
Handle zero-quantity edge case in position reconciliation
⚙️ Miscellaneous Tasks
- Release v0.22.2
0.22.1 - 2025-11-25
🚀 Features
- Implement dynamic exchange precision fetching
🐛 Bug Fixes
-
Prevent unhedged positions from partial emergency closes
-
Resolve Copilot review comments on precision implementation
-
Address PR review issues - remove unwrap_err, fix close precision
-
Replace unreachable!() with unwrap_err() for safer error handling
📚 Documentation
- Update documentation for dynamic precision fetching
⚙️ Miscellaneous Tasks
- Release v0.22.1
0.22.0 - 2025-11-25
🚀 Features
- Add monitoring metrics for accepted residual mismatches
🐛 Bug Fixes
- Address copilot PR review comments
📚 Documentation
-
Add comprehensive hedge quantity validation documentation
-
Clarify metric naming convention (OpenTelemetry vs Prometheus)
-
Align risk threshold percentages across documentation
♻️ Refactor
- Extract hedge validation to dedicated method with type-safe result enum
⚙️ Miscellaneous Tasks
- Release v0.22.0
0.21.8 - 2025-11-25
🐛 Bug Fixes
- Validate hedge quantities before placement to prevent rollback failures
⚙️ Miscellaneous Tasks
- Release v0.21.8
0.21.7 - 2025-11-25
🐛 Bug Fixes
- Wait for limit order fills before completing execution
⚙️ Miscellaneous Tasks
- Release v0.21.7
0.21.6 - 2025-11-25
🐛 Bug Fixes
- Prevent quantity precision mismatch between exchanges
⚙️ Miscellaneous Tasks
- Release v0.21.6
0.21.5 - 2025-11-25
🚀 Features
-
Enhance deployment script with server argument and improved file checks
-
Add Docker Compose configuration for remote and update deployment script
🐛 Bug Fixes
-
Restrict OTLP receiver ports to localhost and clarify health check exposure
-
Update deployment script to correctly reference Docker Compose file name
-
Simplify .env file handling in deployment script
-
Correct HyperLiquid quote asset to USDC
-
Reduce false alarm ERROR during config watcher shutdown
-
Rollback all positions when hedging fails to prevent unhedged exposure
-
Address copilot review comments for rollback implementation
📚 Documentation
- Update atomic execution safety guarantees and hedging failure behavior
♻️ Refactor
- Rename compose files for clarity (stack/prod/dev)
⚙️ Miscellaneous Tasks
- Release v0.21.5
0.21.4 - 2025-11-24
🐛 Bug Fixes
- Remove Access events from config watcher to prevent reload loop
⚙️ Miscellaneous Tasks
- Release v0.21.4
0.21.3 - 2025-11-24
🚀 Features
- Enhance Grafana Cloud integration with MCP service and configuration updates
🐛 Bug Fixes
- Prevent spurious config reloads from editor temp files
♻️ Refactor
- Make Grafana Cloud default compose setup
⚙️ Miscellaneous Tasks
- Release v0.21.3
0.21.2 - 2025-11-24
🚀 Features
- Add deployment script for wealth binary to degen production server
🐛 Bug Fixes
- Load observability config from config.toml instead of env vars only
⚙️ Miscellaneous Tasks
- Release v0.21.2
0.21.1 - 2025-11-24
⚙️ Miscellaneous Tasks
- Release v0.21.1
0.21.0 - 2025-11-24
🚀 Features
-
config: Implement config source tracking infrastructure
-
config: Complete Phase 3 config source tracking
🐛 Bug Fixes
-
Remove unnecessary OpenTelemetry OTLP export log message
-
Resolve all compilation errors after config migration
-
Resolve all failing tests after v0.21.0+ schema migration
-
config: Enhance config watcher with shutdown handling and dynamic file name matching
-
config: Integrate shutdown coordinator into config reload handler
-
config: Update config display to show file values and improve source tracking
-
config: Improve config reload handler to monitor watcher task and handle shutdown signals
-
config: Add spacing for improved readability in ConfigWatcher implementation
📚 Documentation
-
Consolidate migration docs into configuration.md
-
Update field paths to match simplified config structure
-
Update all documentation to v0.21.0+ schema
♻️ Refactor
-
Simplify config structure by removing backward compatibility layers
-
Standardize config system and remove backward compatibility
-
config: Standardize naming and remove unused code
-
config: Enhance ConfigError with source tracking for invalid values
-
Remove deprecated CLI parameters from run command
⚙️ Miscellaneous Tasks
-
Move config dependency to serialization section
-
Remove config.toml from version control
-
Release v0.21.0
Wip
- Config cleanup - old config removed, config_v2 renamed to config
0.20.5 - 2025-11-23
🐛 Bug Fixes
- Add customizable logging level for OpenTelemetry initialization
⚙️ Miscellaneous Tasks
- Release v0.20.5
0.20.4 - 2025-11-23
🚀 Features
- Enhance OpenTelemetry initialization to ensure console output visibility
⚙️ Miscellaneous Tasks
- Release v0.20.4
0.20.3 - 2025-11-23
🚀 Features
- Align log field names with metric labels for Grafana correlation
⚙️ Miscellaneous Tasks
- Release v0.20.3
0.20.2 - 2025-11-23
🚀 Features
- Require 'run' command for starting the trading bot and update help display
⚙️ Miscellaneous Tasks
- Release v0.20.2
0.20.1 - 2025-11-23
♻️ Refactor
- Remove OTLP headers parsing and logging from init_opentelemetry function
⚙️ Miscellaneous Tasks
- Release v0.20.1
0.20.0 - 2025-11-23
⚙️ Miscellaneous Tasks
-
Add .env.backup to .gitignore for improved environment variable management
-
Release v0.20.0
0.19.0 - 2025-11-23
🚀 Features
-
Update Grafana Cloud configuration to use configs for otel-collector
-
Secure Grafana Cloud OTLP collector configuration
📚 Documentation
-
Add Grafana Cloud setup guide and configuration
-
Add OTEL_EXPORTER_OTLP_HEADERS to .env and .env.example
-
Consolidate OTLP troubleshooting into docs/troubleshooting.md
-
Update Grafana Cloud setup guide with current architecture
♻️ Refactor
- Streamline logging during OpenTelemetry shutdown process
⚙️ Miscellaneous Tasks
-
Comment out environment variable defaults in .env.example for clarity
-
Comment out environment variable settings in Grafana Cloud configuration for clarity
-
Release v0.19.0
0.18.0 - 2025-11-23
⚙️ Miscellaneous Tasks
- Release v0.18.0
0.17.1 - 2025-11-23
⚙️ Miscellaneous Tasks
- Release v0.17.1
0.17.0 - 2025-11-23
🚀 Features
-
Enhance error handling by extracting machine limit from Keygen error messages
-
Migrate observability stack from Prometheus/Loki to OpenTelemetry OTLP
-
Implement proper OpenTelemetry provider shutdown with explicit flush
🐛 Bug Fixes
-
Address Copilot review comments for OpenTelemetry migration
-
Implement OpenTelemetry shutdown and fix gauge semantics
-
Rename update_position_duration_avg to record_position_duration_sample
-
Correct balance_reserved_amount metric calculation on release
-
Make OpenTelemetry initialization idempotent to prevent panics on re-init
-
Increase atomic balance tracking precision from 2 to 4 decimal places
-
Return existing meter provider on OpenTelemetry re-initialization
-
Return HTTP 500 error on metrics parsing failure instead of silent fallback
-
Remove prometheus exporter namespace to prevent double prefixing
📚 Documentation
-
Fix misleading 'unused' comment for init_opentelemetry parameters
-
Add cleanup function for balance tracking maps to prevent unbounded growth
-
Clarify fetch_sub behavior in balance metric tracking
-
Update documentation for OpenTelemetry migration
-
Document metric memory accumulation in local-only mode
-
Fix WealthMetrics::global() error message to reference correct initialization methods
-
Use jq -S in migration commands to preserve field order and minimize diffs
-
Update logging.md to remove outdated Loki push references
-
Update architecture and monitoring docs for OpenTelemetry metrics
⚡ Performance
- Eliminate repeated string allocations in opportunity detection hot path
♻️ Refactor
-
Add explicit error handling for WealthMetrics initialization
-
Consolidate label helpers into single API
-
Add --otlp-endpoint flag and deprecate --loki-url
-
Remove deprecated --loki-url flag
-
Deprecate no-op metrics functions with migration guidance
-
Remove deprecated no-op metrics functions
-
Update metrics handling to use JSON format and remove Prometheus dependency
-
Improve OpenTelemetry shutdown error handling
⚙️ Miscellaneous Tasks
- Release v0.17.0
0.16.0 - 2025-11-23
🚀 Features
-
constants: Add default Keygen API URL constant and update references
-
secret_serde: Add reusable serialization/deserialization functions for SecretString
-
bin: Add wealth-admin binary for administrative tasks
♻️ Refactor
-
execution: Streamline order placement with helper methods for rollback and hedging
-
Improve task management and atomic execution
-
Update error handling to include TODOs for parsing expiration date and activation limit
-
Simplify warning message in machine_fingerprint error handling
🧪 Testing
- Add serial attribute to mock provider test for safe concurrent execution
⚙️ Miscellaneous Tasks
- Release v0.16.0
Build
-
Add release profile optimizations for binary size and protection
-
Remove panic abort setting to allow Drop for RAII patterns
-
Update strip option to modern syntax for release profile
-
Add serial_test and sdd packages for testing support
0.15.3 - 2025-11-20
🚀 Features
- cli: Add funding rate calculations for positions when funding flag is enabled
🐛 Bug Fixes
- strategy: Add validation for funding rates to reject invalid data
⚙️ Miscellaneous Tasks
- Release v0.15.3
0.15.2 - 2025-11-18
📚 Documentation
- strategy: Document known issue with close_position method not using reduce_only flag
🧪 Testing
- config: Update default max hedge passes to 5 and improve example configuration
⚙️ Miscellaneous Tasks
- Release v0.15.2
0.15.1 - 2025-11-17
🐛 Bug Fixes
-
execution: Include hedge orders in filled quantity calculations
-
execution: Increase max hedge passes to 5 and improve hedge quantity capping logic
-
execution: Parse order side from Binance API response instead of hardcoding
⚙️ Miscellaneous Tasks
- Release v0.15.1
0.15.0 - 2025-11-16
🚀 Features
-
cli: Enhance balance, funding, and positions commands with structured table output
-
Implement order status monitoring and cancellation across exchanges
🐛 Bug Fixes
-
cli: Refactor position fetching to use execution registry and parallel requests
-
logging: Update verbosity level documentation and default filter to WARN
-
cli: Update verbosity level to WARN and adjust documentation accordingly
📚 Documentation
- Add Loki push logging configuration and benefits to copilot-instruction
⚙️ Miscellaneous Tasks
- Release v0.15.0
0.14.0 - 2025-11-14
🚀 Features
-
Add Loki direct push logging support
-
Integrate Loki push logging config into central config management
-
Enhance Loki push logging with JSON formatting for better field extraction
-
binance: Fetch exchange info to populate precision cache during initialization
-
binance: Add price precision handling and rounding for orders
🐛 Bug Fixes
-
Address Copilot code review comments
-
Update observability module to remove unnecessary manual log level mapping for Loki
-
Record FUNDING_RATE_SPREAD metric in opportunity detection
📚 Documentation
-
Add Loki push logging configuration documentation
-
Update CLI reference and configuration guide for trailing stop features and examples
♻️ Refactor
-
logging: Standardize log messages and improve clarity across modules
-
logging: Simplify log messages for clarity and consistency across modules
⚙️ Miscellaneous Tasks
-
Remove test config file
-
Release v0.14.0
0.13.1 - 2025-11-12
♻️ Refactor
- Improve error handling for Bybit balance fetch response
⚙️ Miscellaneous Tasks
- Release v0.13.1
0.13.0 - 2025-11-11
🚀 Features
-
Enhance configuration support with JSON and environment variable overrides
-
Add config validation command
-
Enhance security of exchange credentials by SecretString
🐛 Bug Fixes
-
Improve error handling for bind address parsing in config
-
Address remaining Copilot code review feedback
📚 Documentation
-
Update file line counts and remove version numbers from documentation
-
Update Copilot instructions with pre-commit hooks and conventional commit format
♻️ Refactor
- Consolidate config system with type-safe env parsing
⚙️ Miscellaneous Tasks
- Release v0.13.0
0.12.8 - 2025-11-10
🐛 Bug Fixes
- Remove unnecessary cast in hyperliquid client
♻️ Refactor
- Optimize CI workflows for performance and caching improvements
⚙️ Miscellaneous Tasks
- Release v0.12.8
0.12.7 - 2025-11-10
🐛 Bug Fixes
- hyperliquid: Add asset metadata caching and precision rounding for HyperLiquid orders
⚙️ Miscellaneous Tasks
- Release v0.12.7
0.12.6 - 2025-11-10
🐛 Bug Fixes
- Add actions:write permission to trigger Docker workflow
⚙️ Miscellaneous Tasks
- Release v0.12.6
0.12.5 - 2025-11-10
🚀 Features
- Automatically trigger Docker release after creating GitHub release
⚙️ Miscellaneous Tasks
- Release v0.12.5
0.12.4 - 2025-11-10
🚀 Features
-
cli: Add clap-verbosity-flag for enhanced logging options
-
Enable pattern ingester in Loki configuration
-
Add workflow_dispatch trigger to Docker release workflow for testing
🐛 Bug Fixes
- Use config.example.json in Docker image to resolve build failure
♻️ Refactor
- main: Streamline CLI argument parsing and logging initialization
⚙️ Miscellaneous Tasks
- Release v0.12.4
0.12.3 - 2025-11-09
🚀 Features
- ci: Implement reusable CI checks workflow and update release process
♻️ Refactor
- ci: Remove push trigger from Docker release and enhance release tag workflow with CI
⚙️ Miscellaneous Tasks
- Release v0.12.3
0.12.2 - 2025-11-09
🚀 Features
-
cli: Add support for file logging via --log-file argument
-
pre-commit: Add commitlint configuration for commit message validation
-
orchestrator: Implement unified shutdown signal handling for graceful termination
🐛 Bug Fixes
-
workflow: Ensure push event triggers on versioned tags
-
strategy: Record successful skips in funding rate strategy metrics
⚙️ Miscellaneous Tasks
- Release v0.12.2
0.12.1 - 2025-11-09
🚀 Features
-
Add GitHub Actions workflow for Docker release and enhance Dockerfile with OCI labels
-
market_data: Add reconnection manager and timeout for WebSocket connections
🐛 Bug Fixes
-
balance: Implement retry policy for fetching balances from exchanges
-
task_manager: Change log level from info to debug for funding rate updates
📚 Documentation
-
Update documentation for version 0.12.0
-
Update diagrams to use mermaid syntax for error handling, Grafana MCP setup, logging, and runbook
♻️ Refactor
- Remove Grafana dashboard and datasource configurations along with Prometheus configuration for Wealth Trading Bot.
⚙️ Miscellaneous Tasks
-
ci: Comment out cargo-deny installation and check steps
-
balance_parser, hyperliquid: Change log level from info to debug for balance and user fills fetching
-
Remove deprecated code
-
Release v0.12.1
0.12.0 - 2025-11-09
🚀 Features
-
execution: Update from_credentials methods to return Result for better error handling
-
Add slippage protection for order execution
-
config: Enhance application configuration with environment variable support for slippage, fees, and trailing stop settings
-
config: Implement unified configuration system with environment variable support and JSON fallback
-
Add CI workflow and cargo-deny configuration
-
Add configurable hedging parameters for atomic execution
-
Enhance fee calculation and opportunity detection for funding rate arbitrage
-
Introduce extension traits for standardized error handling and improve error context across modules
-
Add in-memory performance history repository and integrate with metrics
-
Implement fee tracking service and user fills fetching from HyperLiquid SDK
-
Enhance EV calculation with comprehensive edge case tests and dynamic slippage integration
-
Implement health check and credential verification commands
-
Implement trading statistics command with performance summary
-
Enhance monitoring with EV, rejection, slippage, and balance metrics
-
phase1: Integrate TrailingStopManager into strategy loop
-
phase1: Integrate SlippageProtector into AtomicOrderExecutor
-
phase1: Wire SlippageProtector into orchestrator initialization
🐛 Bug Fixes
- config: Align .env.example with Phase 1 defaults
📚 Documentation
-
Refactor code organization and improve metrics tracking
-
Streamline copilot instructions and enhance clarity on architecture and patterns
-
Update README.md with additional badges for build status, linting, documentation, and security scan
-
Enhance copilot instructions with data flow, loading behavior, and documentation standards
-
Add pre-commit hook setup documentation and update SUMMARY.md
-
Add strategy formulas documentation and enhance strategy guide with mathematical references
-
Standardize variable formatting in strategy formulas documentation
-
Enable MathJax support for enhanced mathematical rendering in documentation
-
Standardize variable formatting in strategy formulas by using inline code style
-
Convert all inline math to math blocks to fix GitHub rendering issues
-
Standardize code block formatting in strategy formulas documentation
-
Simplify variable definitions in strategy formulas by using inline formatting
-
Update mathematical expressions to use display math for improved readability
-
Update mathematical expressions to use block formatting for consistency and improved rendering
-
Update CLI reference and strategy formulas for v0.12.0
-
Document enhanced monitoring metrics in monitoring.md
-
phase1: Add Phase 1 configuration and documentation
⚡ Performance
- Optimize hot paths in opportunity detection and strategy loop
♻️ Refactor
- Clean up imports and improve code formatting across multiple files
🎨 Styling
- Clippy fixes
⚙️ Miscellaneous Tasks
-
Add pre-commit hooks and fix remaining clippy warnings
-
Update pre-commit hooks to use version 6.0.0
-
Remove book.toml configuration file as part of project restructuring
-
Release v0.12.0
0.11.0 - 2025-11-08
🚀 Features
-
Implement unified error classification system for exchange clients
-
Add initial mcp configuration for Hyperliquid Docs
-
Integrate Grafana MCP for AI-powered monitoring and enhance documentation
-
metrics: Enhance monitoring with new position metrics and automatic tracking
-
performance: Implement performance analytics monitor for Sharpe ratio and max drawdown calculations
-
metrics: Add new latency and performance metrics for order execution and WebSocket message processing
-
metrics: Update metrics documentation and implementation for spread distribution analysis
-
metrics: Implement fee tracking infrastructure and update metrics dashboard
🐛 Bug Fixes
-
Update Grafana MCP command and entrypoint for proper execution in stdio mode
-
Correct structure of mcp.json by renaming "server" to "servers"
-
Mcp configuration file path for Visual Studio Code
-
Rename "Grafana Monitoring" to "Grafana" in mcp.json for consistency
📚 Documentation
- Enhance circuit breaker documentation with use cases and state descriptions
♻️ Refactor
-
Enhance Grafana dashboard with new metrics and visual improvements
-
Error handling and improve code readability
⚙️ Miscellaneous Tasks
-
Replace dashboard with new one
-
Release v0.11.0
0.10.2 - 2025-11-07
🐛 Bug Fixes
-
Restructure config.example.json to use instruments array for exchanges and symbols
-
Enhance leverage initialization to set values on configured exchanges only
📚 Documentation
- Update execution and market data guides for improved clarity and structure
🎨 Styling
- Update changelog configuration for improved formatting and clarity
⚙️ Miscellaneous Tasks
- Release v0.10.2
0.10.1 - 2025-11-07
📚 Documentation
-
Update documentation to version 0.10.0, reflecting recent changes and improvements
-
Update documentation to remove versioning information and improve clarity across multiple guides
⚙️ Miscellaneous Tasks
- Release v0.10.1
0.10.0 - 2025-11-07
🚀 Features
-
Add leverage configuration and management
-
Implement RAII balance guard to prevent race conditions and ensure automatic cleanup
-
Enhance async efficiency by parallelizing balance fetching and position management across exchanges
-
Enhance memory optimization by replacing HashMap cloning with Arc in funding rate retrieval
🐛 Bug Fixes
- Improve error handling and logging across various modules
📚 Documentation
-
Add performance tuning and operational runbook documentation
-
Update architecture documentation with mermaid diagrams for clarity and improved execution flow
-
Add new documentation for code organization improvements and reduce duplication
-
Convert documentation to mdBook
⚙️ Miscellaneous Tasks
-
Remove ignored config.json file
-
Update .gitignore to include additional configuration and backup file patterns
-
Release v0.10.0
Build
- Update alloy dependency version to 1.1 for compatibility with hyperliquid_rust_sdk
0.9.0 - 2025-11-07
🚀 Features
-
Implement minimum quantity validation to prevent order rejections
-
Enhance order quantity validation with detailed error messages and checks for zero or negative quantities
-
Add order status parsing and querying for updated fill information in Binance execution client
-
Add reduce_only field to OrderRequest
-
Implement close positions command
-
Implement shutdown-aware background tasks for improved responsiveness
-
Implement leverage management across exchanges for consistent trading
🐛 Bug Fixes
-
Enhance position management by fetching actual open positions and adjusting size calculations
-
Implement reduce_only support in exchange clients
-
client: Hyperliquid close position bug
📚 Documentation
-
Enhance Binance order handling with improved fill detection and validation error messaging
-
Add comprehensive reduce-only orders documentation
⚡ Performance
-
ci: Enable git push for manual release handling
-
ci: Enable GPG signing for tags and commits in cargo-release configuration
♻️ Refactor
- Unify credential loading strategy for seamless experience
⚙️ Miscellaneous Tasks
-
Logging level adjustment for rounding zero error
-
Release v0.9.0
0.8.1 - 2025-11-07
🚀 Features
- Add automatic GitHub Release creation on tag push
⚙️ Miscellaneous Tasks
- Release v0.8.1
0.8.0 - 2025-11-07
🚀 Features
- Integrate git-cliff for automatic changelog generation
🐛 Bug Fixes
- ci: Remove unnecessary configuration options for GitHub releases
📚 Documentation
- Update release workflow documentation for git-cliff integration
♻️ Refactor
- Replace release-plz with cargo-release for version management
⚙️ Miscellaneous Tasks
-
Update changelog for version 0.7.2 and add documentation updates
-
Remove deprecated run.sh script for funding rate arbitrage bot
-
Enable GPG signing for commits in cargo-release configuration
-
Release v0.8.0
0.7.2 - 2025-11-07
🚀 Features
-
credentials: Add vault mode support for HyperLiquid API integration
-
Implement position tracking and shutdown improvements
-
Implement shutdown verification with retries and position closure checks
🐛 Bug Fixes
-
Fetch symbol precision from Binance to prevent order rejection
-
Improve graceful shutdown sequence to prevent premature task termination
-
ci: Update release configuration to ensure only feature and refactor commits trigger releases
-
ci: Configure release-plz to properly handle private package
-
ci: Add release = true to explicitly enable package processing
-
ci: Remove redundant publish = false from package config
-
ci: Add publish = false back to match Cargo.toml
-
ci: Remove publish = false from Cargo.toml to allow release-plz processing
📚 Documentation
-
hyperliquid: Add vault mode support and update authentication modes in documentation
-
Trigger release-plz workflow test after publish field fix
⚡ Performance
- ci: Ensure changelog updates include feature and refactor commits
♻️ Refactor
- ci: Simplify changelog structure and enhance commit parsing
🎨 Styling
-
Binance client fmt
-
execution: Simplify assertion formatting in precision calculation test
⚙️ Miscellaneous Tasks
-
ci: Disable GitHub releases for the wealth package
-
Add HyperLiquid vault mode configuration option to environment example
-
Bump version to 0.7.2 to account for recent feat commits
0.7.1 - 2025-11-06
🚀 Features
- execution: Implement structured error classification for Binance API errors
🐛 Bug Fixes
-
release: Restore publish = false and simplify changelog header
-
ci: Enable release-plz processing by removing publish = false from Cargo.toml
-
ci: Remove date variable from changelog body template
-
ci: Adjust changelog template for consistent formatting and improved readability
-
ci: Add CI/CD section to changelog template to fix missing commits in release PRs
🧪 Testing
- Improve error handling in configuration and funding modules
⚙️ Miscellaneous Tasks
-
Update Cargo.lock after removing publish field
-
Release v0.7.0
-
Bump version to 0.7.1 in changelog, Cargo.toml, and Cargo.lock
0.7.0 - 2025-11-06
🚀 Features
- Add client_order_id to OrderRequest for idempotency and tracking
🐛 Bug Fixes
-
Remove Cargo.lock from .gitignore for binary project
-
ci: Add pull-requests permission to release-plz-release job
📚 Documentation
-
Update documentation for release-plz integration
-
Enhance copilot instructions with critical context and dependency notes
♻️ Refactor
- Consolidate balance repository interface and remove backward compatibility
🎨 Styling
- Apply cargo fmt formatting
⚙️ Miscellaneous Tasks
-
Mark crate as private to prevent accidental publishing
-
ci: Remove hyperliquid-sdk branch from push triggers in release-plz workflow
-
ci: Update GITHUB_TOKEN reference in release-plz workflow to use standard secret
-
release: Bump version to 0.7.0 for testing release-plz
0.6.0 - 2025-11-06
🚀 Features
-
Implement Funding Rate Arbitrage Trading Bot
-
Add Phase 2 implementation with automated execution and position management
-
Integrate barter-data for WebSocket streaming and enhance instrument management
-
Remove high-priority integration examples and implement funding rate arbitrage strategy
-
Add Binance Futures execution client and configuration
-
Implement BinanceExecution client with account and balance queries, and update configuration for strategy ID
-
Add methods for fetching positions, changing leverage, position mode, and margin type in BinanceExecution client
-
Enhance BinanceExecution client with detailed documentation and improved logging for order and account management
-
Add Bybit execution client module and re-export in execution module
-
Implement macro-based helper functions to reduce code duplication in Binance and Bybit execution clients
-
Add Docker support with Dockerfile and Docker Compose configuration
-
Integrate Prometheus metrics for trading bot performance monitoring
-
Add Grafana configuration files for data sources and dashboards
-
Add HyperLiquid exchange support with funding rate fetching and execution client
-
Implement arbitrage opportunity checking in funding rate strategy
-
Enhance funding rate strategy with exchange metrics tracking
-
Add position tracking metrics for opened and closed positions
-
Implement application configuration and dependency injection structure
-
Implement market price fetching and order execution logic for trading strategies
-
Implement WebSocket price streaming for real-time market data
-
Enhance active positions metric to include position side
-
Add Active Positions by Side panel to Grafana dashboard and update expression for active positions
-
Enhance Grafana dashboard with improved visualizations and new metrics for funding rates, account balance, and order errors
-
Add balance monitoring task to fetch and record account balances from exchanges
-
Implement dynamic position sizing based on account balance and add balance tracking for exchanges
-
Add support for initializing mock balances in paper trading mode and update balance management in strategy
-
Enhance order validation and position management in trading strategy
-
Implement circuit breaker pattern, health checks, rate limiting, and graceful shutdown handling
-
Implement BotOrchestrator for application lifecycle management and modularize orchestration logic
-
Add batch update for funding rates and enhance order validation
-
Enhance configuration management with centralized application settings and detailed documentation
-
Enhance developer experience and production hardening
-
Implement enhanced balance validation and multi-asset support
-
Implement advanced WebSocket reconnection strategy with metrics
-
Implement intelligent error recovery with adaptive retry strategies and classification
-
Add alerting system with configurable thresholds and metrics integration
-
Implement atomic order execution with rollback and hedging
-
Implement structured logging with correlation ID tracking for enhanced observability
-
Implement position reconciliation task with alerting and automatic rollback for enhanced error handling
-
Add support for Bybit V5 API and enhance HyperLiquid implementation details in documentation
-
Implement encrypted credentials management and enhance security with AES-GCM encryption
-
Implement comprehensive CLI for trading bot with subcommands
-
Add dotenvy for environment variable loading and update main.rs to load .env file
-
Enhance balance, funding, and positions commands with detailed output and error handling
-
Implement EIP-712 signing for HyperLiquid API
-
Enhance funding rate and price fetching with dynamic exchange configuration
-
Implement HyperLiquid WebSocket streaming for real-time price updates and reconnection handling
-
Add shell completion support using clap_complete for bash, zsh, fish, powershell, and elvish
-
Add asynchronous initialization for execution dependencies and Binance position mode management
-
Enhance HyperLiquid execution client with dynamic asset index resolution and improved error handling
-
Implement atomic order execution with rollback and hedging
-
monitoring: Add circuit breaker metrics and integration tests
-
balance: Introduce BalanceProcessor for centralized balance handling and metrics recording
-
infrastructure: Optimize state management and concurrency in funding rate and position repositories
-
execution: Implement funding payment tracking system with exchange integration and real-time updates
-
tracing: Add correlation ID support for distributed tracing in order execution
-
monitoring: Overhaul Grafana dashboard with 18 panels and enhanced metrics visualization
🐛 Bug Fixes
-
Update Binance funding rate response handling and improve error messages
-
Temporarily remove OrderBooksL1 from market data stream due to Barter library bug with BybitPerpetualsUsd
-
Update funding rate updater to extract unique symbols using exchange names for correct API format
-
Enhance logging initialization to suppress Bybit ping/pong warnings
-
Update environment variables in Docker Compose for API credentials
-
Update dependencies in Cargo.lock to latest versions
-
Update .dockerignore to exclude Cargo.lock
-
Add quantity rounding function to ensure compliance with exchange precision requirements
-
Import statement for response module in health.rs
-
Update Bybit account balance structure and improve request signing for wallet balance retrieval
-
Normalize decimal values in OpportunityValidator and FundingRateStrategy for precision handling
-
Add circuit breakers and reconnection managers for dynamic exchange handling in PriceFetcher
-
Update credential types from
SecrettoSecretStringfor improved security -
Improve error handling for circuit breakers and reconnection managers in price fetcher
-
execution: Binance race condition
-
Reduce logging verbosity in production
-
Clippy warnings
-
Enhance wallet address handling and user state fetching for perpetual trading
📚 Documentation
-
Add full Barter-RS integration and remove obsolete files
-
Remove obsolete documentation files and update index
-
Refactor documentation structure and consolidate integration details
-
Remove obsolete files and complete integration of funding rate arbitrage strategy
-
Revise README for clarity and structure, enhance feature descriptions, and update integration details
-
Clean up README by removing outdated links and redundant information
-
Revise README for improved clarity, structure, and feature descriptions
-
Update README for Rust 2024 edition and enhance configuration details
-
Remove outdated documentation and implement live trading infrastructure
-
Remove outdated documentation and implementation summaries for BinanceExecution
-
Update documentation for clarity and structure, including installation and configuration details
-
Enhance documentation with macro-based architecture details and update exchange support status
-
Update README to reflect changes in OKX support, funding rate monitoring, and logging improvements
-
Enhance security with encrypted credential management and update documentation
-
Update documentation for active development status and feature stubs
-
Enhance .env.example with detailed configuration and security notes
-
Enhance documentation across modules with detailed descriptions and examples
-
Dynamic exchange configuration across task manager, funding rate, market data, and strategy modules
-
Update documentation for version 0.5.0, including HyperLiquid integration and CLI enhancements
-
Update example usage in execution and market_data modules for improved clarity and error handling
-
Update documentation for atomic order execution and error handling improvements
-
Re-organize
-
Add CHANGELOG for version history and upgrade notes
-
Simplify README.md
-
Add comprehensive Copilot instructions for Wealth Trading Bot
-
Update Rust version in README.md to 2024 edition
-
Enhance security documentation and add tests for credential protection
-
changelog: Update changelog for circuit breaker metrics and error handling improvements
-
Integrate HyperLiquid official SDK, update documentation and examples
⚡ Performance
- Add additional instruments for bybit perpetuals exchange
♻️ Refactor
-
Execution module to integrate barter-rs types
-
Improve all logging
-
Streamline logging and improve code readability in integration examples
-
Integrate barter crate
-
Standardize logging format across the repository for improved Grafana compatibility
-
Update instrument definitions in config.json for improved clarity and structure
-
Update rust editon to 2024
-
Simplify Binance execution structures and remove unused credential loading function
-
Remove execution_live module and update references to load_credentials_from_env
-
Remove OKX support from documentation, configuration, and codebase
-
Update Docker Compose and Prometheus configuration for improved host access
-
Simplify instrument filtering logic and enhance logging in funding rate updater
-
Enhance logging for funding rate fetching across exchanges
-
Streamline HyperLiquid funding rate fetching and improve instrument filtering
-
Improve next funding time calculation for HyperLiquid
-
Remove barter crates
-
Funding rate arbitrage strategy into modular components
-
Update logging initialization for improved Grafana compatibility
-
Remove unused fields and clean up imports in execution clients
-
Simplify position sizing configuration by removing legacy method and updating documentation
-
Domain structure
-
Re-organize
-
Strategy initialization to use structured parameters and improve exchange parsing error handling
-
Grafana dashboard
-
Enhance logging with structured context and improve error handling across multiple modules
-
Streamline active position tracking with increment and decrement methods
-
Update metrics registry import path to monitoring module
-
Simplify balance retrieval and update logic in InMemoryEnhancedBalanceRepository
-
Optimize shortest connection update logic in ReconnectionManager
-
Enhance BusinessMetrics with status tracking and logging on drop
-
Enhance logging and error handling across multiple modules
-
Consolidate CLI commands under 'wealth' and remove encrypt-config binary
-
Improve precision handling for exchange quantities by introducing dedicated functions
-
Split execution clients into dedicated modules
-
execution: Standardize error handling across execution clients
-
Simplify conditional checks for better readability in multiple files
-
monitoring: Re-organize metrics module
-
Replace EIP-712 signing with hyperliquid-sdk
-
Update example usage in atomic order execution and enhance balance processing functions
⚙️ Miscellaneous Tasks
-
Remove legacy funding rate strategy and risk manager code, update module structure
-
Remove main_engine module and associated binary entry point
-
Remove OKX exchange instruments and associated mocked exchange data from config.json
-
Remove unused modules and code
-
Update .gitignore to include Rust-specific files and directories
-
Clean up Cargo.toml and remove mocked execution configurations from config.json
-
Add HyperLiquid configuration to environment example
-
Add dead code annotations for open_interest and mark_px in HyperliquidAssetContext
-
Add environment variables for trading configuration including position sizing, leverage, and logging
-
Remove duplicate logging level entry in environment configuration
-
Remove unused dependencies and legacy code from execution modules
-
Update package version from 0.1.0 to 0.5.0 in Cargo files
-
Rename execution/stubs to clients
-
Add launch configuration for debugging 'wealth' library and executable
-
Update version to 0.6.0 and enhance documentation across multiple guides
-
Remove example setup script for live trading
-
Add release-plz automation for changelog and releases
Build
-
Update dependencies to latest versions for improved performance and stability
-
Remove nonzero_ext dependency from Cargo.toml and Cargo.lock
-
deps: Bump alloy-primitives from 0.8.26 to 1.4.1
-
deps: Bump alloy from 0.6.4 to 0.12.6
-
deps: Bump prometheus from 0.13.4 to 0.14.0
-
deps: Bump tokio-tungstenite from 0.21.0 to 0.28.0
-
deps: Bump rand from 0.8.5 to 0.9.2
-
Update dependencies and refactor random number generation
-
deps: Bump axum from 0.7.9 to 0.8.6
-
deps: Bump governor from 0.6.3 to 0.10.1
-
deps: Bump secrecy from 0.8.0 to 0.10.3
-
Update dependencies to latest versions for improved stability and features